
You will also need:
Animation Shop. This is from CNET, so it's a safe download.
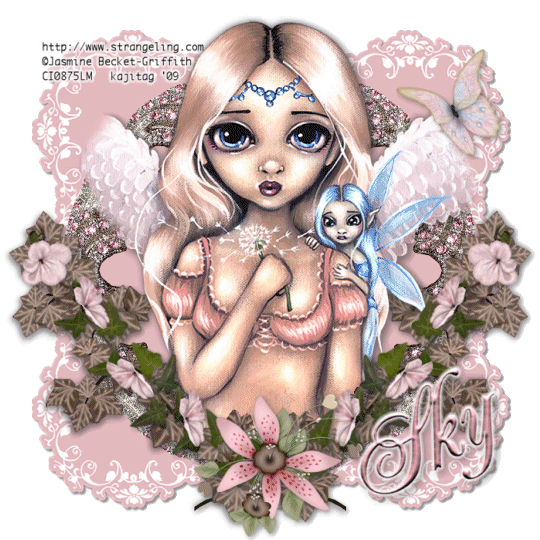
A tube your choice. I'm using the stunning artwork of Jasmine Becket-Griffith. You must have a license to use her work. You may purchase that license at CILM.
Scrap kit is by Sky, of Sky Scraps. It's a PTU kit, is available at Scrap It Sassy, and is called Romance. This kit is currently on sale!! This is also available in scrappers' size.
Filters: dsb Flux > Bright Noise
Font: I used Renaissance
Supplies: No outside supplies in this tutorial!
Okay, let's begin...
Open a new image, 700 x 700, white.
Open eleganceCutout2. Resize 110%. Copy and paste as a new layer. Add a small drop shadow.
Open Frame1. Copy and paste as a new layer.
Add your tube. Resize, position and drop shadow to your taste.
Highlight your frame layer. Grab your magic wand and click inside the frame. Selections > Modify > Expand by 1. Selections > Invert.
Highlight your tube layer. Grab your eraser brush and erase any of your tube that you don't want overlapping the bottom of the frame.
Selections > Select none.
Open Ivy1. Copy and paste as a new layer. Drag this layer below your tube layer. Position in the bottom right area of your canvas. Duplicate this layer and Image > Mirror. Merge these two layers down and apply a drop shadow.
Open DecoFlower3. Resize 75%. Copy and paste as a new layer. Rotate right 30°. Position above your ivy layer on the right. Duplicate this layer and Image > Mirror. Merge these two layers down and apply a drop shadow.
Open DecoFlower2. Resize 65%. Copy and paste as a new layer. Position in the center of the ivy and the first deco flower layers. See my tag for placement reference. Apply a drop shadow.
Open Butterfly4. Resize 55%. Image > Mirror. Copy and paste as a new layer. Position where you'd like. I chose the top right side of the tag. Again, see my tag for placement reference.
Add your name. I used color #e5b9bf as the fill AND the stroke, the stroke set at 2.
Drop shadow your name.
Add your copyright, license information if applicable, and taggers'/watermark.
Resize your tag to a size with which you're comfortable. At this point, you can just merge and save, if you choose not to animate!!
A N I M A T I O N
Highlight your frame layer. Duplicate this layer twice, for a total of three layers.
Still on the bottom frame layer...
Effects > Plugins > dsb Flux > Bright Noise, intensity set on 30. Click on "mix" once.
Hit okay.
Highlight the middle frame layer. Again, apply Bright Noise, this time clicking on "mix" twice.
Hit okay.
Highlight the top frame layer. Apply Bright Noise again, clicking "mix" three times.
Hit okay.
Close out the top two frame layers, leaving the bottom frame layer open.
Edit > Copy merged
Open Animation Shop, right-click on the desktop area, and paste as a new animation.
Return to PSP. Close out the bottom frame layer, and open the middle frame layer.
Edit > Copy merged.
Return to Animation Shop and Edit > Paste > After Current Frame.
Back to PSP. Close out the middle frame layer and open the top frame layer.
Edit > Copy merged.
And, back to Animation Shop. Edit > Paste > After Current Frame.
View > Animation. Et, voila! We are done! I hope you've enjoyed this tutorial! Thanks for stopping by!
.


No comments:
Post a Comment