
You will also need:
Tube of your choice. I'm using the great artwork of Shane Glines. BE AWARE: There is adult content on the very first page you get to at Shane's site. Use your own discretion. A little blurb from me: Shane was the first artist that actually caught my eye and that I could identify with certainty I *really* liked when I first started PSPing. This was long before I'd ever heard of licensing companies, or any of the FABULOUS artists that could be found through those outlets. I'm SO glad he's out there now, and so available! You must have a license to use his work. You may purchase that license at CILM. (Previously, he'd been with My PSP Tubes, but I don't have this image from there. It's from CILM.
Animation Shop. This is from CNET, so it's a safe download.
Scrap kit by Bluey of Bluedream Designs. It's a FTU kit, called April Showers. It's an easy basic tut, until you get to the animation!
Filters: Eye Candy 4000 > Gradient Glow
Font: I used CarattereROB
Supplies: Just the mask, by Becky, which you can find here.
Okay, let's start!
Open a new image, 700 x 700, white.
Open Frame1. Resize 90% Copy and paste as new layer.
Add your tube. Resize, position, and drop shadow to your liking.
Highlight your frame layer. Grab your magic wand and click inside the frame. Selections > Modify > Expand by 1. Selections > Invert.
Highlight your tube layer. Now get your eraser tool and erase any portions of your tube that overlap the bottom and/or side of the frame. Selections > Select none.
Highlight your white background layer. Add a new raster layer. Selections > Select all.
Open Paper6. Copy and paste INTO SELECTION. Selections > Select none.
Apply your mask. Delete the mask layer, answer "yes" to the pop-up question, and merge group.
In your layer palette, go to the top layer of your canvas.
Open Doodle3. Copy and paste as a new layer. Move this to the upper left orientation on the canvas. Not all the way to the top. See my tag for placement reference. Duplicate this layer and Image > Mirror. Merge these two layers down. Duplicate that layer. Image > Flip. Play around with the doodles until you can almost see it like a "splash" effect. At least, that's what I see! I've been told I'm weird before!! Merge your doodle layers down, and drag it to just above the mask layer.
Open Raindrops. Copy and paste as a new layer. This layer should be just below your frame.
Highlight your frame layer. Grab your magic wand and click inside the frame. Selections > Modify > Expand by 10. Selections > Invert.
Highlight your Raindrops layer. Hit delete. Selections > Select none. Apply a soft drop shadow to the Raindrops.
Drop shadow your frame.
Open Flower3. Resize 65%. Copy and paste as a new layer. Place this on the lower left arc of the frame. Again, see my tag for placement reference. Drop shadow your flower.
Open Flower1. Resize 50%. Copy and paste as a new layer. Arrange this next to your Flower3 layer. Drop shadow and duplicate. Move the duplicate to the opposite end of this cluster of flowers. Sorry, didn't word that very well. See my tag for what I really meant! LOL!
Add your name. I used color #bbd9da as the fill AND the stroke, stroke set at 2.
Apply Eye Candy 4000 > Gradient Glow, settings on 3 - 0 - 100, color #fff3c9.
Drop shadow your name.
Add your copyright, license information if applicable, and taggers'/watermark.
Resize your tag to your desired size.
You can save now and be done if you choose not to animate. The animation makes the tag quite a heavy file. But it's my favorite image effect in Animation Shop, and goes with the "theme."
A N I M A T I O N
Layers > View > None.
Open the doodle layer and the mask layer.
Edit > Copy merged
Open Animation Shop, right-click on the desktop layer and paste as new animation.
Go to Effects > Insert Image Effects
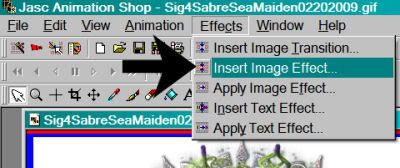
Choose "Underwater," with the settings shown below:
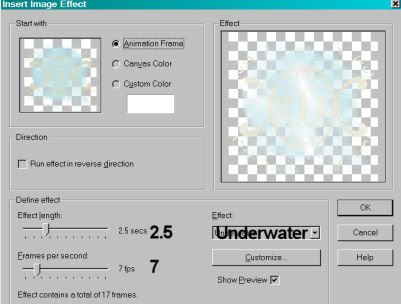
I'm including the settings I had when I clicked on "Customize" -- to tell the truth, I'm not REALLY sure what this does, but here are my settings:
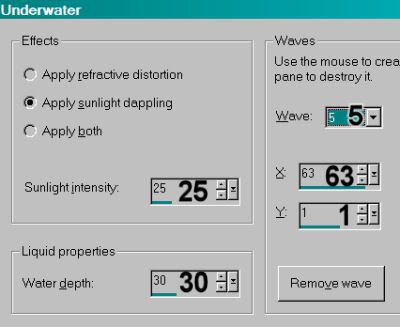
This gives you 18 frames. Delete the first frame. Bring the slider at the bottom of this animation to the first frame.
Return to PSP. Layers > View All.
Close out the mask, doodle, and white background layers.
Edit > Copy merged
Return to Animation Shop, right-click on the desktop area and paste as new animation.
Duplicate this frame until you have a total of 17 frames. Again, bring the slider at the bottom of this animation to the first frame.
Edit > Select All
Edit > Copy
Go to your animation with the underwater effects.
Edit > Select All
[NOTE: On the next step, do not release your mouse button until you have positioned your frames where you want them to be on the finished product!]
Edit > Paste > Into Selected Frame
Animation > Animation Properties with the following settings:
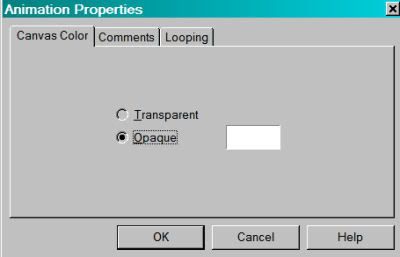
View > Animation! Save as .gif and we're done!! Thanks for trying my tut, I hope it was clear for you.
.


No comments:
Post a Comment