

You will also need:
Animation Shop. This is from CNET, so it's a safe download.
A tube your choice. I'm using the great artwork of Jessica Dougherty. You must have a license to use her work. You may purchase that license at CILM.
Scrap kit is by Kimmie's Kreations. It's a PTU kit, is available at Scrap It Sassy, and is called Summertime Fun. This kit is currently on sale for 50% off!
Filters: Alien Skin > Xenfex 2 > Constellation
Font: I used Pea Cara in TX
Supplies: Just the mask, here. This came from Butterfly Flutterby. You can get the whole group of them at that link. Thanks, girlie!!
Also, please, if you have problems with the download link for supplies, drop me a line via e-mail. Leaving a comment without a way for me to contact you back doesn't help. If you e-mail me, I'll send you the supplies.
Just to let you know, it's killer heat here the past couple of days. The idea of "refreshing" is just dominating my thoughts! Oh, what I'd give for a Popsicle and some sparkly water to play in!
Okay then!! Let's begin...
Open your mask and minimize in PSP. Alternatively, you can load it into your PSP masks folder for use at a later date.
Open a new image, 750 x 700, white.
Open scallop frame2. Copy and paste as a new layer.
Add your tube. Resize, position and drop shadow to your taste.
Highlight your frame layer. Grab your magic wand and click inside the frame. Selections > Modify > Expand by 1. Selections > Invert.
Highlight your tube layer. Grab your eraser brush and erase any of your tube that you don't want overlapping the frame. In my case, I wanted the little heart "purse" or whatever it is to hang over the frame. It's up to you.
Selections > Select none.
Highlight your white background layer. Open paper14. Copy and paste as a new layer.
Once again, highlight your frame layer. Grab your magic wand and click inside the frame. Selections > Modify > Expand by 10. Selections > Invert.
Highlight paper14 layer. Hit delete. Selections > Select none.
This is going to sound like a lot of repetition (and it is!), but here we go.
Highlight your white background layer. Add a new raster layer. Selections > Select all.
Open paper14 again. Copy and paste INTO SELECTION. Selections > Select none.
Apply your mask. Delete your mask layer, answer "yes" to the pop-up question, and merge group.
Open string1. Resize 50%. Copy and paste as a new layer. Drag this layer above your frame layer. Position on the top right corner of your frame. Duplicate this layer and Image > Mirror. Merge these two layers down and drop shadow.
Open butterfly2. Resize 40%. Copy and paste as a new layer. I positioned mine on the bottom left portion of the frame. See my tag for placement reference.
Highlight your mask layer.
Open bling2. Copy and paste as a new layer.
Open bling4. Mirror this element. Copy and paste as a new layer. Merge these two layers down. No drop shadow.
Add your name. I used color #ff859a as the fill, the stroke is color #fefcd9, stroke set at 3.
Drop shadow your name.
Add your copyright, license information if applicable, and taggers'/watermark.
Resize your tag to a size with which you're comfortable. At this point, you can just merge and save, if you choose not to animate!!
A N I M A T I O N
Highlight your merged bling layer. Duplicate this layer twice, for a total of three layers.
Still on the bottom bling layer...
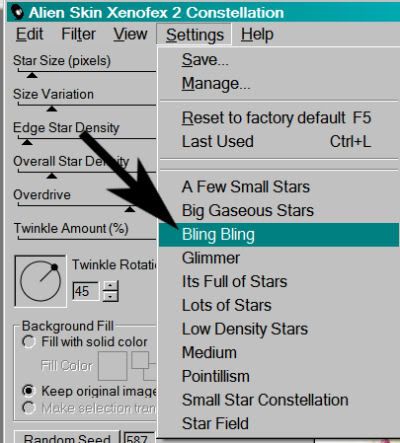
Effects > Plugins > Alien Skin > Xenofex 2 > Constellation with the following preset:
And the following settings:
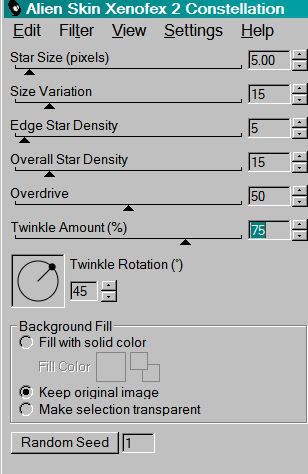
Hit okay.
Highlight the middle bling layer. Again, apply Constellation, this time clicking on "Random Seed" button.
Hit okay.
Highlight the top bling layer. Apply Constellation again, clicking "Random Seed" once more.
Hit okay.
Close out the top two bling layers, leaving the bottom bling layer open.
Edit > Copy merged
Open Animation Shop, right-click on the desktop area, and paste as a new animation.
Return to PSP. Close out the bottom bling layer, and open the middle bling layer.
Edit > Copy merged.
Return to Animation Shop and Edit > Paste > After Current Frame.
Back to PSP. Close out the middle bling layer and open the top bling layer.
Edit > Copy merged.
And, back to Animation Shop. Edit > Paste > After Current Frame.
View > Animation. And we're done! I hope you've enjoyed this tutorial! Thanks for stopping by!
.


No comments:
Post a Comment