

This tutorial was written on June 15, 2010 using Paint Shop Pro, version X.03. It should be okay to do with other versions as well. I just find X.03 more comfortable for me. You may download a free trial of Paint Shop Pro, version X3, from Corel. The release of X3 is new to me, so hopefully Corel hasn't changed things up too much!!
You will also need:
Animation Shop. This is now a pay-for product, through Corel. That changed a while ago. I don't know why!!
A tube (or two) of your choice. If you're going for the same "vibe," a laying-down posture would work best. I'm using the fantastic artwork of Jessica Dougherty. You must have a license to use her work. You can get that license and artwork from C.I.L.M.
The scrap kit used was made by Vabys of Designs by Vabys. This is a FTU kit, called Gold Rush. This kit is chock full of stuff! I only used a small amount of it! Be sure to leave some love for Vabys, for making us a great FTU kit!
Supplies: Just the mask, which can be found here. I do not know from whom I got this mask. I only know it's really handy! If you know who made this mask, or if it is YOU!, then let me know so that I can give you credit where it's due!!
Filters: Mura's Meister > Copies, dsb flux > Bright Noise
Font: I used ViceroyJF.
Okay, let's try this again!
Open a new canvas, 800 x 700, white.
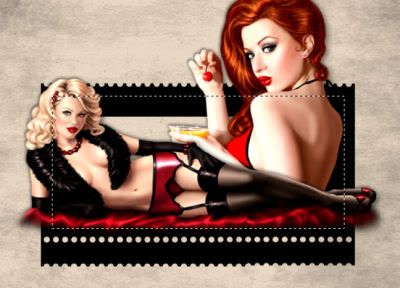
Open frame (21). Copy and paste as a new layer. Move it down from center a bit.
Open your (first, laying down) tube and add it as a new layer. Resize, position, and drop shadow to your taste.
Highlight the white background layer.
Open paper (11). Resize to 800x700 pixels. Copy and paste as a new layer.
Apply your mask. Delete mask layer, answer "yes" to the pop-up question, and merge group.
I duplicated the mask layer twice, for a total of three mask layers. This is up to you. If you do the duplicates, merge your layers down.
Open element (65). Resize 50%. Copy and paste as a new layer.
Effects > Plug-Ins > Mura's Meister > Copies with the following settings:
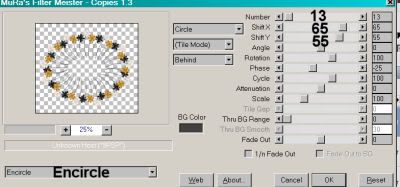
Hit okay.
Position this as you like it. I moved mine down and over to the left a bit. Totally up to you! Drag this layer below your frame layer, but above your mask layer. Drop shadow.
Add your second tube here, if you're using one. This layer should be below the first tube layer, but above the frame layer. Resize, position and drop shadow to your liking.
Open paper (15). Copy and paste as a new layer. Drag this layer below the frame layer, but above your circle of flowers layer.
Grab your selection tool, set on rectangle, and draw a selection around the outside of the frame. Like so, if you can see it. It's kinda hidden here. :)
Selections > Invert.
Make sure you're on the paper (15) layer you just added. Hit delete.
Selections > Select None.
Drop shadow your frame layer.
Open element (40). Copy and paste as a new layer. This should be above your newer paper layer, and below the frame layer. Give this a small drop shadow. Lower the opacity of this layer to 65.

Go back to the top layer.
Open element (54). Resize 65%. Copy and paste as a new layer. Position as you would like it. Drop shadow.
Back again to the top layer, and add your name. I used color #f6c112 as the fill, black as the stroke. Stroke set at 2.
I added the following bevel:
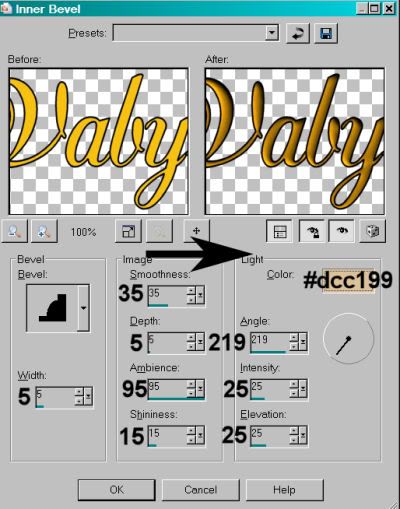
Hit okay.
Drop shadow your name.
Resize your canvas to a size with which you are comfortable.
Add your copyright, license information if applicable, and taggers'/watermark.
If you choose not to animate, you're now done, and you can merge your layers and save!
A N I M A T I O N
I started this out intending to just animate the wire heart element. When I had it all done, it was barely visible. So I went back and animated the flower oval afterward. So both those layers are animated in my example. You may choose to do that, or not. I am including all the steps for both. You don't have to do it if you don't want to. :)
Highlight your element (40) layer. Duplicate this layer three times, for a total of four element (40) layers.
Now, highlight your element (65) layer. Duplicate *this* layer three times, for a total of four element (65) layers.
Go to the bottom layer of one of those groups of four.
Effects > Plug-ins > dsb flux > Bright Noise, with the following settings:
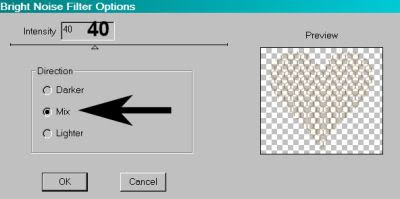
Hit okay.
Apply this plug-in to the bottom layer of your other element grouping, as well. Hope I'm saying this well enough for you to follow!!
Go to the second layer up of your group of four. Apply Bright Noise again, this time with the setting at 45.
Hit okay, then go to your second grouping of four and apply this effect to the second layer up in that group.
Now, go to the third layer up in that same group.
Apply Bright Noise again, this time with the setting on 50.
Hit okay, and go back to your other grouping of four layers, highlight the third layer up and apply the effect the same way.
Finally, now open the top layer of that grouping. Apply Bright Noise again, this time with the setting on 55.
Hit okay. Find your other group of four layers, and highlight the top layer. Apply Bright Noise with the setting on 55.
Whew!
Now, close the top three layers in both groups of four.
Edit > Copy Merged.
Open Animation Shop. Right-click on the desktop area and paste as a new animation.
Return to PSP.
Close your bottom layers and open the next layers up in each group of four.
Edit > Copy Merged.
Go back to Animation Shop. Edit > Paste > After Current Frame.
Return again to PSP.
Close out the current layers, and open the next layers up, in both groups.
Edit > Copy Merged.
Again, back to Animation Shop. Edit > Paste > After Current Frame.
One last time, back to PSP. Close out the open layers and open the top layers in each group of four.
Edit > Copy Merged>
Back to Animation Shop and Edit > Paste > After Current Frame.
We are done!
Now, View > Animation.
I hope you like what you see (and I hope I explained that well enough)!! If so, save as a .gif file, and we're done! Thanks so much sticking with it!!
.


No comments:
Post a Comment