
This tutorial was written on June 14, 2010 using Paint Shop Pro, version X.03. It should be okay to do with other versions as well. I just find X.03 more comfortable for me. You may download a free trial of Paint Shop Pro, version X3, from Corel. The release of X3 is new to me at this time, so hopefully Corel hasn't changed things up too much!!
You will also need:
Animation Shop. This is now a pay-for product, through Corel. That changed a while ago. I don't know why!!
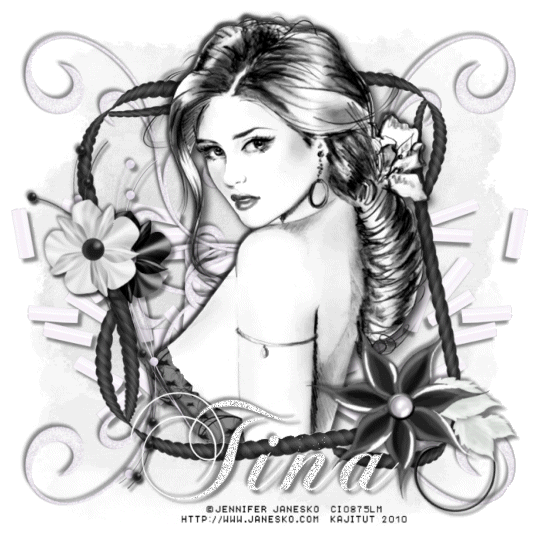
A tube of your choice. I'm using the fantastic artwork of Jennifer Janesko. You must have a license to use her work. You can get that license and artwork from C.I.L.M.
The scrap kit used was made by Tina of Tina's Magical World. This is a FTU kit, called Eleganzia. This is the 10th kit down on this post. Tina created this to answer a challenge from Creative Misfits. Be sure to share the love with Tina for this great black & white freebie!! Snag some of the others if the mood strikes you! Thanks to Missy and Yvette for making the challenge!
Supplies: Just the mask, which can be found here. The mask is by the wonderful-yet-still-missing Becky!! Thanks go out to Becky for her fabulous contributions to the PSP cause!
Filters: No outside filters are used in this tutorial.
Font: I used KB ChopinScript.
Okay, let's see if I can still drive this thing! LOL! I started out reallllllly slow, because three months off made everything really foreign to me!
Open a new canvas, 700 x 700, white.
Open RopeFrame1. Resize 87%. Copy and paste as a new layer.
Open your tube and add it as a new layer. Resize, position, and drop shadow to your taste.
Highlight your frame layer. Grab your magic wand and click inside the frame. Make sure you get all the little nooks & crannies in this one!! Selections > Invert.
Highlight your tube layer. Grab your eraser brush and erase any portion(s) of your tube that you don't want showing underneath or to the sides of the frame.
Selections > Select None.
Highlight the white background layer.
Open Paper22. Copy and paste as a new layer.
Apply your mask. Delete mask layer, answer "yes" to the pop-up question, and merge group.
Now, you could open, resize and use any of the elements if you wanted. Here's what I did:
Open ElegantFlower1. Resize 70%. Copy and paste as a new layer. Position to the left side of the frame. See my example for placement reference. Drop shadow.
Open ElegantFlower2. Resize 75%. Copy and paste as a new layer. Rotate 10° left. Position to the left portion of the frame, on top of the previous flower. Drop shadow.
Open Flower1. Resize 65%. Rotate 20° right. Copy and paste as a new layer. Position on the right bottom corner of the frame. See my example for placement reference, if you like. Drop shadow.
Highlight your mask layer.
Open SeedBeads2. Copy and paste as a new layer. Position to the left center of the canvas. Drop shadow. Duplicate this layer. Image > Mirror. Merge these two layers down.
Open Doodle2. Copy and paste as a new layer. Rotate 35° left. Position above center. See my example for placement reference. Duplicate this layer. Image > Mirror. Merge these two layers down. Drop shadow. Duplicate *this* layer. Image > Flip. Merge those two layers down.
Drop shadow your frame layer.
Go back to the top layer and add your name. I used white as the fill, no stroke.
Drop shadow your name.
Resize your canvas to a size with which you are comfortable.
Add your copyright, license information if applicable, and taggers'/watermark.
If you choose not to animate, you're now done, and you can merge your layers and save!
A N I M A T I O N
On your name layer,
Grab your magic wand and carefully click inside the open areas on your name.
Duplicate your name layer twice, for a total of three name layers.
Highlight your bottom name layer.
Adjust > Add/Remove Noise > Add Noise with the following settings:
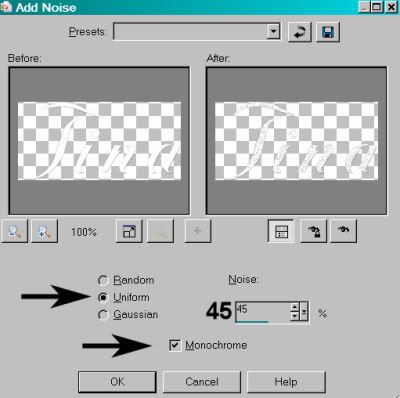
Hit okay.
Highlight your middle name layer.
Adjust > Add/Remove Noise > Add Noise, changing the setting to 48.
Hit okay.
Highlight your top name layer.
Adjust > Add/Remove Noise > Add Noise, this time changing your setting to 53.
Hit okay.
Selections > Select None.
Close out your top two name layers, leaving just the bottom name layer open.
Edit > Copy Merged.
Open Animation Shop. Right-click on the desktop area and paste as a new animation.
Return to PSP.
Close your bottom name layer and open the middle layer.
Edit > Copy Merged.
Go back to Animation Shop. Edit > Paste > After Current Frame.
Return again to PSP.
Close out your middle name layer, and open the top layer.
Edit > Copy Merged.
Once more, back to Animation Shop. Edit > Paste > After Current Frame.
View > Animation.
Save as a .gif file, and we're done! Thanks so much for trying my tut!
.


No comments:
Post a Comment