
This tutorial was written on March 2, 2010 using Paint Shop Pro, version X.03. It should be okay to do with other versions as well. I just find X.03 more comfortable for me. You may download a free trial of Paint Shop Pro, version X2, from Corel.
You will also need:
Animation Shop. This is now a pay-for product, through Corel. That changed a while ago. I don't know why!!
[NOTE: The animation is negligible on this tag. It is TOTALLY not needed. I just love things moving on tags, so I always seem to fit it in somewhere. So if you don't want to add it, that's SO okay with this one!!]
A tube of your choice. I'm using the artwork of Keith Garvey. You must have a license to use his artwork. You may get this license from My PSP Tubes.
The scrap kit is by Clarey, of Clarey's Designz. This is a PTU kit, available at Clarey's Designz Digital Scrapbook Shoppe. It's called Luck o' the Irish, and is available for $3.00 USD!!
Filters: dsb Flux > Bright Noise, Eye Candy 4000 > Gradient Glow
Font: I used Cancellaresca Script.
Supplies: Just the mask, which can be found here. This is a mask made by Sugar, who was once quite a great and prolific tutorial writer. Sugar helped me learn how to use PSP, so I owe her a great deal of gratitude. Sugar, wherever you are, thank you for your many contributions to the PSP community!!
But let's get this puppy done!
Open a new canvas, 750 x 700, white.
Open roundframe. Resize 93%. Copy and paste as a new layer. I added the following bevel:

Hit okay.
Add your tube. Resize, position and drop shadow to your liking.
Highlight your frame layer. Grab your magic wand and click inside the frame. Selections > Modify > Expand by 1. Selections > Invert.
Highlight your tube layer. Grab your eraser brush and erase any of the tube that you don't want showing below or to the sides of the frame.
Selections > Select None.
Open "ireland" lol. Resize 110%. Copy and paste as a new layer. In your layer palette, this layer should be below your frame layer. Drop shadow.
Drop shadow your frame.
Highlight your white background layer.
Open paper3. Resize to 750x700 pixels. Copy and paste as a new layer.
Apply your mask. Delete the mask layer, answer "yes" to the pop-up question, and merge group.
Open balloons. Resize 65%. Copy and paste as a new layer. Rotate 25° left. Position toward the upper left corner of your canvas. See my example for placement reference. Drop shadow. This layer should be below the "ireland" layer.
Open sparklingshamrock. Copy and paste as a new layer. In your layer palette, this should be below your tube layer and above the "ireland" layer.
Go back to the top and add your name. I used color #344b1e as the fill and the stroke, stroke set at 2.
Effects > Plugins > Eye Candy 4000 > Gradient Glow set on 4-25-100, color #e7dc94.
Drop shadow your name. Arrange your name as you'd like it.
Resize your canvas to a size with which you are comfortable.
Add your copyright, license information if applicable, and taggers'/watermark.
If you choose not to animate, you're now done, and you can merge your layers and save!
A N I M A T I O N
Highlight your sparklingshamrock layer. Duplicate this layer twice, for a total of three sparklingshamrock layers.
Now highlight your bottom sparklingshamrock layer.
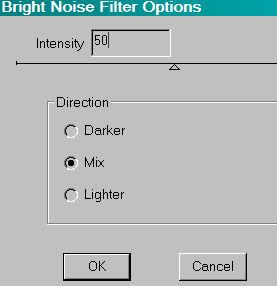
Effects > Plug-ins > dsb Flux > Bright Noise with the following settings:
Hit okay.
Highlight the middle sparklingshamrock layer.
Add Bright Noise again, and click on the "mix" tab a couple times. For this tag, I also changed the setting for intensity to 55.
Hit okay.
Highlight the top sparklingshamrock layer.
Add Bright Noise once more, again clicking "mix" a couple times. I changed the intensity to 60, as well.
Hit okay.
Close out your top two sparklingshamrock layers, leaving the bottom layer open.
Edit > Copy Merged.
Open Animation Shop. Right-click on the desktop area and paste as a new animation.
Return to PSP. Close out your bottom sparklingshamrock layer, and open the middle layer.
Edit > Copy merged.
Back to Animation Shop. Edit > Paste > After Current Frame.
Return again to PSP. Close out the middle layer, and open the top layer.
Edit > Copy merged.
Again, back to Animation Shop. Edit > Paste > After Current Frame.
View > Animation.
There we have it! Simple, eh? I hope you've enjoyed this tutorial. I'm awfully glad you've stopped by!!
.


No comments:
Post a Comment