
This tutorial was written on March 18, 2010 using Paint Shop Pro, version X.03. It should be okay to do with other versions as well. I just find X.03 more comfortable for me. You may download a free trial of Paint Shop Pro, version X2, from Corel.
You will also need:
Animation Shop. This is now a pay-for product, through Corel. That changed a while ago. I don't know why!!
A tube of your choice. I chose to use the art of Dave Nestler. You must have a license to use his work. You can get that license at C.I.L.M.
The scrap kit is by Heike, of Fantasy Dreams Designz. This is a FTU kit, called Looking. Be sure to leave her some thanks for sharing her freebies with us!!
Supplies: Just the mask, which you can find here. This is one of my most oft-used masks, by Becky, who is no longer "out there" in the PSP world. But I thank you, Becky, for contributing so much when you were around!!
Filters: Eye Candy 4000 > Gradient Glow
Font: I used one called "Love." I think this is a variant on a Rob Leuschke font. Not sure, but I think it is. I have thousands of fonts!!
Okay, here we go! This is a very easy tut. The kit used had so much intricacy in each element, that there really wasn't a need for a lot of stuff!
Open your mask in PSP and minimize. You could also file it in the PSP mask files on your computer for use at a later date.
Open a new canvas, 700 x 700, white.
Open Element20. Copy and paste as a new layer.
Open your tube and add it as a new layer. Resize, position, and drop shadow to your taste.
Highlight your Element20 (frame) layer. Grab your magic wand and click inside the frame.
Highlight your tube layer. Grab your eraser brush and erase any portion(s) of your tube that you don't want showing underneath or to the sides of the frame.
Selections > Select None.
Highlight the white background layer.
Open Paper3. Copy and paste as a new layer.
Apply your mask. Delete mask layer, answer "yes" to the pop-up question, and merge group.
Open Element15. Copy and paste as a new layer. In your layer palette, this should be above your mask layer, below all else.
Return to your top layer.
Open Element30. Resize 35%. Copy and paste as a new layer. Position where you'd like it. Drop shadow.
Open Element26. Resize 75%. Copy and paste as a new layer. Position where you'd like it. Mine is in the bottom left corner of the canvas.
Effects > Plug-ins > Eye Candy 4000 > Gradient Glow set at 3-0-100, color white. Drop shadow.
Apply the same Gradient Glow to your frame layer. Drop shadow your frame layer.
Okay, now it's time for your name!!
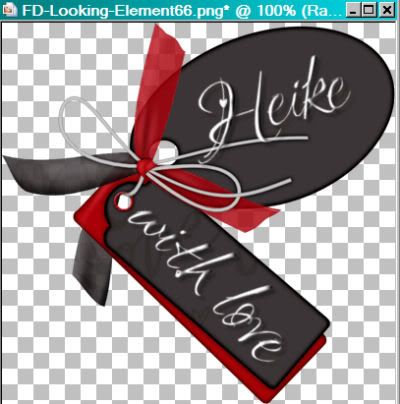
Open Element66. Stay with this piece. Put whatever text you like... but I put the signature, and "with love" on my tags. I used white as the fill, no stroke.
For the name layer, rotate 15° left. Position in place.
For the text layer, rotate 45° right. Position in place.
I added the following bevel to both layers:
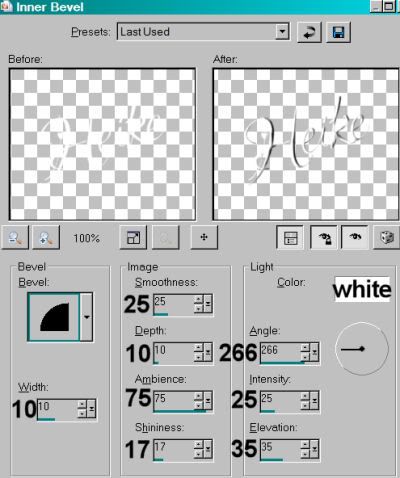
Hit okay.
Drop shadow both text layers.
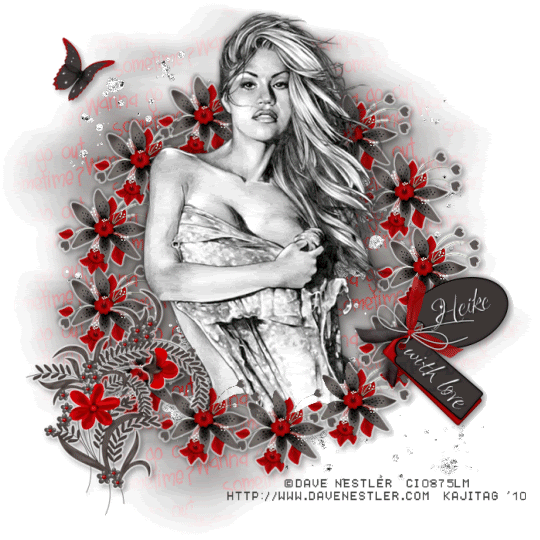
It should now look something like this:
Edit > Copy merged.
Return to your main canvas and Edit > Paste as a new layer. Resize 50%. Position where you'd like it. Drop shadow.
Resize your canvas to a size with which you are comfortable.
Add your copyright, license information if applicable, and taggers'/watermark.
If you choose not to animate, you're now done, and you can merge your layers and save!
A N I M A T I O N
Highlight your Element15 layer. Duplicate this layer twice, for a total of three Element15 layers.
Now highlight your bottom Element15 layer.
Adjust > Add/Remove Noise > Add Noise with the following settings:
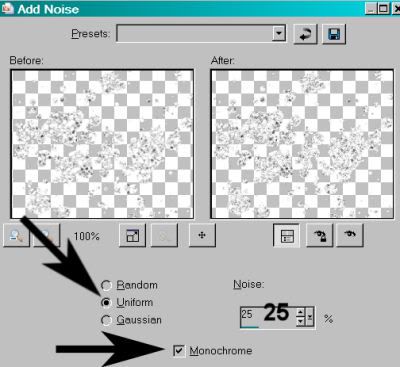
Hit okay.
Highlight the middle Element15 layer.
Add Noise again, this time changing the setting to 30.
Hit okay.
Highlight the top Element15 layer.
Add Noise once more, this time changing the setting to 35.
Hit okay.
Close out your top two Element15 layers, leaving the bottom layer open.
Edit > Copy Merged.
Open Animation Shop. Right-click on the desktop area and paste as a new animation.
Return to PSP. Close out your bottom Element15 layer, and open the middle layer.
Edit > Copy merged.
Back to Animation Shop. Edit > Paste > After Current Frame.
Return again to PSP. Close out the middle Element15 layer, and open the top layer.
Edit > Copy merged.
Again, back to Animation Shop. Edit > Paste > After Current Frame.
View > Animation.
Save as .gif and we're done! Told you it was easy!! I love black, white and red as a color scheme, so I just had to go for this one. Thanks so much for using my tut!
.


No comments:
Post a Comment