
This tutorial was written on March 16, 2010 using Paint Shop Pro, version X.03. It should be okay to do with other versions as well. I just find X.03 more comfortable for me. You may download a free trial of Paint Shop Pro from Corel.
You will also need:
Animation Shop. This is now a pay-for product, through Corel. That changed a while ago. I don't know why!!
A tube of your choice. I am using the artwork of Deacon Black. (His former site is no longer operating, so the folks at C.I.L.M. said to use this as a URL for his art.) You must have a license to use his work. You can get that license through C.I.L.M.
The scrap kit used is by Melanie, of SunnySideScraps. This is a FTU kit, called African Dreams. Be sure to leave some love in the form of a thank you for Melanie for her freebies offered to us!!
Supplies: The mask and the gem I used, which you can find here. The mask came from a now-closed blog, Div's This-n-That. Thanks for the masks, Divvy! The gem is by Alice Naylor. In trying to find Alice, I found this list, which definitively shows she's retired. The link to her site is no longer valid. So Alice, I thank you for all that you did while you were around! Many thanks to Ellie for letting me know from whence the mask came!!
Filters: Mura's Meister > Copies, Eye Candy 4000 > Gradient Glow, Eye Candy 4000 > Corona
Font: I used Margaret Regular.
Let's make a tag!
Open your supplies in PSP and minimize. Alternatively, you could file them with your other PSP supplies for use at a future date!
Open a new canvas, 750 x 700, white.
Open Element-72. Resize 35%. Copy and paste as a new layer. Image > Flip.
Effects > Plug-ins > Mura's Meister > Copies with the following settings:
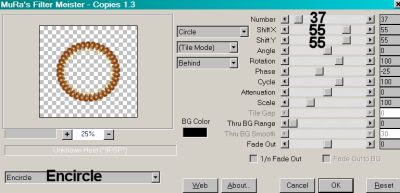
Hit okay.
Add your tube. Resize, position and drop shadow to your taste.
Highlight your layer that you made into a frame. Grab your magic wand and click inside the frame.
Selections > Modify > Expand by 1. Selections > Invert.
Highlight your tube layer.
Grab your eraser brush and erase all the portions of your tube that you don't want showing under the frame or to the sides.
Selections > Select None.
Highlight your white background layer.
Open Paper-19. Copy and paste as a new layer.
Highlight your frame layer. Again, grab your magic wand and click inside the frame.
Selections > Modify > Expand by 20.
Highlight your Paper-19 layer. Hit delete.
Selections > Select None.
Again, highlight your white background layer.
Open Paper-27. Resize to 750x700 pixels. Copy and paste as a new layer.
Apply your mask. Delete mask layer, answer "yes" to the pop-up question, and merge group.
Give your mask layer a small drop shadow.
Open the gem provided in the supplies. Resize 35%. Copy and paste as a new layer.
Effects > Plug-ins > Mura's Meister > Copies with the following settings:
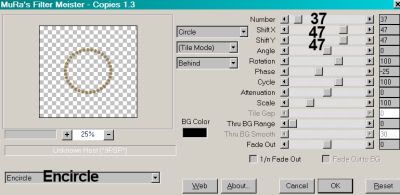
Hit okay.
In your layer palette, drag this layer to just below your tube layer.
In my particular example, the tube has areas both inside and outside the frame made earlier. In order to have these gems behind the tube but above the inside leg, I duplicated this layer. So if your tube is similar, duplicate this layer!
Drag this new layer up to just above the tube layer.
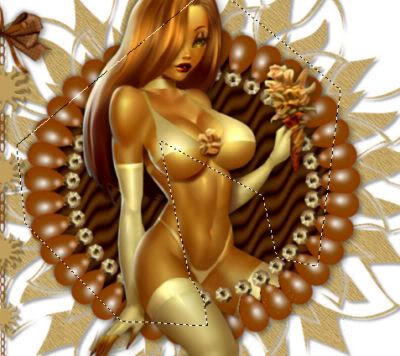
Grab your lasso tool, set on point-to-point, and draw a "random" selection around the areas you do not want showing above your tube, leaving the inside-the-frame portion of your tube uncovered by this selection. Example:
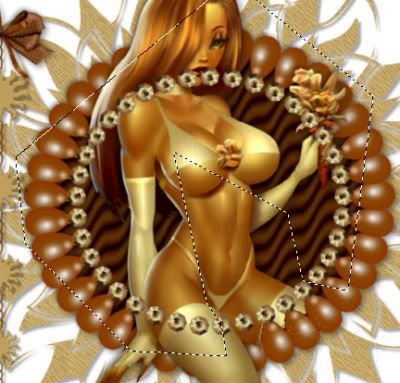
Make sure you're highlighting the upper "gem" layer and hit delete. Example:
Selections > Select None.
Sorry if your tube wasn't an inside-outside one. I just thought I should include those steps for those who might be using a similar tube.
Open Element-66. Resize 50%. Copy and paste as a new layer. Position to the left of your canvas, as though it could be hanging from one of the points on the mask. Drop shadow.
Open Element-28. Resize 25%. Copy and paste as a new layer. Rotate 60° right. Position at the top of the previous layer, as though the bow is holding it there. Drop shadow.
Open Element-34. Resize 25%. Copy and paste as a new layer. I chose to position mine in the right of the canvas, as though it might be attached to the frame we made in the beginning. Drop shadow.
Drop shadow your original frame.
Go back to the top layer and add your name. I used color #b18861 as the fill AND the stroke, stroke set at 2.
I added the following bevel:
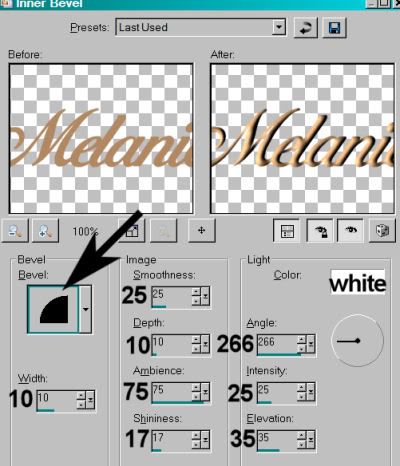
Hit okay.
Effects > Plug-ins > Eye Candy 4000 > Gradient Glow set at 5-0-100, color #8c3f01.
Drop shadow your name. Arrange your name as you'd like it.
Resize your canvas to a size with which you are comfortable.
Add your copyright, license information if applicable, and taggers'/watermark.
If you choose not to animate, you're now done, and you can merge your layers and save!
A N I M A T I O N
Highlight your mask layer. Duplicate this layer twice, for a total of three mask layers.
Now highlight your bottom mask layer.
Effects > Plug-ins > Eye Candy 4000 > Corona, with this setting:
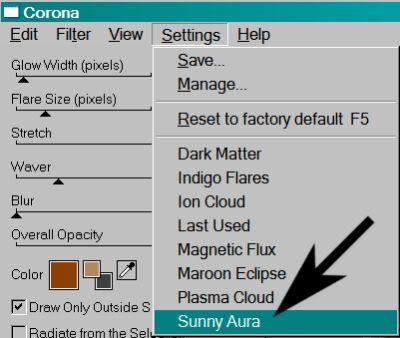
and these numbers (color #8c3f01):
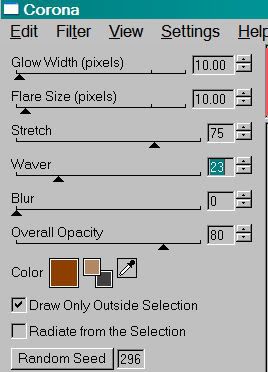
Hit okay.
Highlight the middle mask layer.
Add Corona again, and click on the "Random Seed" tab.
Hit okay.
Highlight the top mask layer.
Add Corona once more, again clicking "Random Seed."
Hit okay.
Close out your top two mask layers, leaving the bottom layer open.
Edit > Copy Merged.
Open Animation Shop. Right-click on the desktop area and paste as a new animation.
Return to PSP. Close out your bottom mask layer, and open the middle layer.
Edit > Copy merged.
Back to Animation Shop. Edit > Paste > After Current Frame.
Return again to PSP. Close out the middle layer, and open the top layer.
Edit > Copy merged.
Again, back to Animation Shop. Edit > Paste > After Current Frame.
Edit > Select All.
Right-click on the top bar of your animation, choose "Frame Properties," and change this number to 25.
View > Animation. Save as a .gif file.
Another one bites the dust! I do hope you're happy with your new tag! Thank you so much for stopping by and choosing to do one of my tuts! I appreciate it!
.


No comments:
Post a Comment