This tutorial was written on March 5, 2010 using Paint Shop Pro, version X.03. It should be okay to do with other versions as well. I just find X.03 more comfortable for me. You may download a free trial of Paint Shop Pro, version X2, from Corel.
Things you will need:
A tube of your choice. I'm using the brand-new Elias Chatzoudis release! You must have a license to use his work. That license can be purchased at My PSP Tubes.
The scrap kit is by Sanie, of Creations by Sanie. This is a FTU kit, called St. Paddy Day. Leave lots of love for the freebies, guys!
Supplies: Just the mask, which can be found here. This mask is by Ali, of Designs by Ali. Thank you, Ali, for all your great contributions to the PSP community!!
Filter: No outside filters used in this tutorial.
Font: I used Sarsaparilla.
Open your mask in PSP and minimize. Alternatively, you could put it in your existing masks file, for use on a future date...
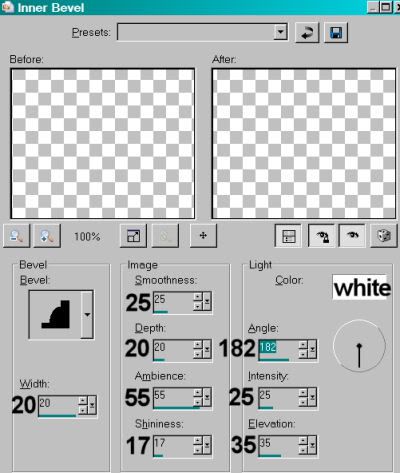
Open Element77. Copy and paste as a new layer. Add the following bevel:

Add your tube. Resize, position and drop shadow to your liking.
Highlight your frame layer. Grab your magic wand and click inside the frame.
Highlight your tube layer. Grab your eraser brush and erase the portions of your tube that you do not want showing, overlapping the frame.
Selections > Select None.
Highlight your white background layer.
Open Paper36. Copy and paste as a new layer.
Apply your mask. Delete mask layer, answer "yes" to the pop-up question, and merge group.
As you may have noticed, I ended up putting my tube a bit to the left, rather than leaving it centered in the frame. You can either do this or not. It's all up to you.
Open Element20. Rotate 90° right, ALL LAYERS CHECKED! Copy and paste as a new layer. In your layer palette, this should be between your tube and your mask layers. Drop shadow.
Now, I didn't like the portions of that element that stuck out from the top and bottom of the frame. To get rid of those, I just used my selection tool, set on rectangle, and drew little selections around both areas and hit delete. Then Selections > Select none.
Open Element6. Copy and paste as a new layer. I placed this on the right side of my frame. Drop shadow.
Open Element4. Copy and paste as a new layer. Place this over the first hanging element, a bit off from that one. See my example for placement reference, if you like. Drop shadow.
Open Element48. Rotate 90° right, ALL LAYERS CHECKED!! Resize 85%. Copy and paste as a new layer. Place this one over the other two, to your liking. Drop shadow.
Open Element62. Resize 35%. Copy and paste as a new layer. Position in the bottom left corner of the frame. You're going to make a cluster there, so changing the position as you go is just fine. Drop shadow.
Open Element65. Resize 35%. Copy and paste as a new layer. Position in the bottom left corner, next to the first flower. Drop shadow.
Open Element63. Resize 35%. Copy and paste as a new layer. Position again, in the bottom left. Drop shadow. Now, arrange the flowers until you like how it's looking.
Open Element55. Resize 50%. Copy and paste as a new layer. Rotate 30° right. Position where you'd like it, over the flowers. Drop shadow.
Go back to the top and add your name. I used color #273712 as the fill and #bfe77c as the stroke, stroke set at 1.5.
I added the same bevel that we used on the frame:

Hit okay.
Drop shadow your name. Arrange your name as you'd like it. Mine is rotated 30° left.
Resize your canvas to a size with which you are comfortable.
Add your copyright, license information if applicable, and taggers'/watermark.
Et, voila! No movement in this one! Hope you liked it!! Thanks for stopping!!
.


The Irish people even flirt online. When you have a long-term boy you just don't have the same kind of high-intensity crushes - on him or on other guys. See above comment regarding facebook stalking pretend boyfriends.
ReplyDelete