
This is just a guideline, and I know not everyone is going to be using the same tube(s)... so use your imagination as you go! Any similarities between this tut and any others you may see are purely coincidental.
You will also need:
Animation Shop. This is now a pay-for product, through Corel. That changed a while ago. I don't know why!!
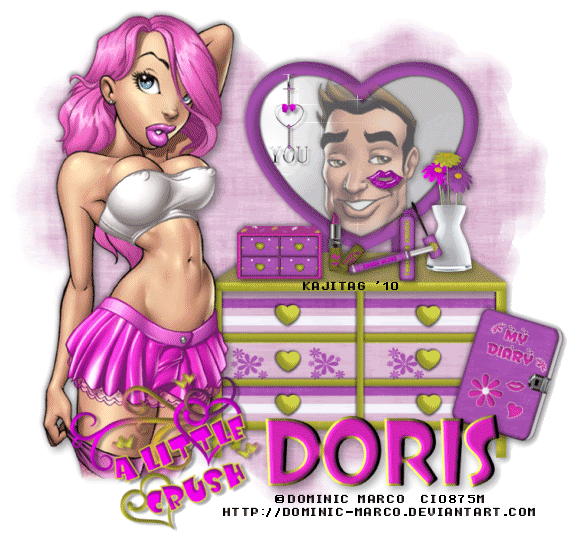
A tube (or tubes) of your choice. I chose to use the great artwork of Dominic Marco. You may have noticed I like his work. LOL! You must have a license to use his art. You can get that license at C.I.L.M.
The scrap kit is by Doris, from Scraps Dimensions. This is a FTU kit, called Teenage Crush. I chose to copy the title used for this tutorial from an old Average White Band song that went on and on in my brain as I put this together lol. (Although I think theirs was "schoolboy" instead of "teenage.") Again, Doris puts a lot of love into her absolutely free kits, so leave some for her in return!!
Filters: VM Natural > Sparkle
Font: I used BoogieWoogieHmk.
Supplies: Just the mask, which can be found here. This is obviously a mask by someone named Angie. I have no idea Angie "who," nor do I know where to find her. If you know who this is, or if this is yours, let me know so that I might give credit where it's due! Thank you!
This is another copy-n-paste a lot type tutorial, like my recent "I Enjoy Being a Girl." It takes a lot of repetition and resizing, but let's do it!!
Open your mask and minimize in PSP. Alternatively, you could file it away with the rest of your PSP mask files, for use at a future date!
Open a new canvas, 750 x 700, white.
Open DRESSER. Resize 65%. Copy and paste as a new layer. Drop shadow.
Add your main tube. Resize, position, and drop shadow to your taste. Arrange with regard to your dresser as you like it.
Either add your secondary tube, or duplicate the one you're using and mirror. Position so that the face of this tube is how you want it to show in the "mirror" portion of the dresser. Drop shadow the tube. Lower the opacity on this tube to 55.
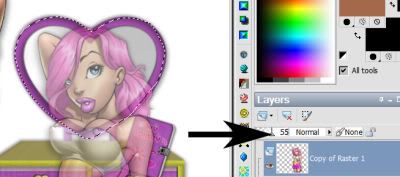
Highlight your secondary tube layer. Hit delete. Selections > Select None.
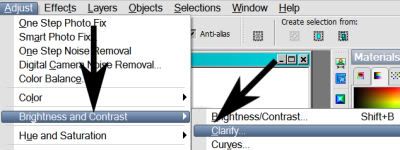
Adjust > Brightness and Contrast > Clarify
with the following setting:
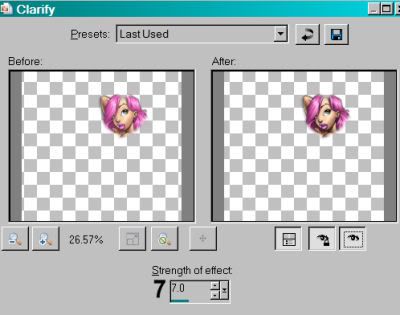
Hit okay.
Open the VASE. Resize 20%. Copy and paste as a new layer. Position on top of the dresser. Drop shadow.
Open WA 3. Resize 15%. Copy and paste as a new layer. Position as though it's hanging from the mirror. Small drop shadow.
Open MASCARA. Resize 15%. Copy and paste as a new layer. Position on top of the dresser. Drop shadow.
Open LIPSTICK. Resize 17%. Copy and paste as a new layer. Position on top of the dresser. Drop shadow.
Open LIP GLOSS. Resize 15%. Copy and paste as a new layer. Position on top of the dresser. Drop shadow.
Open JEWELRY BOX. Resize 17%. Copy and paste as a new layer. Position on top of the dresser. Drop shadow.
The following may not pertain to your tag. If you're using a mirror image of your main tube, perhaps you don't want lips on the cheek, I don't know.
Open LIPS. Resize 7%. Copy and paste as a new layer. Position on the cheek of your image in the mirror. Small drop shadow.
Open WA 2. Resize 30%. Copy and paste as a new layer. Position in the center bottom (to the left a bit, above your tube) portion of the canvas. See my example for placement reference. Rotate 20° left. Drop shadow.
Arrange the elements on the dresser to your liking. You can use my example for placement reference, if you like.
Highlight your white background layer.
Open PAPER 8. Copy and paste as a new layer.
Apply your mask. Delete mask layer, answer "yes" to the pop-up question, and merge group.
Open DIARY. Resize 20%. Copy and paste as a new layer. In your layer palette, this should be above the dresser layer. Rotate 17° right. Position at the middle-right of the dresser. See my example for placement reference, if you like. Drop shadow.
Go to your top layer and add your name. I used color #d927b8 as the fill, and #c1c342 as the stroke, stroke set at 3.
I applied the following bevel:
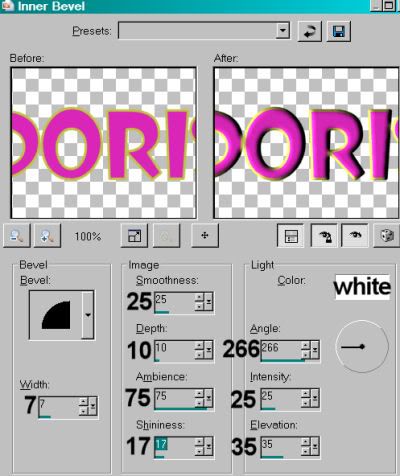
Hit okay.
Drop shadow your name. Arrange your name as you'd like it.
Resize your canvas to a size with which you are comfortable.
Add your copyright, license information if applicable, and taggers'/watermark.
If you choose not to animate, you're now done, and you can merge your layers and save!
A N I M A T I O N
Highlight your DRESSER layer. Here comes a repetition!
Grab your lasso tool, set on point-to-point, FEATHER SET AT ZERO, and carefully draw a selection around the mirror portion of your dresser.
Duplicate the DRESSER layer twice, for a total of three DRESSER layers.
Now highlight your bottom DRESSER layer.
I suspect this next filter does not re-adjust itself back to any default settings between uses. This first setting could just be what I last used, I don't know. So I'm not sure if it's important which settings your start with first. lol.
Effects > Plug-ins > VM Natural > Sparkle with the following settings:
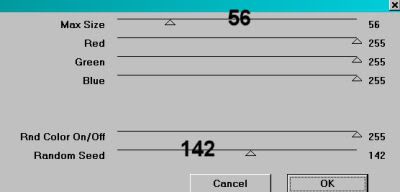
Hit okay.
Highlight your middle DRESSER layer.
Add Sparkle again, this time moving your "size" and "random" seed settings to something different. You can watch your choices in the preview window as you change your sliders in this filter. Just keep moving the slider settings until you like what you see.
Hit okay.
Highlight the top DRESSER layer.
Add Sparkle once more, again moving the "size" and "random seed" settings to something different.
Hit okay.
Now, with Sparkle, I always (yes, always) go back and repeat on all three layers, so I'll get more sparkle. So go back to the bottom and start all over again, applying Sparkle to all three layers and changing the settings as you go.
Selections > Select None.
Close out your top two DRESSER layers, leaving the bottom DRESSER layer open.
Edit > Copy Merged.
Open Animation Shop. Right-click on the desktop area and paste as a new animation.
Return to PSP. Close out your bottom DRESSER layer, and open the middle layer.
Edit > Copy merged.
Back to Animation Shop. Edit > Paste > After Current Frame.
Return again to PSP. Close out the middle DRESSER layer, and open the top DRESSER layer.
Edit > Copy merged.
Again, back to Animation Shop. Edit > Paste > After Current Frame.
Edit > Select All.
Right click on the top bar of your animation, and choose "Frame Properties." Change this number to 30.
View > Animation.
Done with another tag! I hope you enjoyed it. Thank you for doing my tut, and have a lovely rest of your day!
.


No comments:
Post a Comment