
This is just a guideline, and I know not everyone is going to be using the same tube... so use your imagination as you go! Any similarities between this tut and any others you may see are purely coincidental.
You will also need:
Animation Shop. This is now a pay-for product, through Corel. That changed a while ago. I don't know why!!
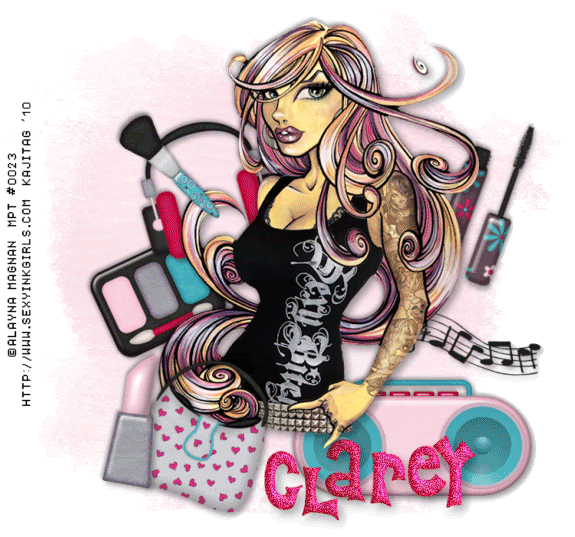
A tube of your choice. I'm using the artwork of Alayna Magnan. You will need a license to use her art. That license & art may be found at My PSP Tubes.
The scrap kit is by Clarey. This is a PTU kit, which she made back in November, as a matter of fact. It can be found at Clarey's Designz Digital Scrapbook Shoppe. The kit is called "It Girl," and is available for $3.00 USD!!
Now, if you go to Clarey's blog, and go straight to her announcement of the kit, you will also find there a couple of freebies: An alpha, which I used in this tutorial, and a double frame, which I did not.
Filters: No outside filters used in this tutorial!
Font: I used the free alpha supplied by Clarey on her blog.
Supplies: You may find here. This file includes another great mask by Becky, and the music notes used in the tag. I don't know from where I got the music notes, so if you know, or they are yours, let me know, and I'll give you proper credit! I thank you both for your contributions!!
Let's try this puppy!! It's pretty much a cut-n-paste tut, so it shouldn't be much of a problem!
Open your supplies in PSP and minimize. You could also file them in the appropriate PSP files on your computer for use at a later date.
Open a new canvas, 750 x 700, white.
Open your tube and add it as a new layer. Resize, position, and drop shadow to your taste. I realize, since this is the first addition, positioning isn't permanent at this point! It sure wasn't for me!
The following elements/layers can be done in any sequence, and placed in any way you prefer in relation to your tube. I'm just giving you the way I completed mine, okay?
Open eyeshadow. Resize 65%. Copy and paste as a new layer. Rotate 25° left. Position as you like. I put mine to the left of my tube, a bit below. Drop shadow.
Open stereo. Resize 50%. Copy and paste as a new layer. Position as you like. I put mine to the right of my tube, also a bit below. Drop shadow.
Open the Music Doodles included in the supplies. Resize 50%. Copy and paste as a new layer. Position a bit above the stereo. Rotate 20° right. Drop shadow.
Open mascara. Resize 65%. Copy and paste as a new layer. Position where you like. I put mine toward the top, on the right side of the tube, again -- a bit lower in the layer palette. Drop shadow.
Open headphones. Resize 45%. Rotate 35% left. Copy and paste as a new layer. Position as you like it. I put mine to the top left of my tube, again, lower in the layer palette than the tube. Drop shadow.
Open handbag. Resize 65%. Copy and paste as a new layer. Rotate 20° right. In the layer palette, this one's above the tube, toward the bottom middle. Drop shadow.
Open lipstick. Copy and paste as a new layer. This one is not resized nor rotated! Position where you like. Mine is a bit to the left, above the handbag. Drop shadow.
Highlight the white background layer.
Open paper5. Resize to 750x700 pixels. Copy and paste as a new layer.
Apply your mask. Delete mask layer, answer "yes" to the pop-up question, and merge group.
Duplicate your mask layer. Merge these two layers down.
Go back to the top and add your name. I used Clarey's freebie alpha to go with this kit.
Open the alpha you wish to use (if using one! lol!). One by one, using your selection tool set on rectangle, draw a small rectangular selection around each letter you need for your tag. Edit > Copy. Then back to your tag and Edit > Paste as a new layer. Position where you'd like your name to be on your tag. Go back to your alpha and Edit > Undo Selection. Then go to your next letter and do the same thing, and so on.
When done, merge down all your letter layers for your name.
Resize your canvas to a size with which you are comfortable.
Add your copyright, license information if applicable, and taggers'/watermark.
If you choose not to animate, you're now done, and you can merge your layers and save!
A N I M A T I O N
Highlight your name layer. Duplicate this layer twice, for a total of three name layers.
Now highlight your bottom name layer.
Adjust > Add/Remove Noise > Add Noise with the following settings:
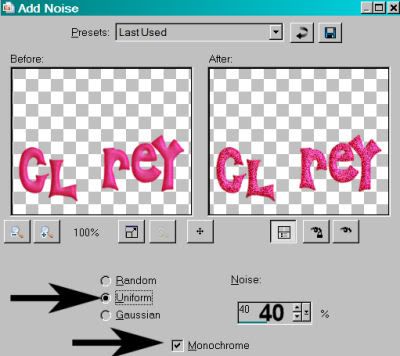
Hit okay.
[Please Note: There is no "a" in the example, because at first, I had the "a" in "Clarey" positioned right below the tube's hand. So I saved the letters together in one layer that were above the hand, and did a separate animation on the "a." I know, it's a bit OCD, but that's why!]
Highlight the middle name layer.
Add Noise again, this time changing the setting to 45.
Hit okay.
Highlight the top name layer.
Add Noise once more, this time changing the setting to 50.
Hit okay.
Now, drop shadow your name, all three layers.
Close out your top two name layers, leaving the bottom layer open.
Edit > Copy Merged.
Open Animation Shop. Right-click on the desktop area and paste as a new animation.
Return to PSP. Close out your bottom name layer, and open the middle layer.
Edit > Copy merged.
Back to Animation Shop. Edit > Paste > After Current Frame.
Return again to PSP. Close out the middle name layer, and open the top name layer.
Edit > Copy merged.
Again, back to Animation Shop. Edit > Paste > After Current Frame.
View > Animation.
There you go! Done with yet another masterpiece! LOL! Thanks for choosing to do one of my tutorials! I appreciate it so much!
.


No comments:
Post a Comment