
This is just a guideline, and I know not everyone is going to be using the same tube... so use your imagination as you go! Any similarities between this tut and any others you may see are purely coincidental.
You will also need:
Animation Shop. This is now a pay-for product, through Corel. That changed a while ago. I don't know why!!
A tube of your choice. As it turns out, I did a tutorial last year with this same name, and lo, and behold! I used the same tube! Weird. Anyway, I'm using the artwork of Suzanne Richards. You must have a license to use her work. You may get that license and her art at C.I.L.M.
The scrap kit I used is by Doris, of Scraps Dimensions. This is a FTU kit, called "Cead Mile Failte." I have no idea what that means. I tried several on-line translators without success.
While waiting for your download, leave Doris some love for all her great work for this community. On her new blog header, it says "Freebies made with Love." I'm sure she'd appreciate a comment!!
Filters: dsb Flux > Bright Noise [NOTE: If you are not using a tube with a mug of beer, you won't (in all probability) be needing this filter.]
Font: I used Celtic Script.
Supplies: Are located here. There is the mask, by Becky, and the sparkle used, which is by Yoka -- who used to be quite active online but I tried to search for her and could not find her. Thank you to both Becky and Yoka for all they contributed to the PSP community in the past.
Okay then, let's begin! This basic tut is quick-n-easy. The animation is a lot of steps, if you've got beer to sparkle. LOL!
Open your supplies in PSP and minimize. You could also file them in the appropriate PSP files on your computer for use at a later date.
Open a new canvas, 700 x 750, white.
Open FRAME 2. Resize 65%. Copy and paste as a new layer.
Add your tube. Resize, position, and drop shadow to your taste.
Highlight your frame layer. Grab your magic wand, and click inside the frame.
Selections > Modify > Expand by 1. Selections > Invert.
Highlight your tube layer. Grab your eraser brush, and erase any of your tube that you don't want overlapping the frame in any way.
Selections > Select None.
Highlight your white background layer.
Open PAPER 5. Copy and paste as a new layer.
Apply your mask. Delete mask layer, answer "yes" to the pop-up question, and merge group. I moved my mask layer JUST A BIT. I just didn't like how it looked in its original position. I don't know if that is just me or not, but know you can do that if you want.
Open "PotOfGoldSampler." Resize 40%. Copy and paste as a new layer. With my tube, I wanted the strings of her bow to "float" over the gold, so in my layer palette, I put mine between the frame and tube layers, to the left of the frame. Drop shadow.
Open GLASS CLOVER 3. Resize 35%. Copy and paste as a new layer. Place where you'd like it on the frame, as if it's dangling there. Drop shadow.
Open WA 1. Resize 25%. Copy and paste as a new layer. Rotate 25° right. Position where you'd like it. Mine is to the right of the bottom of the frame. Drop shadow.
Drop shadow your frame layer.
Go back to the top and add your name. I used color #fbe260 for the fill, color #013d01 for the stroke, stroke set at 2.
I added the following bevel:
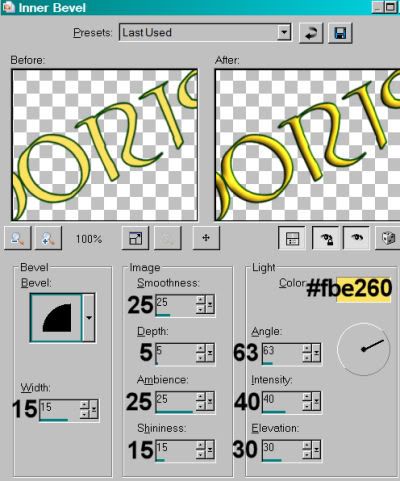
Hit okay.
Drop shadow your name.
Resize your canvas to a size with which you are comfortable.
Add your copyright, license information if applicable, and taggers'/watermark.
If you choose not to animate, you're now done, and you can merge your layers and save!
A N I M A T I O N
If you're using a tube with a beer mug, this animation goes in two steps. Well, two steps that take some more sub-steps! LOL! First, we'll work on the pot o' gold sparkles.
Open the Yoka star file included with the supplies. Resize 50%. Copy and paste as a new layer. Position over a portion of your gold coins.
Do this again, three more times, for a total of four sparkle layers. Place them randomly over the gold. Label them, if you like, sparkle 1, sparkle 2, etc.
If you do not have a mug of beer in your tube, the following doesn't apply. If you do, then....
Highlight your tube layer. Zoom in a BUNCH, focusing on the mug of beer.
Grab your selection tool, set on point-to-point, and carefully draw a selection around the liquid part of the beer (as opposed to the foam). Once the selection has been completed, you can zoom back to normal size.
Duplicate this layer three times, for a total of four tube layers.
Effects > Plug-ins > dsb Flux > Bright Noise with the following settings:

Hit okay.
Highlight the next tube layer up.
Add Bright Noise again, this time clicking on "mix" once or twice.
Hit okay.
Highlight the next tube layer up.
Add Bright Noise once more, clicking on "mix" a couple times again.
Now, highlight the top tube layer.
Add Bright Noise the last time, clicking "mix" a couple times again.
Hit okay.
Selections > Select None.
Close out your top three layers in each group (the sparkles and the Bright Noise), leaving the bottom two layers open.
Edit > Copy Merged.
Open Animation Shop. Right-click on the desktop area and paste as a new animation.
Return to PSP. Close out your bottom layer in each group, and open the next layers up.
Edit > Copy merged.
Back to Animation Shop. Edit > Paste > After Current Frame.
Return again to PSP. Close out the layers just used, and open the next layers up, in both groups.
Edit > Copy merged.
Again, back to Animation Shop. Edit > Paste > After Current Frame.
Back to PSP one last time! Close out the open layers in both groups, and open the top layers in each.
Edit > Copy merged.
Finally, back to Animation Shop. Edit > Paste > After Current Frame.
Edit > Select All.
Right-click on the top bar of your animation, choose "Frame Properties," and change this number to 30.
View > Animation.
If you don't like the look of your animation, whether it be because the beer isn't sparkling right, or your sparkles aren't in the right order on the pot of gold, change things around until you like them. To make the beer fizz like normal, you would NOT change the Frame Properties to 30, but then the sparkles would be WAY too fast. So fiddle with things. It's okay to do -- just time consuming!
View > Animation again!
Et, voila! We've finished another! LOL! I appreciate so much that you like my tuts. Leave a shout out if you're feeling chatty!!
.


hello, trying out this tut now...this looks like fun!
ReplyDeleteFYI according to my Gaelic dictionary:
cead - hundred (one of its definitions)
mile - thousand
failte - welcome
so my guess is it might translate to "[a] hundred thousand welcome[s]".
just a tidbit from an Irish-descendant girl :)