
This is just a guideline, and I know not everyone is going to be using the same tube... so use your imagination as you go! Any similarities between this tut and any others you may see are purely coincidental.
You will also need:
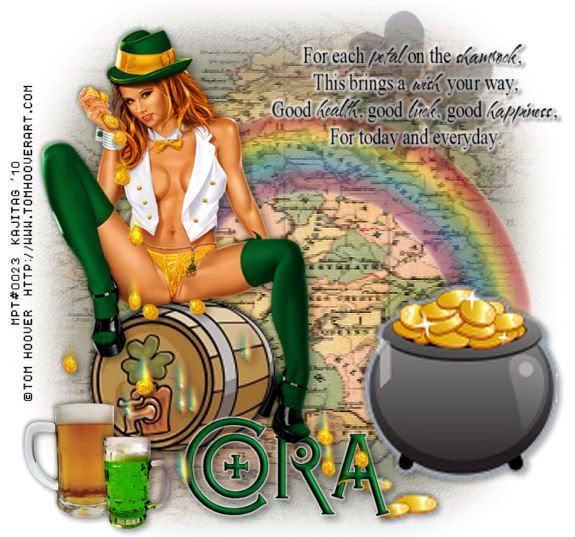
A tube of your choice. A sitting tube might be best, but is not required. I'm using the artwork of Tom Hoover. You must have a license to use his art. You may obtain that license and his art from My PSP Tubes.
The scrap kit was done by Cora, again. This was a PTU kit last year, which she is now offering as a FTU. So I thought I'd take advantage of that for you! This one is called Just My Luck. Be sure to thank her! Leave a little love for the freebie!
Supplies: Okay, in the file, found here, you will find a mug of green beer, a mug of regular beer, some word art, and my favorite mask. I don't know anything about the mugs of beer nor the mask. BUT! The word art was done by Melissa, of Sentimental Style. Back when I got this particular word art, she was "Scrappy Expressions," and I can't find anything that old on this blog. She's also seemingly lost her mojo (and her PC), which is a shame. But I thank you SO much, Melissa, for all the enjoyment you've given me over the years!!
Filters: Eye Candy 4000 > Gradient Glow
Font: I used Brahn Mufun.
The map I got from iStock Photo. This will cost money, to get this particular map. I used to be at StockXpert.com, but they closed up and transferred my credits to iStock Photo. If you go for it, I'll make your search easier than mine was - whew! The image is called "Mid-Victorian map of Ireland." Good luck!
Now, let's try this, shall we??!
Open your supplies in PSP and minimize. Alternatively, you could place them in your PSP folders for future use.
Open a new canvas, 750 x 700, white.
Open irish-ale. Resize 200%. Adjust > Sharpness > Sharpen. Copy and paste as a new layer. Position where you think this will go. I moved stuff all over in this one, so just put it someplace! LOL! Drop shadow.
Add your tube. Resize, position and drop shadow to your taste.
Open pot-o-gold. Resize 250%. Adjust > Sharpness > Sharpen. Copy and paste as a new layer. Position this wherever you'd like it. Drop shadow.
Open Rainbow. Copy and paste as a new layer. In your layer palette, drag this down so it will be behind both your tube and your pot of gold, and position it so that it appears to end at the gold, like the legend says.
Open both the beer mugs that came in the supplies. Resize them both 50%. Mirror one of them. Place them where you'd like them on your tag. Drop shadow both.
Open the word art included with the suppies. Resize 85%. Copy and paste as a new layer. I gave this a gradient glow of 5-0-100 in white. Then I drop shadowed both directions set at 3, the opacity at 40 and the blur also at 3.
Highlight your white background layer.
Open pp10. Resize to 750x700 pixels. Copy and paste as a new layer.
Apply your mask. Delete the mask layer, answer "yes" to the pop-up question, and merge group.
Now, apply your mask again on the same layer. Delete, answer, and merge.
If you were able to locate a map of Ireland or something like it, this is where you'll copy and paste it as a new layer. This should be just above the paper layer.
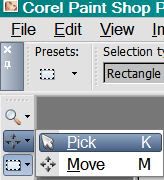
Grab your pick tool
And pull the top, bottom and sides until you have the map filling your entire canvas as you'd like it to.
Apply your mask to this layer, as well. Twice!
Go to the top layer and add your name. I used color #04561e as the fill and black as the stroke. Stroke set at 1.
I added the following bevel:
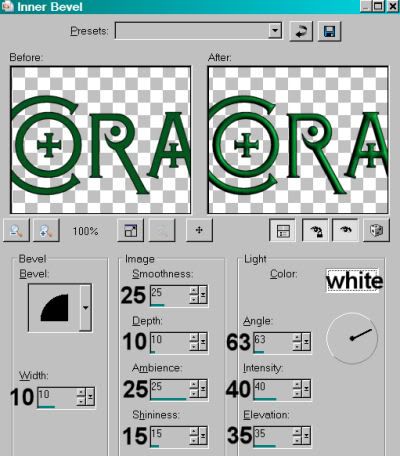
Hit okay.
Effects > Plug-ins > Eye Candy 4000 > Gradient Glow set at 3-0-100, color white.
Drop shadow your name.
Resize your canvas to a size with which you're comfortable.
Add your copyright, license information if applicable, and taggers'/watermark.
Layers > Merge > and save! We are done!
And there it is! Another finished tag! I hope you liked this tutorial, and I thank you SO much for choosing to work with it!!
.


No comments:
Post a Comment