

This is just a guideline, and I know not everyone is going to be using the same tube... so use your imagination as you go! Any similarities between this tut and any others you may see are purely coincidental.
You will also need:
Animation Shop. This is from now a pay-for product, through Corel. That changed a while ago. I don't know why!!
A tube of your choice. I'm using the artwork of Elias Chatzoudis. You will need a license to use his art. That license & art may be found at My PSP Tubes.
The scrap kit is by Bel Vidotti, and is available exclusively at Galeria Free! This kit is called "Sweet Rose" Leave some love for this collaboration of talent!! Lots of free stuff available there!
Filters: Eye Candy 4000 > Gradient Glow, Eye Candy 4000 > Bevel Boss, VM Natural > Sparkle
Font: I used Berthold Script BQ.
Supplies: Just the mask used, which can be found here. This is a Becky Mask. Becky has departed the PSP scene, but I do greatly thank her for her contributions while she was here!
Let's do it!!
Open a new canvas, 750 x 700, white.
Open Elemento64. Resize 50%. Copy and paste as a new layer.
Effects > Plug-ins > Mura's Meister > Copies.
The following actual settings are different than the numbers I've typed in. That's because after starting this tag, I decided that the resulting frame should be rotated 90° either way. This could be done more easily by just using different settings in Copies. So, the settings you should use to get the up-and-down frame are typed in by me:
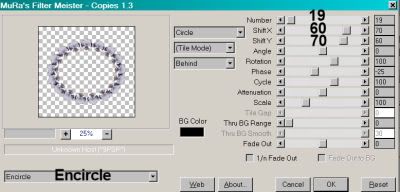
Hit okay.
Add your tube. Resize, position, and drop shadow to your taste.
I didn't want all of the bottom of my tube to disappear, and it was made so intricately that I couldn't, without much time and patience, get the exact result I wanted. So I opted for this. If you want to get a feathered out look on the bottom of your tube, then grab your lasso tool, set on freehand, feather 15, and draw a smile-looking freehand selection at the bottom of your tube.
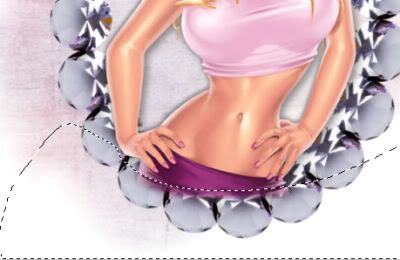
I had to do this about five times to get it right for me. Hit delete. Selections > Select None.
Highlight your white background layer.
Open Papel10. Resize to 750 x 700 pixels. Copy and paste as a new layer.
Apply your mask. Delete mask layer, answer "yes" to the pop-up question, and merge group.
Now, I had problems, also, with this next embellishment!! LOL! So...
Open Elemento14. Resize 50%. Copy and paste as a new layer. Resize again, 85%. And again, 95%. There! In your layer palette, drag this below your mask layer.
I did the following on the top layer. I find it easier to do this way.
Open Elemento30. Resize 57%. Copy and paste as a new layer. Rotate left 45°. Move this up a bit on your canvas. Position where you'd like it. Duplicate this layer. Image > Mirror. Image > Flip. Position this layer lower than middle. Position where you'd like it. See my example for placement reference, if you'd like. Merge these two layers down.
Add the following bevel to these beads:
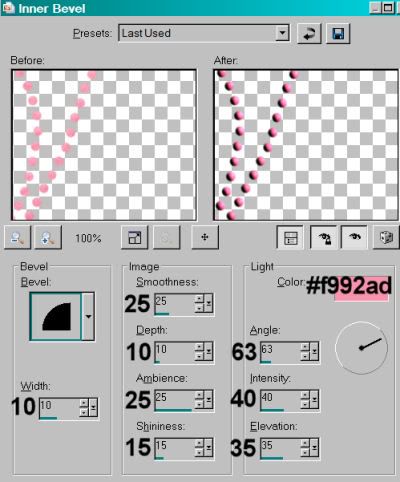
Hit okay.
Add a small drop shadow. In your layer palette, this layer should be above your mask.
Open Elemento04. Resize 15%. Copy and paste as a new layer. Position where you'd like it on your tag. I chose the bottom right area of the canvas. See my example for placement reference, if you like. Drop shadow this rose.
Open Elemento02. Resize 10%. Copy and paste as a new layer. Position this somehow in combination with the previous rose. Drop shadow.
Open Elemento12. Resize 7%. Copy and paste as a new layer. Position this to the right side, but below the first rose. Drop shadow. Duplicate this layer and Image > Mirror. Bring this one back to the second rose, on its left side, and below. You can merge these two layers down if you like.
Open Elemento57. Resize 10%. Copy and paste as a new layer. Position where you'd like it. I had it a few places, until I decided to put it just above the first rose. You choose your place! Drop shadow your butterfly.
Be sure you're on the top and add your name. I used color #f5cbdd as the fill and stroke, stroke set at 1.5.
Effects > Plug-ins > Eye Candy 4000 > Bevel Boss with the following setting:
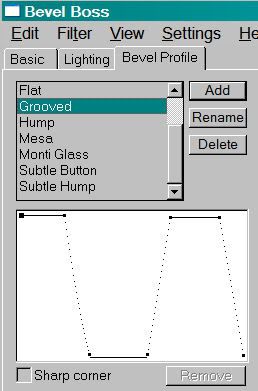
Hit okay.
Now this is the only setting I played with in Bevel Boss. Perhaps you have different settings elsewhere on yours, I don't know. But this is, like I said, the only thing I set on mine.
Effects > Plug-ins > Eye Candy 4000 > Gradient Glow set on 4-0-100, color #772a5f.
Drop shadow your name. Arrange your name as you'd like it.
Resize your canvas to a size with which you are comfortable.
Add your copyright, license information if applicable, and taggers'/watermark.
If you choose not to animate, you're now done, and you can merge your layers and save!
A N I M A T I O N
Highlight your Elemento64 layer (the frame we made in Copies). Duplicate this layer twice, for a total of three frame layers.
Now highlight your bottom frame layer.
I suspect this next filter does not re-adjust itself back to any default settings between uses. This first setting could just be what I last used, I don't know. So I'm not sure if it's important which settings your start with first. lol.
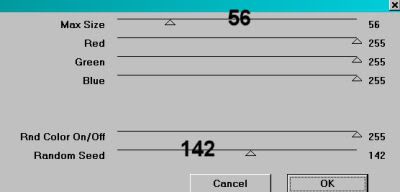
Effects > Plug-ins > VM Natural > Sparkle with the following settings:
Hit okay.
Highlight your middle frame layer.
Add Sparkle again, this time moving your "size" and "random" seed settings to something different.
Highlight the top frame layer.
Add Sparkle once more, again moving the "size" and "random seed" settings to something different.
Hit okay.
Now, with Sparkle, I always (yes, always) go back and repeat on all three layers, so I'll get more sparkle. So go back to the bottom and start all over again, applying Sparkle to all three layers and changing the settings (blindly lol) as you go.
Close out your top two frame layers, leaving the bottom frame layer open.
Edit > Copy Merged.
Open Animation Shop. Right-click on the desktop area and paste as a new animation.
Return to PSP. Close out your bottom frame layer, and open the middle layer.
Edit > Copy merged.
Back to Animation Shop. Edit > Paste > After Current Frame.
Return again to PSP. Close out the middle frame layer, and open the top frame layer.
Edit > Copy merged.
Again, back to Animation Shop. Edit > Paste > After Current Frame.
Edit > Select All.
Right click on the top bar of your animation, and choose "Frame Properties." Change this number to 30.
View > Animation.
There you go! Another completed tag! I do hope your sparkles came out right the first time!! And as always, I hope you enjoyed it. I'd love to see your results! Or to hear from you in my shout box! Thank you for doing my tut, and have a lovely rest of your day!
.


No comments:
Post a Comment