
This is just a guideline, and I know not everyone is going to be using the same tube... so use your imagination as you go! Any similarities between this tut and any others you may see are purely coincidental.
You will also need:
Animation Shop. This is from CNET, so it's a safe download. However, it costs. That changed a bit ago. I don't know why!!
A tube of your choice. I'm using the artwork of Bam Bam. You must have a license to use his work. You can get that license and art at My PSP Tubes.
The scrap kit is once again by the very talented and prolific Sylvie, of Fantasy Moments. This is a FTU kit called "St. Patty." Leave a "thank you" for her where it has room for comments!!
Filters: Eye Candy 4000 > Gradient Glow
Font: I used Script-P720-Swashes.
Supplies: May be found here. This includes the mask, which appears to have been made by the wonderful Sugar. She was quite prolific in her PSP days, but disappeared about two years ago. I hope you're doing well, Sugar, and know you are missed! The bling is also supplied in this file. This was done by Roberta. Roberta almost started the bling fling single-handedly! But it was soon taken up by many more. I don't know where Roberta's gone, but she, also, is truly missed. Thank you, legendary ladies, for sharing your talent with us while you were around!!
Okay, here we go!
Open your mask and minimize in PSP. Alternatively, you could save it in with those already in your masks file, for use at a later date! Put Roberta's bling where it will be handy when you get into Animation Shop.
Open a new canvas, 800 x 700, white.
Open Element-78. Resize 90%. Copy and paste as a new layer. Position to your liking. Mine is on the right portion of the canvas. See my example for placement reference.
Open Element-50. Resize 87%. Copy and paste as a new layer. Position directly over the previous frame.
Merge the two frame layers down.
Add your tube. Resize, position, and drop shadow to your taste.
Highlight your frames layer. Grab your magic wand and click inside the frames. Selections > Modify > Expand by 1. Selections > Invert.
Highlight your tube layer.
Grab your eraser brush and erase any part of your tube that you don't want overlapping the sides and/or the bottom of your frames.
Selections > Select None.
Drop shadow your frames layer.
Open Element-54. Resize 57%. Copy and paste as a new layer. Position as you'd like it. Mine is on the left portion of the canvas. See my example for placement reference. Drop shadow.
Open Element-72. Resize 20%. Copy and paste as a new layer. Position at the very top of the hanger that holds the banner. Drop shadow.
Open Element-44. Resize 50%. Copy and paste as a new layer. Position kind-of between the frames and the banner, toward the middle of the canvas. Drop shadow.
Open Element-19. Resize 50%. Copy and paste as a new layer. Position close to the green pot o' gold, in the front. See my example for placement reference. Drop shadow.
Open Element-60. Resize 35%. Copy and paste as a new layer. Rotate 25° right. Position in the front. Drop shadow.
Highlight your white background layer.
Open Paper-18. Resize to 800x700 pixels. Copy and paste as a new layer.
Apply your mask. Delete the mask layer, answer "yes" to the pop-up question, and merge group.
Go back to the top and add your name. I used color #007d00 as the fill and the stroke, stroke set on 2.
Effects > Plug-ins > Eye Candy 4000 > Gradient Glow set on 3-0-100, color black.
I added the following bevel:
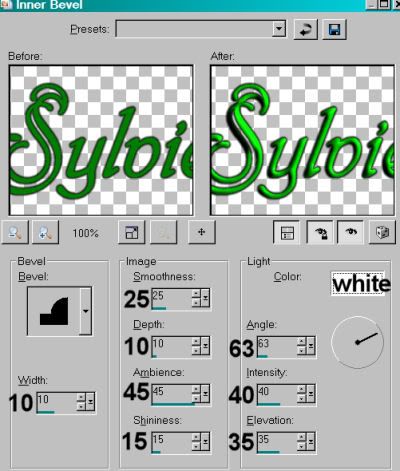
Hit okay.
Drop shadow your name.
Resize your canvas to a size with which you are comfortable.
Add your copyright, license information if applicable, and taggers'/watermark.
If you choose not to animate, you're now done, and you can merge your layers and save!
A N I M A T I O N
Layers > View > None.
Open the bottom two layers. This should be your mask layer and the white background layer.
Edit > Copy Merged.
Open Animation Shop. Right-click on the desktop area, and paste as a new animation.
Duplicate this frame until you have a total of 21 frames.
Drag your slider on the bottom back to the first frame.
Locate and open the shamrock bling I included in the supplies. Delete frame 1 (this should be the black frame). You should now have 21 frames.
Edit > Select All.
Animation > Reverse Frames.
Edit > Select All. Edit > Copy.
Return to the white & green animation you have just built.
Edit > Select All. Edit > Paste > Into Selected frame.
Hover your mouse until you have the shamrock placed where you'd like it. This is a tricky thing here. I had to do it about four or five times, undoing the paste and redoing the paste until I had it where I wanted it. When you find it, HOORAY!!
Return back to PSP.
Layers > View > All.
Close out the mask and white background layers.
Edit > Copy Merged.
Return to Animation Shop. Right-click on the desktop area, and paste as a new animation.
Duplicate this frame until you have a total of 21 frames.
Drag your slider on the bottom back to the first frame.
Edit > Select All. Edit > Copy.
Return back to the main animation, where you've just pasted your shamrock bling.
Edit > Select All. Edit > Paste Into Selected Frame.
Hover your mouse until you have your tag situated just right. Then release your mouse button.
View > Animation.
If you don't like the placement of your bling, you can Edit > Undo and then redo until placed to your liking.
Et, voila! We're done! I hope you're happy with your results! And thanks for stopping by!
.


No comments:
Post a Comment