
You will also need:
Animation Shop - I've found it here! This is from CNET, so it's a safe download, too!
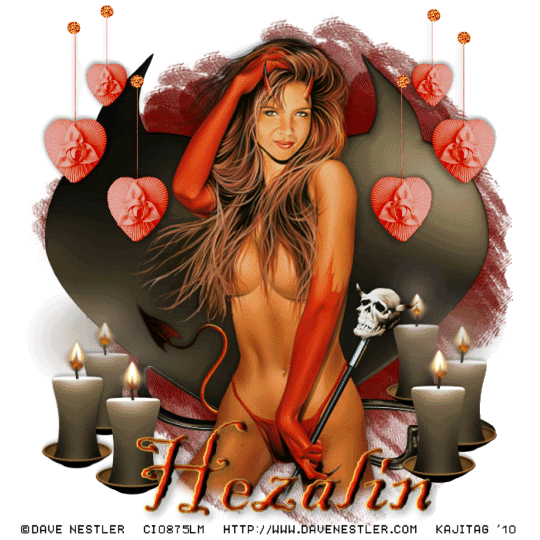
A tube of your choice. I'm using the great artwork of Dave Nestler. You must have a license to use his work. You may purchase that license at C.I.L.M.
Scrap kit is by Hezalin, of HezaScraps. It's a FTU kit, and is is called Dark Cravings. This is but one part of a blog train, so feel free to get more parts if you like! And be sure to leave some love if you download this great kit!
Filters: Alien Skin Eye Candy 5 > Impact > Bevel, Eye Candy 4000 > Fire, dsb Flux > Bright Noise
Font: I used Blackadder ITC.
Supplies: These include the mask and the little red sparkly dot. The mask is by Ali, from Dezigns by Ali. Thank you so much, Ali!! The dot is labeled, but I could not find "Inc or "lnc" through search engines that had anything to do with scraps, so if you know whose it is, please let me know so that I can give proper credit! Thank you ladies!! You can find the supplies here!
Okay now, let's try this, shall we??
Open your mask and "diamond" in PSP and minimize. Alternatively, you can load them into the PSP files where you keep such things for use at a later date. :)
Open a new image, 700 x 700, white.
Open Devil Heart 2. Copy and paste as a new layer. Resize 115%.
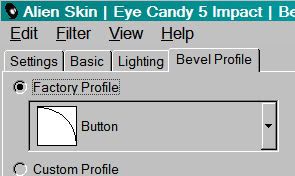
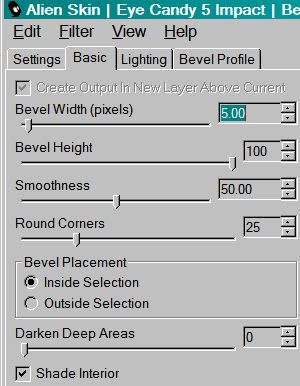
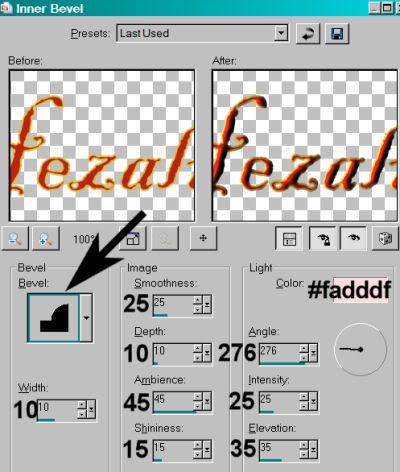
Effects > Plug-ins > Alien Skin Eye Candy 5 > Impact > Bevel with the following series of settings....
Profile:
Lighting:

Basic:
Hit okay.
Add your tube. Resize, position and drop shadow to your liking.
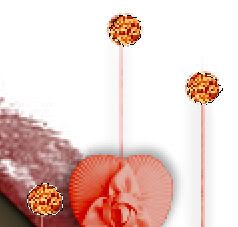
Open Heart Decoration. Resize 50%. Copy and paste as a new layer. Position on one or the other side of your canvas, however you'd like them to be. Duplicate this layer. Image > Mirror. Merge these two layers down. Drop shadow.
Adjust > Hue and Saturation > Colorize these hearts as below:
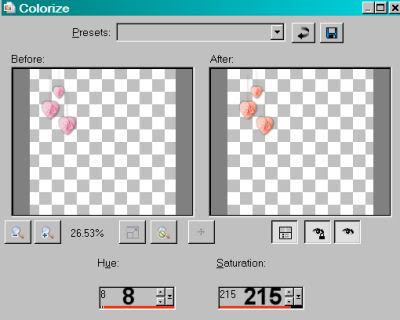
Hit okay.
Now, Adjust > Brightness and Contrast > Brightness/Contrast with these settings.

Hit okay.
Do take into consideration that I colorized and darkened these hearts to go with the tube I've used. Your tube may not have the same colorization as mine. Do what you feel is best for your tag.
Grab your lasso tool, set on freehand, and feather set on 17. Draw a small curve over the top of the strings "holding" these hearts, so they won't just disappear into the edge of your canvas. Hit delete. Selections > Select none.
Open the "diamond" included in the supplies I provided. Copy and paste as a new layer. Position this over the top of one of the strings holding the heart decorations. Repeat this for all six of the strings. Merge these layers down with the heart decorations layers. You should have one layer for all these items.
Open Candle 1. Resize 50%. Copy and paste as a new layer. Position where you'd like it. Duplicate this layer and resize by 90%. Position this where you'd like it, making a cluster of candles sitting together. Duplicate the original candle 1 layer again. Resize 80%. Position this in the cluster as well. Drop shadow all three candles. Merge these three layers down.
If you're using a tube that's in the middle of the tag, as I did, duplicate that candle layer and Image > Mirror. Position them as you like them. Then merge those two layers down.
Highlight your white background layer. Open Paper 4. Resize to 700x700 pixels. Copy and paste as a new layer.
Apply your mask. Delete mask layer, answer "yes" to the pop-up question, and merge group.
Go back to the top and add your name. I used color#b8250d as the fill, and #dfc146 as the stroke, stroke set at 2.
I added the following bevel:
Hit okay.
Drop shadow your name. Position as desired.
Resize your tag to a size with which you're most comfortable.
Add your copyright, license information if applicable and taggers'/watermark.
If you choose not to animate, at this point you could stop!!! Just merge your layers and save!
A N I M A T I O N
I applied the Bright Noise animation to the round "diamonds" on the top of the strings on the heart decorations. It's VERY VERY subtle. To the point of being unseen. I'm going to include those instructions, but seeing as how it's barely there, you may just decide not to do it.
I'm also going to explain the candles flickering, so there will be two types of animation here. Please bear with me!
Diamonds:
Zoom your canvas quite big, to make this easier to do.
Highlight your layer with all the "diamonds" on top of the heart strings.
Grab your lasso tool, set on point-to-point, feather set back to zero. Draw a selection around each of the diamonds. All 6!
Zoom out.
Duplicate this layer twice, for a total of three diamond layers.
Selections > Select None.
Highlight the bottom diamond layer.
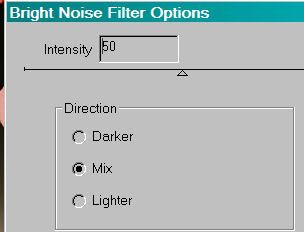
Effects > Plug-ins > dsb Flux > Bright Noise with the following settings:
Hit okay.
Highlight the middle diamond layer.
Add Bright Noise again, this time hitting "Mix" once or twice.
Hit okay.
Highlight the top diamond layer.
Add Bright Noise again, and again, hit "Mix" once or twice.
Hit okay.
Close out the top two diamond layers, leaving the bottom layer open.
Candles:
Highlight your candles layer.
Again, zoom your canvas quite big, to make this easier to do.
Grab your lasso tool, set on point-to-point, feather still set at zero. Draw a selection around each of the flames. Again, all 6!
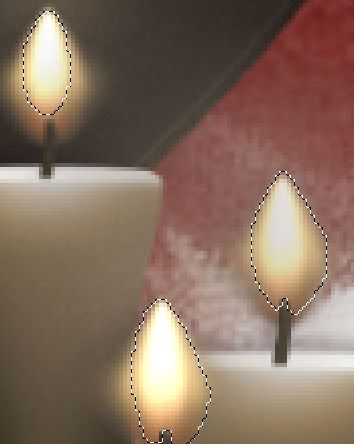
When done, zoom back out. Duplicate the candle layers twice, for a total of three candles layers.
Selections > Select None.
Highlight the bottom candles layer.
Effects > Plug-ins > Eye Candy 4000 > Fire using the flicker setting:
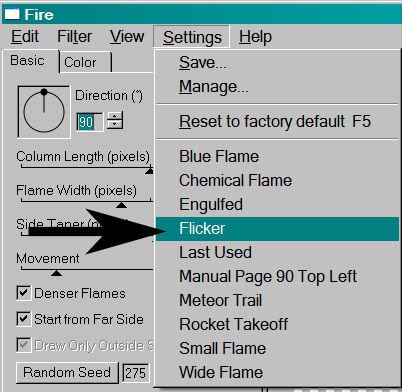
Hit okay.
Highlight your middle candles layer.
Add Fire again, this time hitting "Random Seed."
Hit okay.
Highlight your top candles layer.
Once more, add Fire, again hitting "Random Seed."
Close out the top two candles layers, leaving the bottom layer open.
Edit > Copy merged
Open Animation Shop, right-click on the desktop area, and paste as a new animation.
Return to PSP. Close out the bottom layers of both the candles and the diamonds. Open up the middle layers of both.
Edit > Copy merged.
Return to Animation Shop. Edit > Paste > After Current Frame.
Back to PSP again. Close out the middle layers of each group, and open the top layers.
Edit > Copy merged.
Finally, back to Animation Shop. Edit > Paste > After Current Frame.
Edit > Select All.
Right-click on the top bar of your animation, choose "Frame Properties," and change this number to 27.
View > Animation. And you're done! I hope you've enjoyed this tutorial! Thanks for stopping by!
.


No comments:
Post a Comment