
This is just a guideline, and I know not everyone is going to be using the same tube... so use your imagination as you go! Any similarities between this tut and any others you may see are purely coincidental.
You will also need:
Animation Shop. This is from now a pay-for product, through Corel. That changed a while ago. I don't know why!!
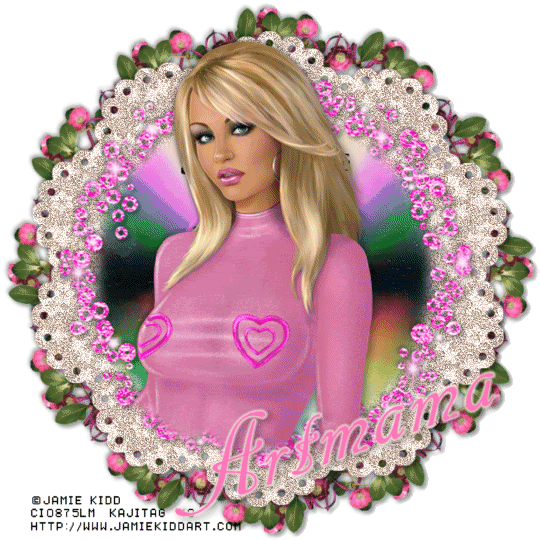
A tube of your choice. I'm using the artwork of Jamie Kidd. You must have a license to use her work. You can get that license and art at C.I.L.M.
The scrap kit is by Artmama. This is a FTU kit called "Pour Some Sugar On Me." As always, be sure to leave her some love for making freebies for us!!
Filters: Mura's Meister > Copies, Eye Candy 4000 > Gradient Glow, dsb Flux > Bright Noise
Font: I used Cancellaresca Script LET Plain:1.0.
Supplies: No outside supplies for this tut!!
Let's do it to it!!
Open a new canvas, 700 x 700, white.
Open embellie 18. Copy and paste as a new layer. Drop shadow.
Add your tube. Resize, position, and drop shadow to your taste.
Highlight your white background layer.
Open embellie 67. Resize by 90%. Copy and paste as a new layer. Drop shadow.
Open embellie 26. Resize by 35%. Copy and paste as a new layer.
Effects > Plug-ins > Mura's Meister > Copies with the following settings:
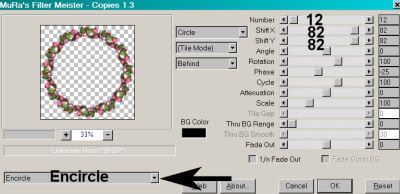
Hit okay. Drop shadow. Drag this layer down so it's the bottom layer (above the white background layer).
Open embellie 43. Resize 120%. Copy and paste as a new layer. This layer should be below your pink flowery frame layer (embellie 18).
I found this next part easiest to do by closing the tube layer first.
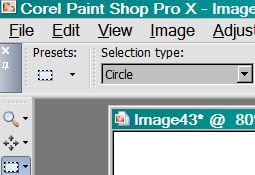
Grab your selection tool, set on Circle.
Set your feather setting to 17. Center your cursor in the middle of your CD layer (embellie 43). Draw a circle selection to just before it hits the edge of your CD layer.
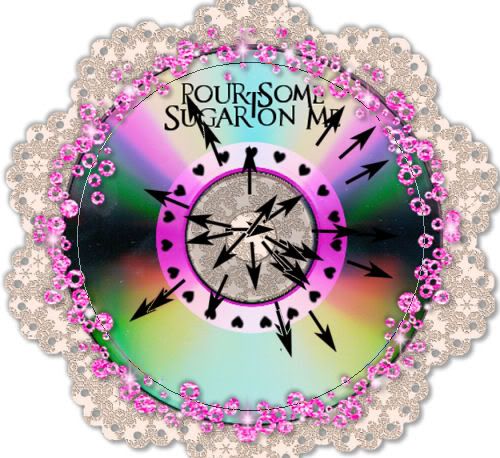
Selections > Invert.
Highlight your CD layer. Hit delete. Selections > Select None.
Re-open your tube layer.
Highlight your embellie 18 layer (the flowery frame layer - first item we put on the canvas). Since we've already given this layer a drop shadow, we'll have to play with the selections again.
Grab your magic wand (make sure you keep feather at 17) and click inside the frame area.
Selections > Invert. Selections > Contract by 35.
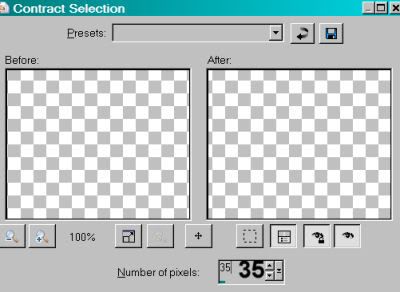
Hit okay. Your canvas should look something like this:
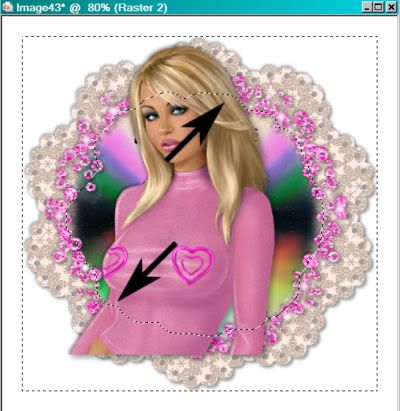
Highlight your tube layer. Grab your eraser brush, and erase any portion of your tube that you don't want showing below the frame area. Selections > Select None.
Go back to the top and add your name. I used color #fa788a as the fill and stroke, stroke set on 2.
Effects > Eye Candy 4000 > Gradient Glow set on 4-0-100, color #fceae0.
Drop shadow your name. I rotated mine 20° to the left. Arrange your name as you'd like it.
Resize your canvas to a size with which you are comfortable.
Add your copyright, license information if applicable, and taggers'/watermark.
If you choose not to animate, you're now done, and you can merge your layers and save!
A N I M A T I O N
Highlight your embellie 67 layer. Duplicate this layer twice, for a total of three embellie 67 layers.
Now highlight your bottom embellie 67 layer.
Effects > Plug-ins > dsb Flux > Bright Noise with the following settings:
Hit okay.
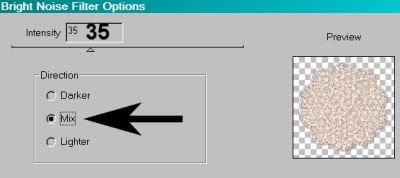
Highlight your middle embellie 67 layer.
Add Bright Noise again, this time hitting "Mix" a couple times.
Hit okay.
Highlight your top embellie 67 layer.
Add Bright Noise once more, hitting "Mix" again, about three times..
Close out your top two embellie 67 layers, leaving the bottom layer open.
Edit > Copy Merged.
Open Animation Shop. Right-click on the desktop area and paste as a new animation.
Return to PSP. Close out your bottom embellie 67 layer, and open the middle layer.
Edit > Copy merged.
Back to Animation Shop. Edit > Paste > After Current Frame.
Return again to PSP. Close out your middle embellie 67 layer, and open your top embellie 67 layer.
Edit > Copy merged.
Again, back to Animation Shop. Edit > Paste > After Current Frame.
View > Animation.
And there you are, done with another tag!! Thanks so much for trying one of my tuts! I appreciate it! Leave a shout out if you feel so inclined!
.


No comments:
Post a Comment