
This is just a guideline, and I know not everyone is going to be using the same tube... so use your imagination as you go! Any similarities between this tut and any others you may see are purely coincidental.
You will also need:
Animation Shop. This is from now a pay-for product, through Corel. That changed a while ago. I don't know why!!
A tube of your choice. I'm using the artwork of Scott Blair. You will need a license to use his art. That license & art may be found at My PSP Tubes.
The scrap kit is by Artmama, of Artmama's Studio. This is a FTU kit, called Feeling Lucky. This is part of a blog train, so go ahead and pick up more if you're feeling like it. But be SURE to leave Artmama some love!!
Filters: Eye Candy 4000 > Gradient Glow
Font: I used CelticMD.
Supplies: NO outside supplies used in this tutorial!
Let's do it!! This one turned out a bit differently for me. I'm not sure I like it. But let's get it done!
Open a new canvas, 700 x 700, white.
Open embellie 29. (This is the background.) Copy and paste as a new layer. Give it a small drop shadow.
Add your tube. Resize, position, and drop shadow to your taste.
Open embellie 13. Copy and paste as a new layer. Position where you'd like it, in relation to your tube's placement. I duplicated this twice, to get it darker. Merged those layers down. Then resized 110%. Give this a slight drop shadow as well.
Open embellie 01. Copy and paste as a new layer. Rotate 25° left. Drop shadow.
Open embellie 05. Copy and paste as a new layer. Position as you'd like it. Drop shadow.
Open embellie 33. Copy and paste as a new layer. Resize 120%. If you're following all my placements, then place this in the middle, but more to the left, so the left arm of the cross is *just* overlapping the embellie 01.
Duplicate this layer. In the layer palette, drag this layer below the embellie 01 layer. Drop shadow.
Now, go to the top clover/cross (embellie 33) layer. Grab your selection tool and crop off the bottom of the cross. This is to make it look like the left arm of the clover/cross is above the patch, for lack of a better term, and the bottom of it is below. Gosh, I hope I'm explaining this right!
Go back to the top and add your name. I used color #458237 as the fill, and black as the stroke, stroke set at 1.
Effects > Plug-ins > Eye Candy 4000 > Gradient Glow set on 4-0-100, color #c0c0c0.
Drop shadow your name. Arrange your name as you'd like it.
Resize your canvas to a size with which you are comfortable.
Add your copyright, license information if applicable, and taggers'/watermark.
If you choose not to animate, you're now done, and you can merge your layers and save!
A N I M A T I O N
Highlight your embellie 29 layer (the background). Duplicate this layer twice, for a total of three embellie 29 layers.
Now highlight your bottom embellie 29 layer.
Adjust > Add/Remove Noise > Add Noise with the following settings:
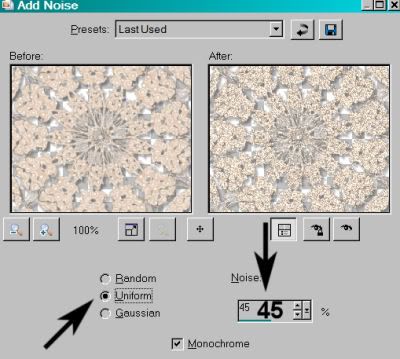
Hit okay.
Highlight the middle embellie 29 layer.
Add Noise again, this time changing the setting to 50.
Hit okay.
Highlight the top embellie 29 layer.
Add Noise once more, this time changing the setting to 40.
Hit okay.
Close out your top two embellie 29 layers, leaving the bottom layer open.
Edit > Copy Merged.
Open Animation Shop. Right-click on the desktop area and paste as a new animation.
Return to PSP. Close out your bottom embellie 29 layer, and open the middle layer.
Edit > Copy merged.
Back to Animation Shop. Edit > Paste > After Current Frame.
Return again to PSP. Close out the middle embellie 29 layer, and open the top embellie 29 layer.
Edit > Copy merged.
Again, back to Animation Shop. Edit > Paste > After Current Frame.
View > Animation.
There you go! Another completed tag! I hope you enjoyed it. I'd love to see your results! Or to hear from you in my shout box! Thank you for doing my tut, and have a lovely rest of your day!
.


No comments:
Post a Comment