
You will also need:
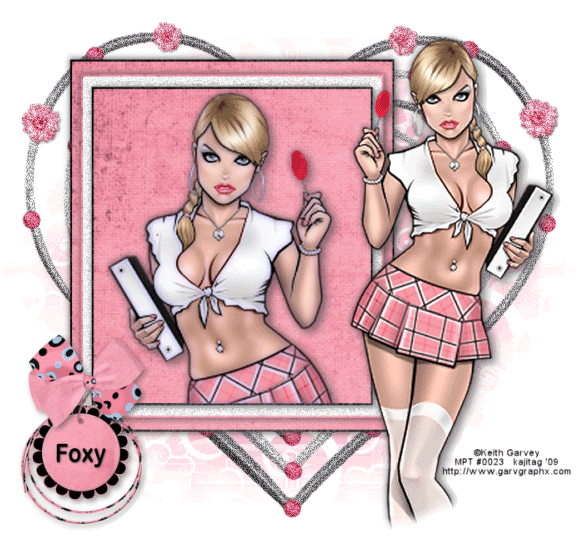
Tube of your choice. I've chosen to use the fantastic artwork of Keith Garvey. You must have a license to use his work. You may purchase that license at My PSP Tubes.
Animation Shop - at this time, I'm not sure where you can get this program, if you don't already have it. You may, however, save the tut as a static (non-animated) image if you like.
Scrap kit (FTU!!) is by Foxy, of Foxys Designz. Again, it's a FTU kit called Pink Struck. Foxy offered this FTU kit as a celebration of her birthday yesterday!! Leave her some LUURVE!!!
Filters: DSB Flux > Bright Noise, Xero > Porcelain
Font: I used Arial Rounded MT Bold
Supplies: The mask, sg_beaded-glass-edge. You can find this here. The mask was made by Essex Girl. She has a LOT of wonderful masks there to choose from, so take a look! Thank you, Essex Girl, for sharing your talent with the PSP community!
Okay, let's go for it!! :)
Open your mask in PSP and minimize, or load it into your PSP masks file.
Open new image, 700 x 650, white.
Open Paper12. Copy and paste as new layer.
Apply your mask. Delete mask layer. Answer "yes" to pop-up questions and merge group.
Open WireHeart1. Copy and paste as new layer. Resize 125%.
Now, open a new image, 600 x 600, transparent.
Using your Paper2 as foreground and Paper4 as background, select your preset shape tool set to rectangle.
Using a width of 3 on your foreground color, draw out a box that's a bit taller than it is wide. See my tag for reference. Objects > Align > Center in canvas. Convert to raster layer.
Change your foreground to your pink paper and your background to white. Highlight a layer below your original box. Draw out another box that is just a tad bit larger than your first. Maybe ¼ inch or so. Objects > Align > Center in canvas. Convert to raster layer.
Now change back to your foreground being your black paper and your background being the pink. Again highlighting a layer below your last box, draw another box, about ¼ inch bigger than the previous. Objects > Align > Center in canvas. Convert to raster layer.
Drop shadow each box layer. Edit > Copy merged
Paste onto canvas as new layer, toward the left side of the canvas.
Add your tube of choice. Position and drop shadow. If you have a partial-bodied tube as I used (this didn't start out that way, but I arranged it in this tag to be so), soften the bottom edge by doing the following:
Highlight the tube layer. Grab your lasso tool with feather set at 17. Draw a curve that looks somewhat like a "smile" at the bottom area of your tube. Hit delete a couple of times. Selections > Select none.
I then resized and mirrored the tube I used, and pasted it over the colored boxes I made. Drop shadow the new tube. Highlight your box layer. Take your magic wand (making sure the feather is set at zero!) and click inside the middle box.
Highlight your tube layer and Selections > Invert. Hit delete. Selections > Select none.
Apply Xero Porcelain with default settings.
Open Tag2. Put your name onto the tag. Objects > Align > Center in canvas. I used the nodes to make the font a bit taller. Convert to raster layer. Drop shadow your name.
Resize ALL LAYERS CHECKED 35%. Edit > Copy merged
Paste onto your working canvas. Place on the bottom left corner of your boxes. Drop shadow.
Open your Bow2. Resize 30%. Copy and paste as new layer. Place over the strings of the tag. Drop shadow your bow.
Now, we're going to animate. I'm doing two animations again. I hope these are easy enough for you to understand!
Duplicate your WireHeart1 layer twice, for a total of three layers.
Grab your magic wand and click, on your boxes layer, into the white box area. Duplicate the box layer twice for a total of three layers.
Highlight your bottom box layer and Adjust > Add/Remove Noise > Add Noise with the following settings:
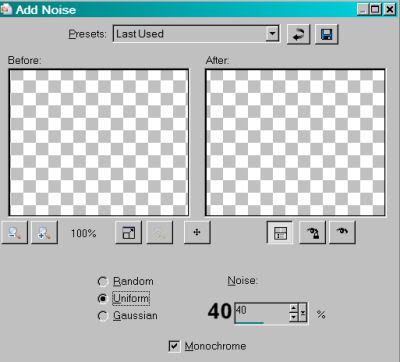
Hit okay.
Highlight your bottom WireHeart1 layer and apply the same noise. Hit okay.
Now highlight your middle WireHeart1 layer and re-apply the noise, changing the "Noise" setting to 45. Hit okay.
Highlight your middle boxes layer and apply the same noise. Hit okay.
And now, highlight the top boxes layer and apply noise, this time with the setting on 50. Hit okay.
Go to your top WireHeart1 layer and add the same noise. Hit okay.
Now, close out the top two layers of each element: the boxes layers and the WireHeart1 layers, leaving the bottom layer of each open.
Add your copyright, license information if applicable, and taggers'/watermark.
Resize your tag to taste.
Edit > Copy merged
Open Animation Shop. Right-click your desktop area and paste as new animation.
Return to PSP and close out the bottom layer for both your WireHeart1 and your boxes. Open the middle layers.
Edit > Copy merged
Return to Animation Shop and Edit > Paste > After current frame.
Back to PSP. Close out the middle layer for both your WireHeart1 and your boxes. Open the top layers.
Edit > Copy merged
And, return again to Animation Shop. Edit > Paste > After current frame.
View > Animation. Et, voila! We are done! I hope this was easy to follow, and that you enjoyed your time. Have a great rest of your day!
.


No comments:
Post a Comment