
You will also need:
Two tubes of your choice by the same artist. I'm using the intricate artwork of Maxine Gadd. You must have a license to use her work. You may purchase that license at My PSP Tubes.
Animation Shop - at this time, I'm not sure where you can get this program, if you don't already have it. You may, however, save the tut as a static (non-animated) image if you like.
Scrap kit by Crystal of Scrap It Sassy. It is a PTU kit, called Inspired. It's on sale, but I think the sale may end today (Saturday, February 28, 2009).
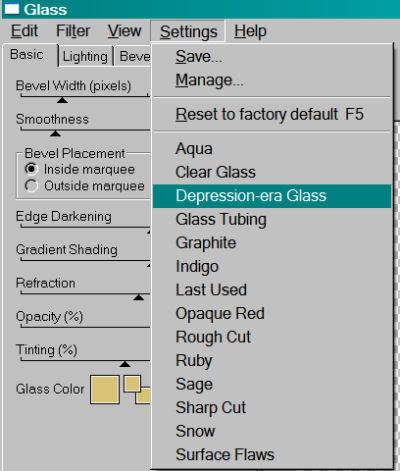
Filters: Eye Candy 4000 > Gradient Glow, Eye Candy 4000 > Glass, VM Natural > Sparkle
Font: I used Fairydust
Supplies: The mask, once again by Essex Girl. I just love her masks!
Let's go!
Open your mask and minimize in PSP. Alternatively, you can save it to your PSP masks file for future use!
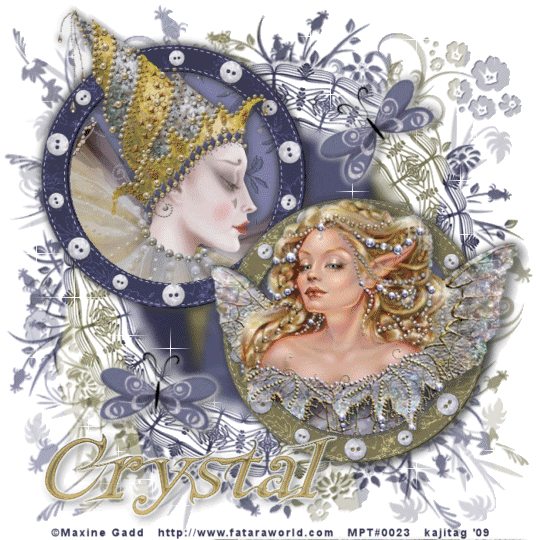
Open a new image, 700 x 700, white.
Open frame1 and frame2. Resize both 70%. Copy and paste as new layers. Position as you like. You can use my example, above, for reference purposes.
Open paper15. Copy and paste as a new layer, below the two frame layers. I lightened it a bit by going Adjust > Brightness and Contrast > Brightness/Contrast with the settings below:
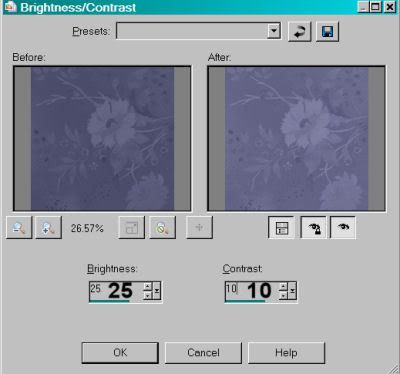
Hit okay.
Highlight one of the frame layers. Grab your magic wand and click inside the frame. Now, highlight the other frame layer and click inside that frame.
Selections > Modify > Expand by 10.
Highlight your paper layer. Selections > Invert and then hit delete. Selections > Select none.
Add your tubes of choice. Resize, position and drop shadow as you like.
To make your tube "emerge" from the frame, once again highlight your frame layer. And once again, click inside the frame with your magic wand. Selections > Invert.
Grab your eraser brush and erase any part of the tube that is hanging over the bottom part of your frame.
Repeat for the second frame.
Now, this is different: Open the paper preview. Resize it to 700 x 700 pixels. Edit > Copy. Highlight your white background layer and paste as new layer.
Apply your mask. Delete the mask layer, answer "yes" to the pop-up question and merge group.
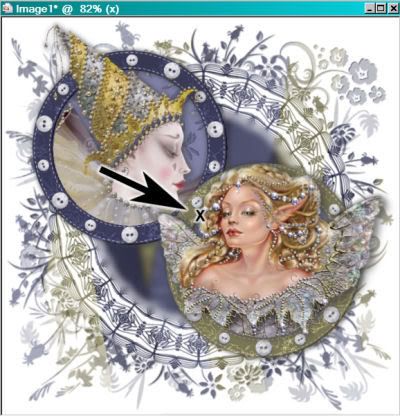
Now, this is also different: Choose your font tool. Pick a font, any font.
Highlight the top layer of your canvas. Type an X in the center of the tag, as a new vector layer. Objects > Align > Center in Canvas. Convert to raster layer.
Grab your selection tool, set on circle.
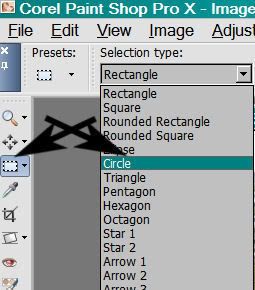
Position your cursor directly over the center of the X that you've just made, and draw out a circle, about the same size as the circle of the mask layer.
Highlight the mask layer. Adjust > Blur > Gaussian Blur set on 5.
Selections > Select none.
Delete your X layer.
Open butterfly. Resize 60%. Place as desired onto your canvas. Rotate to your liking. See my example for reference. Drop shadow.
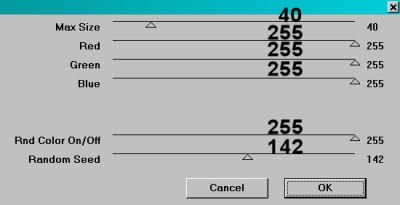
Add your name. I used color #d8c275. I then applied Eye Candy 4000 Glass with the following settings:
I then added a white Gradient Glow, settings of 3 - 0 - 100. Drop shadow your name.
Add your copyright, license information if applicable, and taggers'/watermark.
Resize your tag to your taste. You can save now if you choose not to animate.
A N I M A T I O N
This is just like most of my other animations!
Highlight your mask layer. Duplicate twice, for a total of three layers.
On your bottom mask layer, Effects > Plugins > VM Natural > Sparkle with the following settings:
Hit okay.
Highlight your middle mask layer and apply Sparkle again, this time moving your "Random Seed" slider to any number you like.
Highlight your top mask layer and repeat.
Whenever I do a tag using VM Natural > Sparkle, I apply the effect twice on each layer. So, go back to the bottom mask layer and repeat Sparkle, making sure to move the "Random Seed" slider to a setting you have not yet used.
Do the same on the middle and top mask layers.
Close out the middle and top mask layers, leaving the bottom mask layer open.
Edit > Copy merged
Open Animation Shop. Right-click on the desktop area and paste as a new animation.
Return to PSP. Close out the bottom mask layer and open the middle mask layer.
Edit > Copy merged
Back to Animation Shop. Edit > Paste > After Current Frame
Once more, back to PSP. Close out the middle mask layer and open the top.
Edit > Copy merged
Return to Animation Shop. Edit > Paste > After Current Frame.
Edit > Select All
Right-click on the top bar of your animation and choose "Frame Properties." Change this number to 35.
Save as a .gif and you're done! Thank you for taking on one of my tutorials! Have a great day!
.


Maxine Gadd is one of my favorite artists, and you have set her off beautifully here! Love this! I am also adding all of your tuts to my blog today. :-)
ReplyDeleteHugs!
Crystal