
You will also need:
Tube of your choice. I've chosen to use the erotic artwork of Barbara Jensen. You must have a license to use her work. You may purchase that license at Her web site.
Animation Shop - at this time, I'm not sure where you can get this program, if you don't already have it. You may, however, save the tut as a static (non-animated) image if you like.
Scrap kit by Denise of Scrappy Redhead Designs. It's a PTU kit, called Charity.
I don't know. I'm certainly leading toward a lot of these soft colors, aren't I??
Filters: Eye Candy 4000 Gradient Glow and Alien Skin Eye Candy 5 > Impact > Bevel for the name. The bevel is barely, if at all, discernible, so perhaps you can forego that one@
Font: I used Portfoloio
Supplies: Just the mask, here.
Okay, let's go!
Open your mask in PSP and minimize, or load it into your PSP masks folder.
Open a new image, 700 x 700, white.
Open Paper7. Copy and paste as new layer.
Apply your mask. Delete mask layer, answer "yes" to the pop-up question, and merge group.
Resize your mask layer 115-120%.
Open Frame9. Copy and paste as new layer.
Open Paper1. Copy and paste as a new layer, below the frame.
Highlight your frame layer, grab your magic wand and click inside the frame. Selections > Modify > Expand by 10.
Highlight your Paper1 layer and Selections > Invert. Hit delete. Selections > Select none.
Open the Sun. Copy and paste as new layer. Resize by 150%, then again by 125%. Drop shadow.
Add your tube of choice. Position and drop shadow. If you want it to "emerge," something I seem wont to do lol, then go like this:
Highlight your frame layer, click magic wand in the center. Selections > Invert. Highlight tube layer and grab your eraser brush. Erase the portion of your tube you don't want showing below the bottom part of the frame. In my case, I wanted to keep the fingers of the hand hanging over, so when I had gotten as much as I could with the eraser brush, I went Selections > Select none and grabbed my point-to-point selection tool and drew carefully around the fingers.
Open bow_wrap_1. Resize 65%. Position where you'd like it in reference to the frame and your tube. Again, highlight your frame layer and click in the middle with your magic wand. Selections > Invert. Highlight your bow_wrap_1 layer and hit delete. Selections > Select none. Drop shadow.
After this step, I still wanted the wrist and hand of the tube to show, so I pasted another copy of my tube onto the canvas, over the bow_wrap_1 layer and positioned into place. Then I took my point-to-point selection tool and cut out almost all of the new tube layer, leaving the wrist and fingers in place.
Open flower_1 and flower_4. Resize both 50%. Position on your frame as you like. Drop shadow.
Add your name. I used the color #f6e9d2. Add Eye Candy 4000 Gradient Glow set at 4 - 0 - 100 with a color of #ffc160. I then applied a bevel using Alien Skin Eye Candy 5 > Impact > Bevel with the below settings:
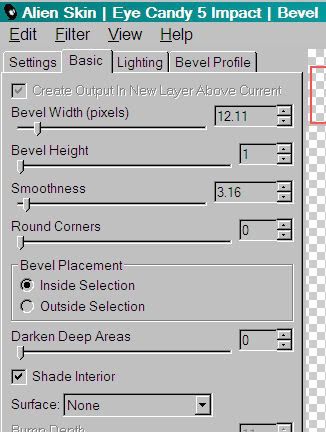
Hit okay.
Drop shadow your name.
Add your copyright, license information if applicable, and tagger's/watermark.
Resize your tag now. You may save at this point, or go on to animate.
A N I M A T I O N
Go to your sun layer. Grab your magic wand and click inside the rays of the sun.
Duplicate this layer twice, for a total of three layers. Yes, you know the drill!
On your bottom sun layer, Adjust > Add/Remove Noise > Add Noise with the following settings:
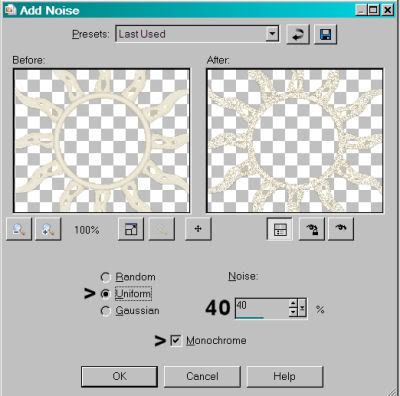
Hit okay.
Highlight the middle Sun layer and add noise again, this time with the noise set at 45. Hit okay.
Highlight the top Sun layer and add noise again, this time with the noise set at 50. Hit okay.
X out the top two Sun layers, and open the bottom.
Edit > Copy merged
Open Animation Shop, right click on the desktop are and paste as a new animation.
Return to PSP. X out the bottom Sun layer and open the middle.
Edit > Copy merged
Back to Animation Shop, Edit > Paste > After current frame
Return again to PSP. X out the middle Sun layer and open the top.
Edit > Copy merged
Finally, back to Animation Shop, Edit > Paste > After current frame.
View > Animation. Et, Voila! Save as .gif and we're done!
Thanks for stopping by, and trying this tutorial. Hope you're having a great day!
.


No comments:
Post a Comment