
You will also need:
Tube of your choice. I'm using the artwork of the talented Carrie Hall. You must have a license to use her work. You may purchase that license at Up Your Art.
Animation Shop - at this time, I'm not sure where you can get this program, if you don't already have it. You may, however, save the tut as a static (non-animated) image if you like.
Scrap kit by Bluey of Bluedream Designs. It's a FTU kit, called Irish Charm.
Filters: Eye Candy 4000 > Gradient Glow, Alien Skin Xenofex 2 > Constellation
Font: I used Celticmd
Supplies: Mask WSL_Mask95, by Chelle at Wee Scots Lass. Click on "Navigate," then "Downloads." Choose the second group of masks in the list to get #95. Thank you Chelle, for sharing your talent with the PSP Community!
Okay, let's go!
Open a new image, 700 x 700, white.
Add new raster layer. Selections > Select All
Open Paper6. Copy and paste INTO SELECTION. Selections > Select none.
Apply your mask. Delete mask layer, answer "yes" to pop-up question, and merge group.
Open Frame 4. Copy and paste as new layer. Drop shadow your frame.
Open Bling Shamrock. Copy and paste as new layer. Drop shadow your bling shamrock.
Add your tube of choice. Position and drop shadow.
Open Pendant2. Copy and paste as new layer. I positioned mine on the left side of the frame. Drop shadow your pendant.
Open your Label. Copy and paste as new layer. Position as desired and drop shadow. See my tag for reference.
Add your name. I used color #e1e8d7 with a .5 stroke in color #2b4e1a. I also added an inner bevel with the following settings:
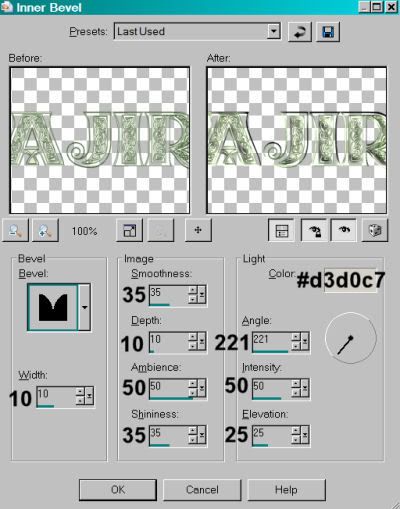
Hit okay. I then used Eye Candy 4000 > Gradient Glow with settings at 4 - 0 - 100, color #e1e8d7. Hit okay. Drop shadow your name.
Add your copyright, license information if applicable, and taggers'/watermark.
Resize your tag to the size you're comfortable with. You may save now if you don't wish to animate. If not, here we go!
A N I M A T I O N
Highlight your Bling Shamrock layer and duplicate twice, for a total of three layers.
Still highlighting the bottom layer, Effects > Plugins > Alien Skin Xenofex2 > Constellation with the following settings;
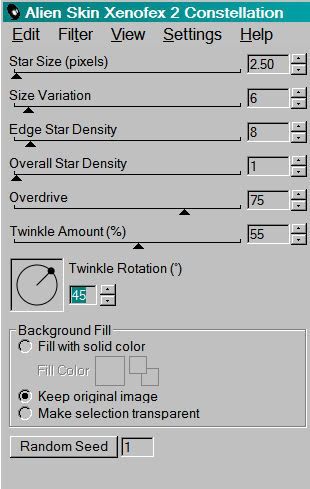
Hit okay.
Now, highlight the middle Bling Shamrock layer and re-apply Constellation, but hit the "Random Seed" button to change the sparklies. Hit okay.
Highlight the top Bling Shamrock layer. Re-apply Constellatioin and hit the "Random Seed" button again. Hit okay.
Now, close out the top two Bling Shamrock layers and leave the bottom one open.
Edit > Copy merged
Open Animation Shop, right-click on the desktop area and paste as a new animation.
Return to PSP. Close the bottom Bling Shamrock layer and open the middle one.
Edit > Copy merged
Return to Animation Shop. Edit > Paste > After current frame
Once again, back to PSP. Close out the middle Bling Shamrock layer and open the top one.
Edit > Copy merged
And, back to Animation Shop. Edit > Paste > After current frame.
View > Animation! Save as .gif and we're done! I hope you've enjoyed this tut!
.


No comments:
Post a Comment