
You will also need:
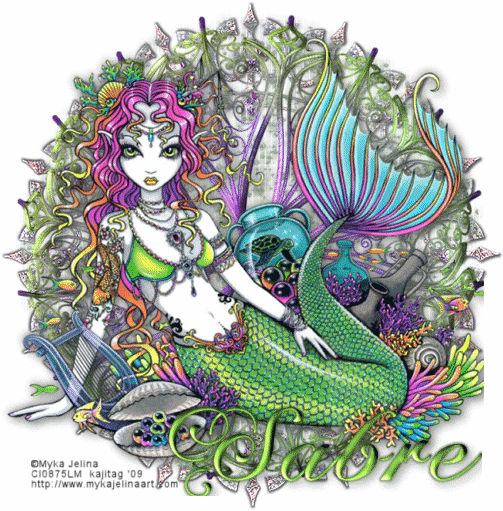
Tube of your choice. I'm using the artwork of the talented Myka Jelina. You must have a license to use her work. You may purchase that license at CILM.
Animation Shop - at this time, I'm not sure where you can get this program, if you don't already have it. You may, however, save the tut as a static (non-animated) image if you like.
Scrap kit by Sabre of The Quill and Parchment. It's a FTU kit, called Morning Glory. It's got some beautiful elements in it. I couldn't find use for many of them in this tut, however. It's an easy basic tut, until you get to the animation!
Filters: Eye Candy 4000 > Gradient Glow
Font: I used Chateau
Supplies: Mask WSL_Mask74, by Chelle at Wee Scots Lass. Click on "Navigate," then "Downloads." Choose the second group of masks in the list to get #74. Thank you Chelle, for sharing your talent with the PSP Community!
Okay, let's start. The names of the contents of this kit are not really in any kind of sequence, so this will be difficult to read, but it'll come out alright at the end!
Open a new image, 700 x 700, white.
Open SL-MGFrame1. Copy and paste as new layer. Resize 115%.
Open SL-MorningGloryPaper2sabre. Copy and paste as new layer.
Apply your mask. Delete the mask layer, answer "yes" to the pop-up question, and merge group.
Open SL-MorningGloryElementSabre. Copy and paste as new layer. Resize by 95%.
Add your tube. Position and drop shadow.
Add your name. I used color #86c54e. I used the following inner bevel:
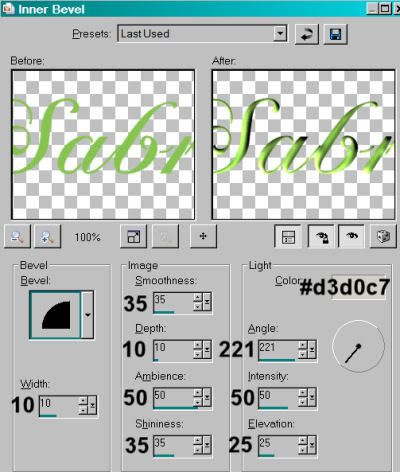
Hit okay.
Apply Eye Candy 4000 > Gradient Glow, settings on 4 - 0 - 100, color #2b4e1a.
Drop shadow your name.
Add your copyright, license information if applicable, and taggers'/watermark.
Resize your tag to your desired size.
Highlight your bottom element layer (SL-MorningGloryElementSabre).
Edit > Copy
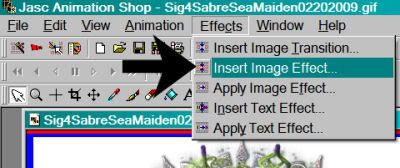
Open Animation Shop, right-click on the desktop layer and paste as new animation.
Go to Effects > Insert Image Effects
Choose "Underwater," with the settings shown below:
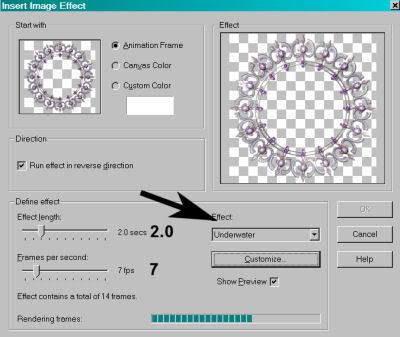
Hit okay.
This gives you 15 frames. Delete the last frame. Bring the slider at the bottom of this animation to the first frame.
Return to PSP. Close out the bottom white background layer and the SC-MorningGlowerElementSabre layer. Reveal all the rest of your layers.
Edit > Copy merged
Return to Animation Shop, right-click on the desktop area and paste as new animation.
Duplicate this frame until you have a total of 14 frames. Again, bring the slider at the bottom of this animation to the first frame.
Edit > Select All
Edit > Copy
Go to your animation with the underwater effects.
Edit > Select All
[NOTE: On the next step, do not release your mouse button until you have positioned your frames where you want them to be on the finished product!]
Edit > Paste > Into Selected Frame
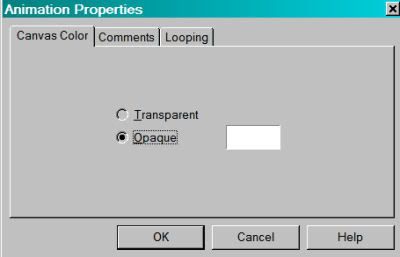
Animation > Animation Properties with the following settings:
View > Animation! Save as .gif and we're done!! Thanks for trying my tut, I hope it was clear for you.
.


No comments:
Post a Comment