

You will also need:
Two tubes of your choice. I've chosen to use the elegant artwork of Jennifer Janesko. You must have a license to use her work. You may purchase that license at CILM.
Scrap kit is by Marianne of Marianne's Creations. You can also find her great work for sale, and currently ON SALE at Terminally Unique Designs. The kit I'm using is FTU and is part of a Valentine blog train called Treasured Love. Marianne's portion can be found on her blog here.
Filters: Eye Candy 4000 Gradient Glow, Eye Candy 3.1 Glass, Xero Porcelain
Font: I used Portfolio
Supplies: I'm using a mask I picked up along the way. It's Becky_Mask036. I wish Becky was still around, but apparently real life overtook her online PSP life. 'Tis a pity, but at least her masks live on!!
Let's do it!
Open your mask and minimize in PSP, or load mask into your mask file.
Open a new file, 700 x 650, white.
Open paper 1. Copy and paste as a new layer.
Apply your Becky_Mask036. Delete mask layer, answer "yes" to the pop-up question and merge group.
Open the double heart frame. Copy and paste as new layer. This will be tricky to work with, as it has the raised glass highlights and shadows. Hopefully you like the result!
Open your first tube. Some tubes I played with had to be rotated left or right a bit to get them to fit nicely into the frame area. I played with a few until I found these two, which worked perfectly as they were. I resized the tube by 115% twice. Arrange to your liking within the left heart area.
Now, highlight your frame layer and grab your magic wand, tolerance on 30 and feather on 17. Click inside the left heart. Selections > Modify > Expand 35. Selections > Invert. Highlight your tube layer and delete.
[NOTE: Turning off the heart frame layer a few times as you find the correct orientation for the tube might help you.]
Drop shadow your tube.
Now, repeat the above for your right heart.
Merge your two tube layers down, and apply Xero Porcelain to this layer, default settings.
Open Flower 4. Image > Mirror. Copy and paste as new layer under the left heart, next to your tube. Drop shadow. Delete any overhang by using your point-to-point selection tool. CHANGE FEATHER TO ZERO!
Open Beaded String. Resize by 75%. Copy and paste above the heart frame, over on the right heart, sort of off-center a bit. Drop shadow.
Add a very soft drop shadow to your frame, trying to set off the flowers a bit without darkening the hearts too much.
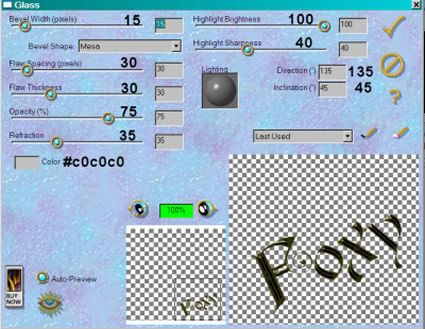
Add your name. I used Portfolio, and used the following Eye Candy 3.1 Glass settings. Just FYI, the image below was used on a previous tut, that's why the name's different:
I also added a Gradient Glow, using Eye Candy 4000 set at 4 - 0 - 100, color #f3ecdb.
Add your copyright, license number if applicable, and tagger's/watermark.
Resize your tag as desired. Save and we're done! Swift and kinda-sorta easy! I hope you enjoyed this tut, and have a wonderful rest of your day!
.


No comments:
Post a Comment