

You will also need:
Tube of your choice. I'm using the fantastic pin-up artwork of Dominic Marco. You must have a license to use his work. You may purchase that license at CILM. For this tut, a laying down or similarly posed tube as I've used is best.
Animation Shop - at this time, I'm not sure where you can get this program, if you don't already have it. You may, however, save the tut as a static (non-animated) image if you like.
Scrap kit by Clarey of Clareys Designz. It is a PTU kit, called Lucky Charm.
Filters: Eye Candy 3.1 > Glass
Font: I used Irish Participants
Supplies: You can find here. This includes the mask, the rainbow, the font and the pile of coins. The rainbow was made by Kelly Gates. I don't know Kelly, so if you are she, or if you know her, please let her know I'd like her permission to use it! I tried Google, but there are a lot of Kelly Gates' listed!
Let's begin, shall we?
Open a new image, 700 x 650, white.
Open your mask and pile of coins. Minimize in PSP. You could also load your mask into your PSP masks file. Load your font, or if you wish, open it and minimize on your task bar. File your rainbow animation where it is most convenient for you to access when we get to that portion of the tutorial.
Add a new raster layer. Selections > Select all
Open paper5. Copy and paste INTO SELECTION. Selections > Select none.
Apply your mask. Delete mask layer, answer "yes" to the pop-up question and merge group. Resize mask layer 85%. I added a small drop shadow to the mask.
Open rectangle frame. Image > Free Rotate > Right 90° Copy and paste as new layer.
Open paper11. Copy and paste as new layer below the frame.
Highlight your frame layer. Grab your magic wand. Click inside the frame. Selections > Modify > Expand by 7. Selections > Invert.
Highlight your paper11 layer. Hit delete. Selections > Select none.
Add your tube. Position and drop shadow.
Open the pot of gold. Resize 50%. Copy and paste at one end of the frame. See my tag for reference purposes. Drop shadow the pot of gold.
Open the pile of coins from the supplies. Copy and paste as new layer. Position and drop shadow.
Open the coin from the scrap kit. Resize 40%. Copy and paste as new layer. I positioned mine as best I could to imply the tube was dropping the coins into the pile. Drop shadow. Duplicate this layer and position the copy as you like. Merge these two layers down. I added motion blur to the two coins. Adjust > Blur > Motion Blur, settings as follows:
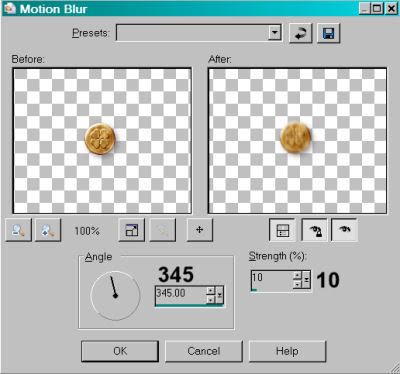
Hit okay.
Open the pipe from the scrap kit. Resize 40%. Positon as you like. I have mine "leaning" on the pot of gold. Drop shadow your pipe.
Add your name. I used color#86ad5a. Apply your Eye Candy Glass with settings as follows:
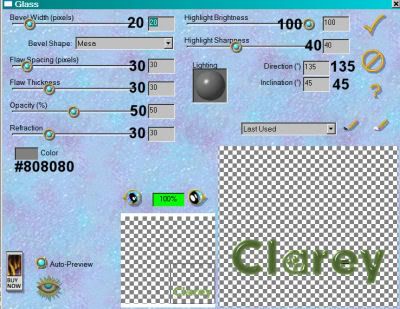
Hit the checkmark (or "okay" if you're using a newer version of Eye Candy).
Drop shadow your name.
Add your copyright, license information if applicable and your taggers'/watermark.
Resize your tag to your taste.
Layers > View > None.
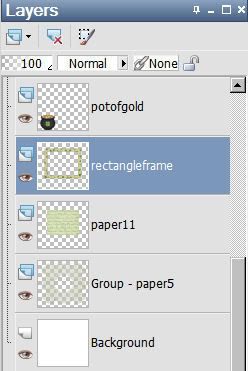
Open up the bottom five layers. For me, it looks like this:
Edit > Copy merged
Open Animation Shop. Right-click and paste as new animation. Duplicate this frame until you have a total of 16 frames. Move your slider at the bottom of this animation to the first frame.
Open your rainbow animation. Edit > Select All. Animation > Mirror. Edit > Copy
Go to your new animation that you just created and Edit > Select All
Edit > Paste > Into Selected Frame
Position as you like, then release your mouse button. I found that just about ½ inch in from the right inside edge of the frame worked for me. If your rainbow isn't ending in the right place, then Edit > Undo Paste and try, try again!
Go back to PSP. Close out the five layers you'd opened before, and open all the rest of the layers above.
Edit > Copy merged
Return to Animation Shop, right-click on the desktop area and paste as new animation. Again, duplicate this frame until you have 16 frames. Move your slider to the first frame.
Edit > Select All. Edit > Copy
Go back to the animation you created with the rainbow in it and make sure you have all layers selected. Edit > Paste > Into Selected Frame.
Position appropriately and release your mouse button.
View > Animation. Et, voila again! We are done! I hope you enjoyed this tutorial, and are pleased with your results!
.


No comments:
Post a Comment