
You will also need:
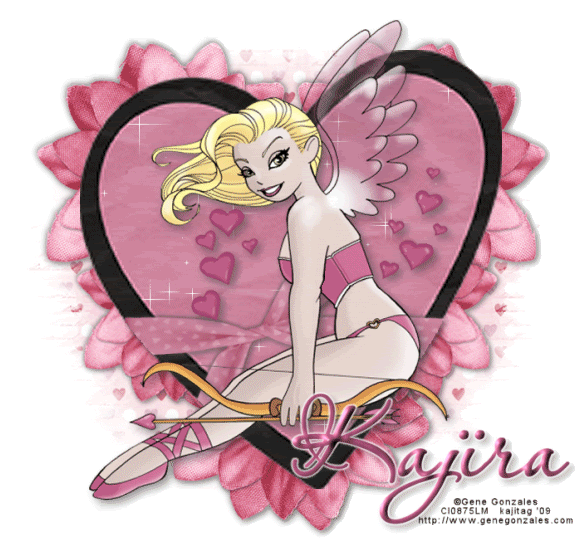
Tube of your choice. I've chosen to use the especially cute artwork of Gene Gonzales. You must have a license to use his work. You may purchase that license at CILM.
Animation Shop - at this time, I'm not sure where you can get this program, if you don't already have it. You may, however, save the tut as a static (non-animated) image if you like.
Scrap kit is by Shanmomto4 of Scrap it Sassy. The kit I'm using is PTU and called Nothing but Love. You can get the freebie add-on, also!
Filters: Eye Candy 4000 Gradient Glow, VM Natural Sparkle
Font: I used PassionsConflict
Supplies: A mask from Chelle at Wee Scot Lass. I am using her mask WSL_Mask236. Thank you, Chelle, for sharing your great work so generously with the PSP community!
Let's do it!!
Open your mask in PSP and minimize. Or, alternatively, you can load them all into your masks file, since there are so many. That way, they're available if you need them. :)
Open a new file, 700 x 650, white.
Open paper16. Copy and paste as new layer.
Apply mask. Delete mask layer and answer "yes" to pop-up question. Merge group.
Resize mask by 105%, if you like.
Open heart 2. Resize to taste. I resized by 200%, then 115%, then fiddled with it until it got the size I liked. Copy and paste as new layer.
Add your tube of choice. Resize if necessary. Drop shadow.
Open ribbon1. Resize by 75%. Resize again to your taste. Position over the heart layer. Grab your magic wand, highlight your heart layer and click OUTSIDE the heart. Go back to your ribbon layer and hit delete. Drop shadow.
Open flower1. Copy and paste onto canvas. I always do this on the top layer, so I can position them as I want. So, position to the left top of your heart. Layer > Duplicate. Image > Mirror. Drop shadow each flower, then merge them down into one layer. Duplicate this layer. Resize 75%. Position below the first flowers on your canvas. Go back to the original flower1, copy and paste again onto your canvas. Drop shadow. Position at the bottom tip of the heart. Merge all flower layers down, then position your layer of flowers to just above the mask layer.
Highlight the heart layer. Grab your magic wand and click inside the black outline of heart. Duplicate heart layer two times for a total of three layers. X out the top two layers for a bit.
Go to the bottom heart layer, and go Effects > Plug Ins > VM Natural > Sparkle with the following settings:
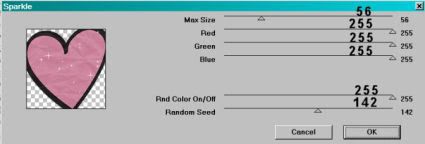
Hit okay.
Close out the bottom layer -- open the middle heart layer and highlight. Repeat with VM Natural Sparkle, but change the random seed setting to one you like. Hit okay.
Close out the middle layer -- open the top heart layer and highlight. Again, repeat VM Natural > Sparkle, changing the random seed. Hit okay.
Now, when I use this filter, I go back and do all that again to get more sparkles. It's up to you.
Selections > Select none.
Add your name, copyright, license # if applicable, and tagger's/watermark.
Add a Gradient Glow to your name with Eye Candy 4000, settings at 3-0-100, color white. Drop shadow your name.
Resize your tag at this point.
Highlight your bottom heart layer and Edit > Copy merged.
Go into Animation Shop and paste as new animation.
Back to PSP. Close out your bottom heart layer and open the middle one.
Edit > Copy merged.
Again, go to Animation Shop and Edit > Paste > After current frame.
Return to PSP, closing the middle heart layer and opening the top one.
Edit > Copy merged.
Returning again to Animation Shop and Edit > Paste > After current frame.
Edit > Select All
Right click on the top bar of your animation and choose Frame Properties. Change to 25
Save as .gif and we're done! I hope you've enjoyed this tut!! Leave a little love if you like! And if there are any questions, drop me a note!
Have a great day!
.


No comments:
Post a Comment