
You will also need:
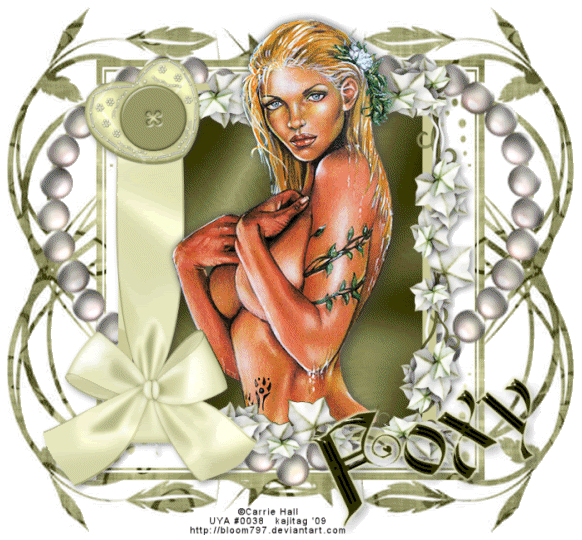
Tube of your choice. I've chosen to use the gorgeous artwork of Carrie Hall. You must have a license to use her work. You may purchase that license at Up Your Art.
Animation Shop - at this time, I'm not sure where you can get this program, if you don't already have it. You may, however, save the tut as a static (non-animated) image if you like.
Scrap kit is by Foxy's Designs at Scrap it Sassy. The kit I'm using is PTU, taggers' sized and called Pearl Elegance. I think it's a gorgeous kit! Well done, Foxy's Designs!
Filters: Eye Candy 4000 Gradient Glow, Eye Candy 3.1 Glass, Eye Candy 4000 HSB Noise
Font: I used FairyScrollDisplay
Supplies: A mask from Zuzzanna. I am using her mask called Zuzzanna_Mask 25. You can get this here. You can see her entire mask collection at her site here. Thanks, Zuzz, for sharing your art with the PSP Community as you do!
Let's do it!!
Open your mask and minimize in PSP. Alternatively, you can load it into your masks file and use it from there.
Open new image, 700 x 650, white.
Open paper 3. Copy and paste as a new layer.
Open frame 1. Copy and paste as a new layer. Resize by 85%.
Add your tube as a new layer. Drop shadow.
Grab your magic wand, highlight your frame layer and click in the middle of the frame.
Selections > Modify Expand by 7. Selections > Invert.
Highlight paper layer. Delete.
Go back again, highlighting the frame layer, and click in the middle of the frame. Invert.
Grab your eraser brush and erase any excess tube that is hanging over the bottom of your frame. Selections > Select None.
Add a new raster layer just below the paper layer, and just above your white background.
Selections > Select All
Open paper 1. Copy and paste into selection. Select > None.
Apply your mask. Delete mask layer, answer "yes" to the pop-up question and merge group.
Open your pearl heart. Resize by 200%. Paste above your mask layer. Duplicate twice, for a total of three layers. X out of the top two layers, and leave open your bottom pearl heart layer. Let them be for a while.
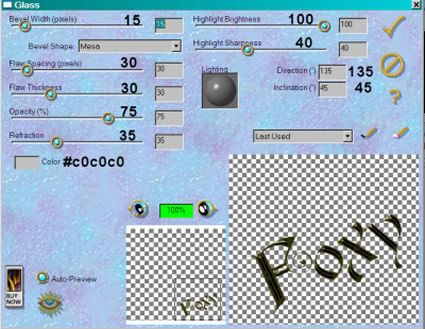
Go back to your top layer and add your name. I used color #3d3d0b. Rotate by 25° left. Position. If you'd like the same effect I got, then:
Effects > Plugins > Eye Candy 3.1 > Glass. Use the following settings:
Then Effects > Plugins > Eye Candy 4000 Gradient Glow using the 4 - 0 - 100 settings and using the color #e7e8bf.
Drop shadow your name. Add your copyright and license #, if applicable. Also, apply your tagger's mark/water mark!
Now, highlight your bottom pearl heart layer.
Effects > Plugins > Eye Candy 4000 > HSB Noise. Use the following settings:
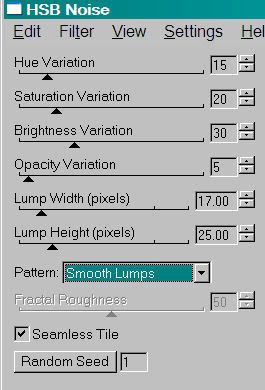
Hit okay. X out of bottom layer. Open and highlight the middle pearl heart layer.
Again, use HSB Noise, but hit the "random seed" button. Hit okay.
X out of the middle pearl heart layer and open the top. Once more with the HSB Noise filter, again hitting "random seed." Hit okay.
View > Animation. Save as a .gif and we're done! Thanks for stopping by and using my tut!
.


No comments:
Post a Comment