
You will also need:
Tube of your choice. I've chosen to use the sumptuous artwork of Jennifer Janesko. You must have a license to use her work. You may purchase that license at CILM.
Animation Shop - at this time, I'm not sure where you can get this program, if you don't already have it. You may, however, save the tut as a static (non-animated) image if you like.
Scrap kit by Denise of Scrappy Redhead Designs. It's a PTU kit, called Forces of Nature.
I thought I'd be doing something St. Patrick's Day related, but it didn't turn out that way! I decided to use the tube that Jennifer called "Forces of Nature" to go with the kit called "Forces of Nature."
Filters: Eye Candy 4000 Gradient Glow, DSB Flux > Bright Noise
Font: I used Turbayne Running Hand
Supplies: No outside supplies for this tut!
Okay, let's go!
Open a new image, 700 x 700, white.
Open Paper12. Copy and paste as a new layer.
Open lace frame. Copy and paste as a new layer. I did some tweaking to this frame as I was building the tag. I used the pick tool and stretched it so it would be taller and skinnier than it was originally. This caused me to have to change the canvas size, with the settings below:
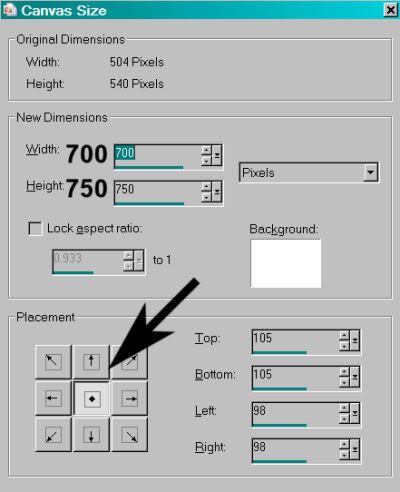
Highlight your frame layer. Grab your magic wand and click inside the frame.
Highlight your paper layer and Selections > Invert. Hit delete. Selections > Select None.
Add your tube. Position and drop shadow.
Highlight the frame layer. Grab your magic wand tool again, and click inside the frame. Selections > Invert.
Highlight your tube layer. Grab your eraser brush and erase the portion of your tube that overlaps the bottom of the frame. Selections > Select none.
Open the lace bow. Copy and paste as new layer over your tube. For *me* I thought the original color was too dark for the tag. I changed the color on the lace bow by using the Adjust > Brightness and Contrast > Brightness/Contrast and using the settings below:
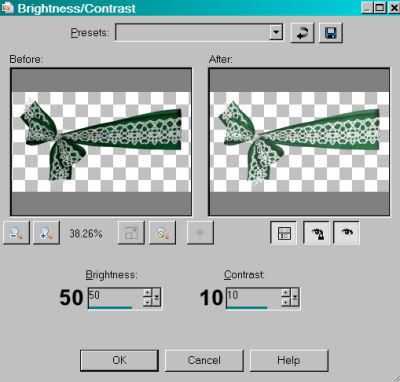
Hit okay. Then, Adjust > Hue and Saturation > Colorize with the settings below:
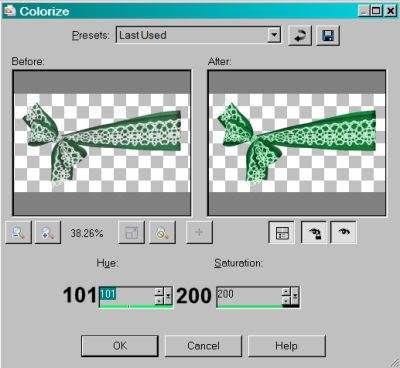
Hit okay. And again with the Brightness and Contrast:
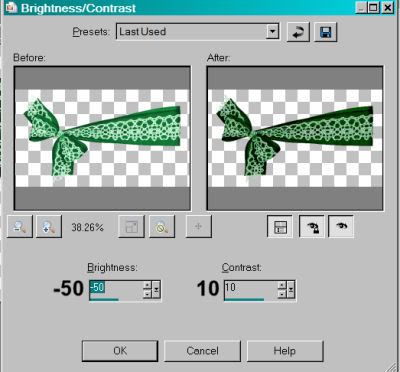
Hit okay. I know that was circuitous, but that's how it worked out.
Position your lace bow where you'd like it. Drop shadow.
Open poison ivy. Copy and paste as a new layer. I put mine on the right side of the frame, at the top.
Duplicate this layer four times, for a total of five layers. Position them in a line up and down the right side of the frame. Merge all these layers down. Drop shadow.
Now, duplicate this layer and Image > Mirror. Duplicate again, and rotate 90° right. Line this up at the top of your frame. Use your selection tool to crop out the right and left sides that are hanging over.
Duplicate this layer and Image > Flip. Whew!
Now, merge these poison ivy layers down as one. Drag this layer down below the tube and above the frame.
Add your name. I used color #f8f0d2. Add Eye Candy 4000 Gradient Glow, settings of 3 - 0 - 100, preset of "Fat" and color #f6a720. Drop shadow your name.
Add your copyright, license information if applicable, and taggers'/watermark.
Resize your tag to taste. You may save now if you don't wish to animate. If you DO wish to animate, keep going.
A N I M A T I O N
You know what's coming!!
Duplicate your poison ivy layer two times, for a total of three layers.
Highlight the bottom poison ivy layer. Effects > Plugins > DSB Flux > Bright Noise with the intensity set at 45, "mix" checked. Hit okay.
Highlight the middle poison ivy layer. Effects > Plugins > DSB Flux > Bright Noise. Intensity is still at 45, but hit mix twice. Hit okay.
Highlight the top poison ivy layer. Effects > Plugins > DSB Flux > Bright Noise. Intensity is still at 45, but hit mix three times. Hit okay.
Close out the top two layers of poison ivy, leaving the bottom layer open.
Edit > Copy merged
Open Animation Shop and right-click on the desktop area, pasting as a new animation.
Return to PSP. Close out the bottom poison ivy layer and open the middle layer.
Edit > Copy merged
Back to Animation Shop. Edit > Paste > After current frame.
Once more to PSP. Close out the middle poison ivy layer and open the top layer.
Edit > Copy merged
And back to Animation Shop once more, Edit > Paste > After current frame.
Still in Animation Shop, Edit > Select All.
Right click on the bar on top of your canvas and choose "Frame Properties." Change this number to 15.
View > Animation. There you go! Save as .gif and we're done!
Thanks for trying my tut! I hope you're having a wonderful day!
.


No comments:
Post a Comment