
You will also need:
Tube of your choice. I've chosen to use the beautiful artwork of Barbara Jensen. You must have a license to use her work. You may purchase that license at Barbara's web site.
Animation Shop - at this time, I'm not sure where you can get this program, if you don't already have it. You may, however, save the tut as a static (non-animated) image if you like.
Scrap kit is by Heza of Terminally Unique Designs. The kit I'm using is PTU and called Heartbreaker. You can get the kit also at Heza's blog, where you can also download a freebie version! Leave Heza some love for her freebies!!
Filters: Eye Candy 4000 Gradient Glow, Mura Meister Copies, DSB Flux bright noise
Font: I used CopperAlt Caps
Supplies: A mask from Chelle at Wee Scot Lass. I am using her mask WSL_Mask259. Thank you, Chelle, for sharing your great work so generously with the PSP community!
Let's do it!!
Open your mask and minimize. Alternatively, since there are so many included in the file, you might want to load them in your masks file. That way, they're available if and when you need them.
Open a new file, 700 x 700, white.
Open paper 8. Isn't this paper exquisite? Copy and paste as new layer.
Apply your mask (WSL_Mask259). Delete mask layer, answer "yes" to the pop-up question, and merge group.
Open Flower 1. Copy and paste as new layer. Resize by 50%, then again by 65%.
Effects > Mura Meister Copies. Find the "Encircle" preset, use default settings, click "ok."
Resize about 110% or so. Maybe 115%. Sorry, forgot to write that down when I was putting this together! Whatever works well for you.
Add tube of choice. Resize if necessary. Drop shadow your tube.
Highlight the circle layer. Grab your magic wand and click inside the circle. Selections > Invert.
Now, grab your Eraser Brush and highlight the tube layer. Erase however much of your tube there may be hanging over the bottom of the circle of flowers.
Selections > Select none.
Open Butterfly 1. Resize down quite small. Copy and paste onto canvas, position as desired. I placed mine on the tube's right shoulder.
Open Poker Chip 3. Resize by 50%, then by 65%, then by 75%. LOL.
Copy and paste as desired. I have it behind the tube, as though it's coming out of her hand.
Drop shadow your poker chip, butterfly, and circle of flowers.
Open the Glitter Doodle. Copy and paste just above the mask layer. Resize 115%.
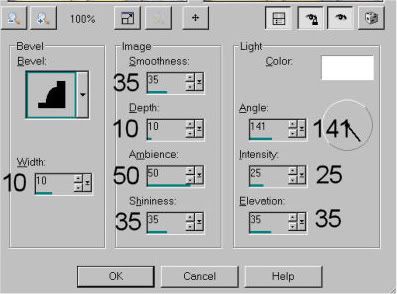
Add your name. If interested, I used color #c9a0aa. I used the inner bevel, settings below:
Add Eye Candy 4000 Gradient Glow, setting at 3-25-100. I used color #5d3356.
Add copyright info, license # if applicable, and your tagger's/watermark.
Resize to taste. If you're not choosing to animate, you can save your work now, and thanks for trying my tut!
A N I M A T I O N
Highlight your glitter doodle layer. Duplicate twice, for a total of three layers. X out of the top two layers, and highlight the original.
Effects > DSB Flux > Bright noise.
Intensity setting is 45. Choose "mix" and click it once. Okay.
X out of the original, and highlight the middle layer. DSB flux again, but click "mix" twice. Okay.
X out of the middle layer, and highlight the top. DSB flux again, but click "mix" three times. Okay.
Now, X out of two of the layers of the glitter doodle. I usually start at the bottom, leaving that layer open.
Edit > Copy merged
Open Animation Shop. Paste as new animation.
Back to PSP, X out of the bottom layer and open the middle. Edit > Copy merged
Move back to Animation Shop and Edit > Paste > After current frame
Go back to PSP, X out of the middle layer and open the top. Edit > Copy merged
And in Animation Shop, again Edit > Paste > After current frame.
View > Animation. Voila!!
We're done! Thank you again for trying my tuts!! Have a lovely week!
.


No comments:
Post a Comment