
You will also need:
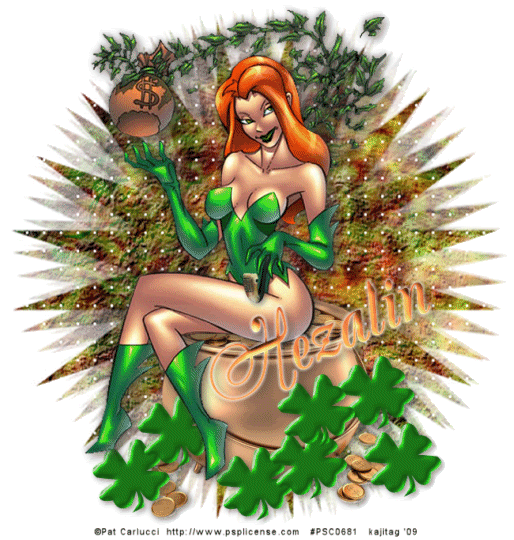
Tube of your choice. A sitting tube would work best. I've chosen to use the great cartoon artwork of Pat Carlucci. You must have a license to use his work. You may purchase that license at his tube site.
Animation Shop - at this time, I'm not sure where you can get this program, if you don't already have it. You may, however, save the tut as a static (non-animated) image if you like.
Scrap kit by Hezalin of Terminally Unique Designs. This is a PTU kit, and is called Off to Tipperary. It also has a GREAT FTU counterpart, which you can find at Hezascraps & Tags. I used this same kit in the tutorial below this one.
Filters: Eye Candy 4000 > HSB Noise, Eye Candy 4000 > Gradient Glow
Font: I used PrimroseJF
The mask is made by the one and only VIX!! You can find her great masks at that link under "Goodies." I've supplied it, here.
Let's begin! :)
Open your mask in PSP and minimize. Alternatively, load into your PSP Masks file for use at any time.
Open a new image, 700 x 700, white.
Open Paper 18. Copy and paste as new layer.
Apply your Vix_Mask218. Delete your mask layer. Answer "yes" to the pop-up question and merge group. Resize your mask layer 120%.
Open your pot of gold. Resize 65%. Copy and paste as new layer. Drop shadow your pot of gold.
Open you tube of choice. Hopefully, it's a sitting tube. Position your tube and drop shadow.
Open the pipe. It's barely discernible on the tag, but I resized it 15% and placed it so it appears to be in the tube's hand. If you choose to do this, reduce the opacity on your pipe layer and zoom in so you can see what you're doing. Use your selection tool, point-to-point, and cut out the part of the pipe that overlaps the hand. Raise the opacity again. Drop shadow your pipe.
Open shamrock 3. Resize 25%. I changed the hue and saturation to match my tube. Adjust > Hue and Saturation > Colorize:
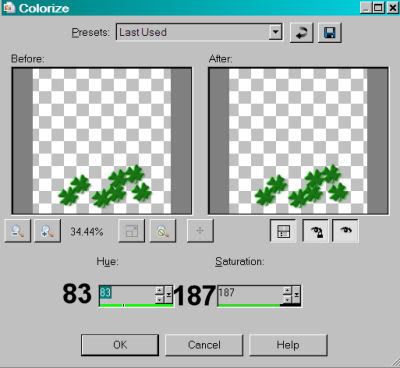
Hit okay. Now, for *mine*, I turned this into a tube within PSP and scattered the shamrocks that way. (I found using the made-by-Corel shamrock tube inefficient in placing these the way I wanted.) To do this, go
File > Export > Picture Tube >
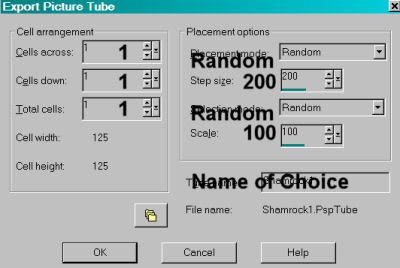
Hit okay.
I then used the Picture Tube tool to scatter the shamrocks randomly. If I didn't like the positioning, I'd undo, then redo, until I found the right configuration for my taste. Drop shadow tubes. I dragged this layer below the tube layer, so they'd be behind her legs and feet.
Add your name. I used an inner bevel, settings as follows:
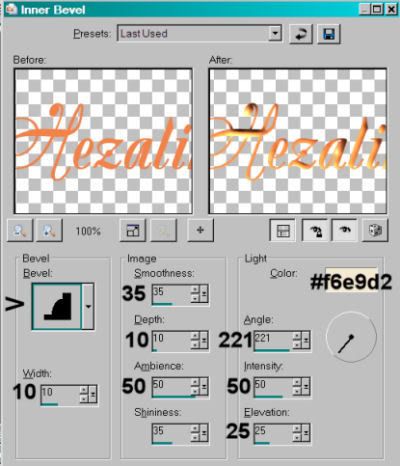
Hit okay. I then gave it a gradient glow of 4 - 0 - 100, color white. Drop shadow your name. If you like, Image > Free Rotate > Left 25°.
Add your copyright, license information if applicable, and tagger's/watermark.
Crop out any excess white, and resize your tag.
You may save now if you choose not to animate. Those that choose TO, see below!
A N I M A T I O N
Highlight your mask layer. Duplicate this layer twice, for a total of three layers.
Highlight the bottom mask layer and apply Effects > Plugins > Eye Candy 4000 > HSB Noise, settings as follows:
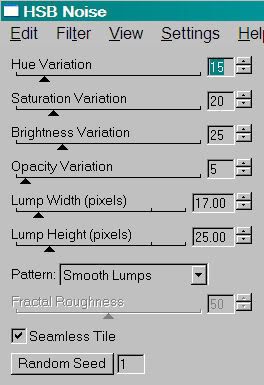
Hit okay.
Highlight the middle mask layer, and again apply HSB Noise, this time hit the "Random Seed" button once or twice. Hit okay.
Highlight the top mask layer and repeat HSB Noise, hitting the "Random Seed" button again.
Close out the two top mask layers, leaving the bottom mask layer open.
Edit > Copy merged
Open Animation Shop, and right-click on the desktop area. Paste as new animation.
Return to PSP and close out the bottom mask layer, opening up the middle layer.
Edit > Copy merged
Back to Animation Shop and Edit > Paste > After current frame
Return again to PSP and close out the middle mask layer, opening the top layer.
Edit > Copy merged
And finally, return to Animation Shop and Edit > Paste > After current layer.
Still in Animation Shop, Edit > Select All
Right-click on the top bar of the animation, and choose Frame Properties. Change this to 25.
View > Animation. Save as .gif and we're done! I hope you enjoyed this tut! :)
.


No comments:
Post a Comment