
You will also need:
Tube of your choice. I'm using the artwork of David Boller. You must have a license to use his work. You may purchase that license at Up Your Art.
Animation Shop - at this time, I'm not sure where you can get this program, if you don't already have it. You may, however, save the tut as a static (non-animated) image if you like.
Scrap kit by Pimptress of Paradise 4 Scrappers. It is a PTU kit, called Just My Luck. It's on sale today for only $1, and will be on sale tomorrow at 25% off -- today and tomorrow only! (February 24 & 25, respectively.)
Filters: Eye Candy 5 > Impact > Perspective Shadow, Eye Candy 4000 > Gradient Glow
Font: I used Inspiration
Supplies can be found here. This includes the mask and the two sparkles I used for the coins. The mask is once again a product of Essex Girl! Thanks once again, for the use of your wicked masks!
Let's begin, shall we?
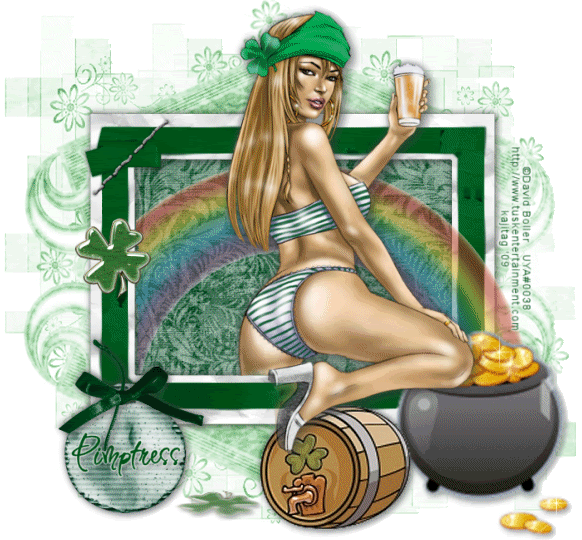
Open a new image, 700 x 650, white.
Add a new raster layer. Selections > Select All.
Open pp05. Copy and paste INTO SELECTION. Selections > Select none.
Apply your mask, INVERT TRANSPARENCY CHECKED! Delete mask layer, answer "yes" to the pop-up question and merge group.
Open Frame-01. Copy and paste as a new layer.
Highlight your mask layer. Open pp09. Copy and paste as new layer.
Highlight your frame layer. Grab your magic wand, click inside the frame and Selections > Modify > Expand by 7.
Highlight your pp09 layer. Hit delete. Selections > Select none.
Open the rainbow. Copy and paste as new layer, above your frame layer.
Take your selection tool, set on rectangle, and crop out the portion of the rainbow that sticks out beyond the frame on the left side. Leave the right side as is.
Open your pot-o-gold. Resize 200%. Adjust > Sharpness > Sharpen. Then Adjust > Softness > Soften. Copy and paste as new layer, at the end of the rainbow on the right. Drop shadow your pot-o-gold.
Open the irish-ale. Resize by 150%. Adjust > Sharpness > Sharpen. Position and drop shadow the irish-ale layer.
Open the trash-tag. Apply your name. I used color #005138. Effects > Plugins > Eye Candy 4000 > Gradient Glow set at 3 - 25 - 100, color white. Drop shadow your name.
Edit > Copy merged. Paste as new layer on your canvas. Resize 65%. Position over the lower left corner of the frame. Drop shadow.
Open the green-ribbon-bows element. Take your selection tool, set on rectangle, and select the farthest left bow. It should look something like this:
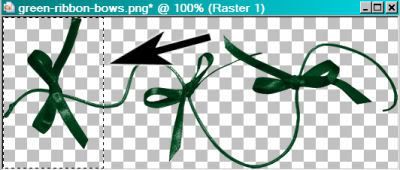
Edit > Copy. then paste as new layer. This should look something like this:
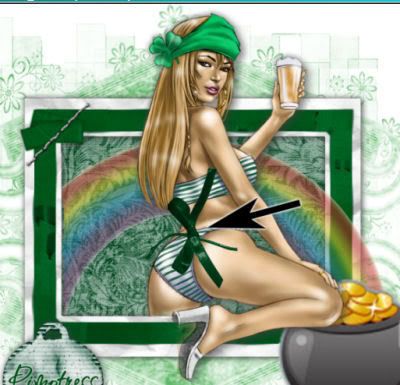
Rotate the bow 90° right. Move the bow over your tag with your name on it. Position and drop shadow your bow.
Open shamrock-01. Resize by 40%. Copy and paste as a new layer. Position on the left side of the frame. See my tag for reference. Drop shadow your shamrock. Duplicate this layer, and position the copy down between the irish-ale and the tag.
Effects > Plugins > Alien Skin Eye Candy 5 > Impact > Perspective shadow. Settings as follows:

Hit okay.
Now, with your selection tool set on point-to-point, draw your selection carefully around the original shamrock (the one on the bottom of the tag), making sure to not nick the shadow you just created. Hit delete. Move the shadow into position as you like. That area of the tag was blank white space, and I wanted to fill it, but subtly. So this is what I did.
Now, open your sparkles. You may pick and choose which one you want where, and at what size. Sprinkle them over your coins, in and out of the pot-o-gold. I ended up with seven layers of sparkles.
Add your copyright, license information if applicable, and your taggers'/watermark.
Resize your tag to suit your taste.
Now, go through your sparkle layers, opening and closing them to get a random look you like.
Edit > Copy merged
Open Animation Shop, right-click on the desktop area and paste as a new animation.
Return to PSP. Open and close your sparkles again, to get the look you want.
Edit > Copy merged
Back to Animation Shop. Edit > Paste > After Current Frame
And return again to PSP and play with your sparkles again.
Edit > Copy merged
Return to Animation Shop and Edit > Paste > After Current Frame.
Right-click the top bar of your animation and choose "Frame Properties." Change this number to 35.
Now View > Animation. When I first did this, I didn't care for the way my sparkles, well, sparkled. So I played back and forth with them until I got the combination I liked. (Deleting a frame, going back to PSP and opening and/or closing layers you think will work better, then Edit > Copy merged and highlight a frame of your animation after which (or before which) you want the new frame and paste accordingly. Whew! LONG sentence! LOL)
When you get to a sequence you like, then save it as a .gif and we're done! I hope you enjoyed playing with this tut! And I also hope you're having a GREAT day!
.


No comments:
Post a Comment