

You will also need:
A tube of your choice. A sitting tube would work best for this tutorial. I'm using the artwork of Rachel Anderson. You must have a license to use her work. You may purchase that license at CILM.
Animation Shop - at this time, I'm not sure where you can get this program, if you don't already have it. You may, however, save the tut as a static (non-animated) image if you like.
Scrap kit by Pimptress of Paradise 4 Scrappers. It is a PTU kit, called Emerald Sky. I have written another tut, posted right below this one, with the same kit.
Filters: Eye Candy 4000 > Gradient Glow
Font: I used Quilline Script Thin
Supplies: The fence, the mask, the grasses and the bling butterfly, available here. The bling comes from Nicky, whose site is no longer functioning. If you are Nicky, let me know so I can put up a working link! The mask is by Essex Girl again. I just love her masks!
This is kind of a fiddly one. It all started out VERY differently than it ended up. There's a lot of "put it where you think it looks best" stuff in here. Also, using your pick tool to reshape things. I hope I can keep it straight for you!
Let's begin!
Open your supplies and minimize in PSP. You can load your mask into your PSP masks file if you wish. File your bling in a place that is easily accessible when you're in Animation Shop.
Open a new image, 700 x 700, white.
Add a new raster layer. Selections > Select all.
Open pp07. Copy and paste INTO SELECTION. Selections > Select none.
Apply your mask, INVERT TRANSPARENCY CHECKED! Delete mask layer, answer "yes" to the pop-up question and merge group.
Here is where I used my pick tool, but I don't think it will work well if you do it right now. You'll notice my mask layer is much smaller than what you've ended up with. I first rotated 90° -- either direction is fine. I used the pick tool to make it skinnier vertically, and a bit thinner side-to-side. I also positioned it higher on the tag, but that will all be better figured out once more of your elements are in place.
So, open fence-nk6. Copy and paste as new layer. Position to the right or left, either is fine. Duplicate this layer. Image > Mirror. Line it up so there are equal spaces between all the slats of the fence. Merge these two layers down. Drop shadow your fence.
Add your tube. Resize, position and drop shadow as you like.
Open vintage-flower. Resize 85%. Copy and paste as a new layer. Position to the opposing side from your tube, above the fence layer. Rotate 10° right. Drop shadow.
Open flora-01. Resize 85%. Copy and paste as a new layer, above the vintage-flower. Rotate 15° left. Drop shadow.
Open grass_2. Copy and paste as a new layer. Position to one side of the fence, above your flower layers. Duplicate this layer. Image - Mirror. Merge these two layers down. Drop shadow.
Open grass1a. Resize 50%. Adust > Brightness and Contrast > Brightness/Contrast with settings below:
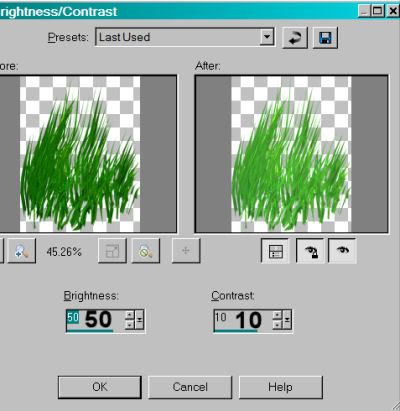
Hit okay.
Adjust > Hue and Saturation > Colorize with the settings below:
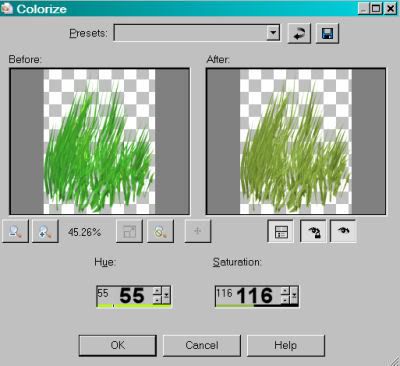
Hit okay. Copy and paste this grass as a new layer. Drag this layer below your first grass layer. Duplicate this layer and Image > Mirror. Move these grasses close to each other, so it's one big clump. Merge these layers down. Move that to the edge of the first grass layer. Duplicate again and Image > Mirror. Duplicate yet again, and continue, until your second grass layer is filled in. Merge these layers together. Drop shadow.
I hope you understood all that!
What I did now was to grab my lasso tool, set at freehand, feather 17. Draw a selection in the form of a big, wide smile so that the bottom of your tag will have a softer feel to it. See my tag for reference purposes. See how the hard edge has been taken off the grassy areas? Hit delete. Selections > Select none.
And I hope you understood that! :)
At this point you can see how you'd want your mask shaped and sized. Your pick tool is your friend! Use it to do the squishing and stretching. :) And place it toward the top of your tag.
Add your name. I used color #95af4e. I added Eye Candy 4000 > Gradient Glow with settings at 5 - 0 - 100, color #f0ebd8. Drop shadow your name.
Add your copyright, license information if applicable, and your taggers'/watermark.
Resize your tag to taste.
Layers > View > None
Open the bottom two layers, the white background and your mask layer.
Edit > Copy merged
Open Animation Shop. Right-click on the desktop area and paste as a new animation. Duplicate this layer until you have 38 frames. That's right! 38! Move your slider at the bottom of your animation to the first frame.
Open your bling animation. Delete the first frame, which is black.
Edit > Select All. Edit > Copy
Go to your mask and white background animation that you just made. Edit > Select All. Edit > Paste > Into Selected Frame. Position the little trail that you see to the left of center. Release your mouse button.
Return to PSP. Layers > View > All. Close the bottom two layers.
Edit > Copy merged
Return to Animation Shop. Right-click on the desktop area and paste as a new animation. Duplicate this layer until you have 38 frames. Move your slider at the bottom of your animation to the first frame.
Edit > Select All. Edit > Copy
Return again to the animation that you're building. Edit > Select All. Edit > Paste > Into Selected Frame
Position as you like and release your mouse button.
Save as .gif and we're done! Whew! Thanks for tackling this one!!
.


No comments:
Post a Comment