
You will also need:
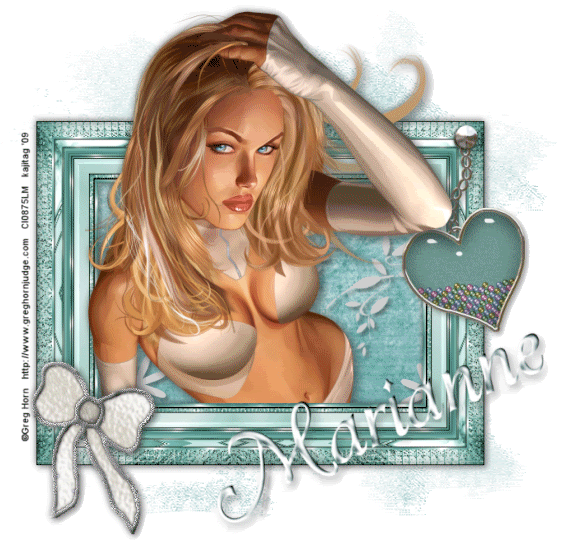
Tube of your choice. I've chosen to use the great artwork of Greg Horn. You must have a license to use his work. You may purchase that license at CILM.
Animation Shop - at this time, I'm not sure where you can get this program, if you don't already have it. You may, however, save the tut as a static (non-animated) image if you like.
Scrap kit by Marianne, of Marianne's Creations. You can find this kit at Treasured Scraps. They had a super 27¢ sale yesterday. Too bad it was only one day. I announced it here. I hope you were able to take advantage of it! This is a PTU kit called Heart of Glass.
No filters used in this tut!
Font: I used Avalanche Script TT
Supplies can be downloaded here. This includes Becky_Mask036 and the steel stud used to hold the heart in place.
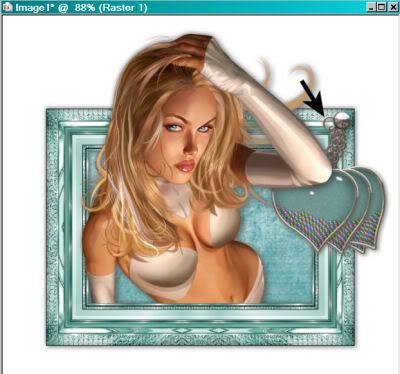
This is another tutorial using a swinging element. My last tutorial with this animation in it seemed to create quite a sensation. Denny gave me some constructive criticism, saying it would be easier with screen shots. So this time, I'm including screen shots. I'm going to confuse myself putting them all up, but hopefully it will help you guys in the end.
Okay let's start... :)
Open your mask in PSP and minimize. Alternatively, you can load it into your PSP masks file and have it there for future use!
Open a new image, 700 x 650, white.
Open Frame 3. Copy and paste as a new layer. Resize 90%.
Open Paper 3. Resize to 700 x 700 pixels. Copy and paste as a new layer, under the frame layer.
Highlight your frame layer. Use your magic wand to click inside the frame. Selections > Modify > Expand by 10. Selections > Invert
Highlight your paper layer and hit delete. Do not deselect! Selections > Invert Then, Selections > Modify > Contract by 10. Selections > Invert again.
Add your tube. Position as you like. Grab your eraser brush and erase the areas of your tube that overlap the bottom of the frame. Selections > Select none. Drop shadow your tube.
[NOTE: I have found that doing things in this order sometimes gives me an overlap of shadow at the bottom of the frame. If this happens to you, then again highlight your frame layer and get your magic wand. Click inside the frame, and Selections > Invert. Now highlight your tube layer. Grab your eraser brush again and remove the errant shadow. Selections > Select none. Sorry about that.]
Open Doodle Art 1. Copy and paste under your tube layer and above your paper layer.
Adjust > Brightness and Contrast > Brightness/Contrast with the settings below:

Hit okay. Drop shadow your doodle.
Drop shadow your frame.
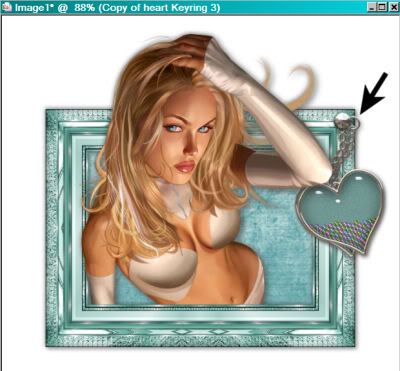
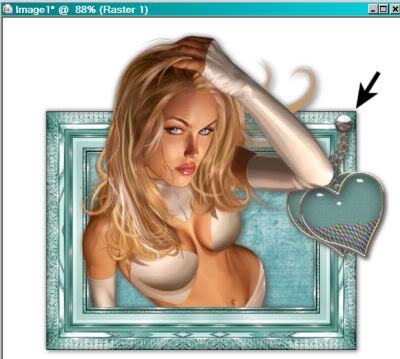
Open Heart Keyring 3. Resize 50%. Copy and paste onto the top right corner of your frame. Drop shadow.
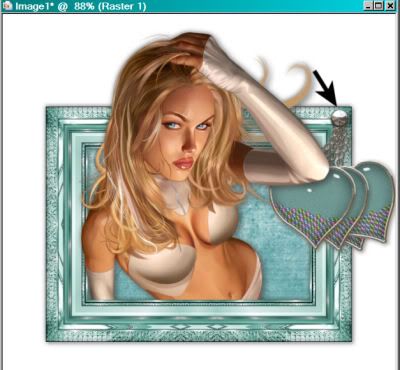
At this point, I realized I didn't have enough room on the right side, so
Image > Canvas Size settings below (we will be resizing this down later, don't worry!):
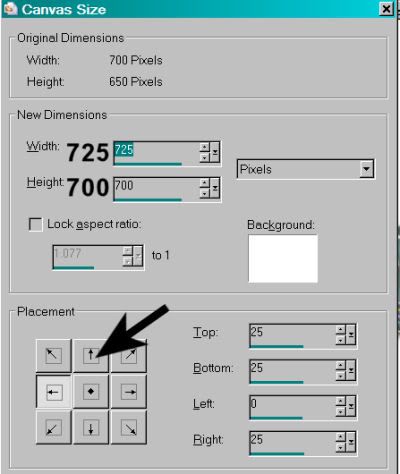
Hit okay.
Open steelstudbyboop. Resize 65% Copy and paste as a new layer, over the loop on your Heart Keyring layer, so it looks like it's holding the keyring in place.
Open Stain Glass Bow 1. Copy and paste at the bottom left corner of your frame. If your tube obstructs any of these areas I mention, simply put them where they'll work for you. A tut is just a guide, not written in gold!
Drop shadow your bow.
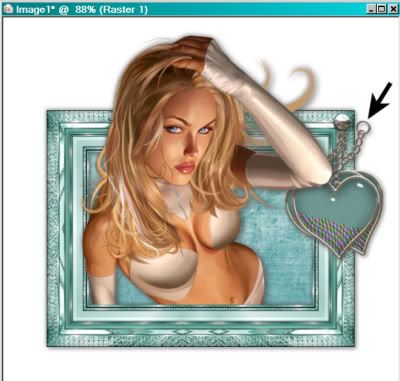
Now, here we go.... Cross your fingers, get settled in, and I hope this helps!
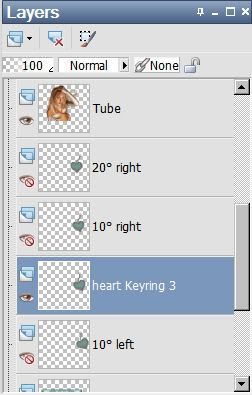
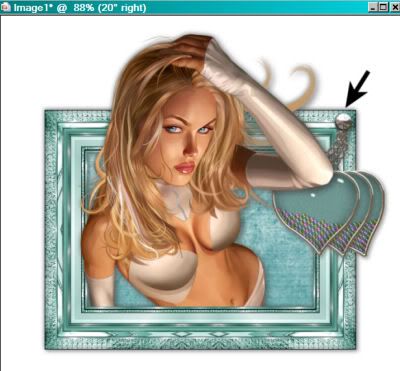
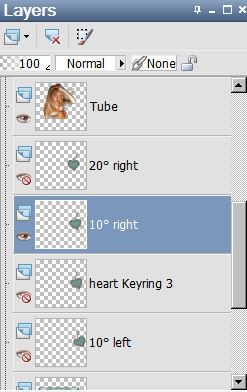
Highlight your Heart Keyring layer. Duplicate this layer 3 times, for a total of four layers. Move one of your copies down below the original, and name this 10° left.
Highlight the copied layer just above the original and rename 10° right.
Highlight the layer above that, and rename 20° right. This is what it should look like:
Now, we're going to use these layers. The names are quite self-explanatory, but I will go through it anyway.
Highlight your 10° right layer and Image > Free Rotate > 10° right. You will have something like this:
Note that the loop on the top of the keyring is not under the steel stud. Using your move tool, move this layer so that the loop is no longer visible, hidden under the steel stud. You should now have something like this:
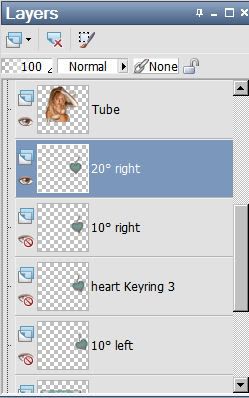
Highlight your 20° right layer. Image > Free Rotate > 20° right. You'll again note that the loop is not under the steel stud.
Again, using your move tool, move this layer so that the loop is no longer visible, hidden under the steel stud. You should now have something like this:
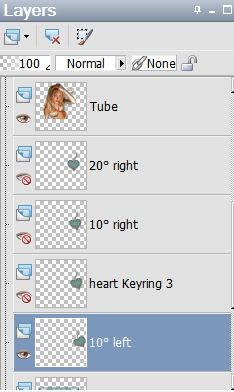
Now, go to your 10° left layer.
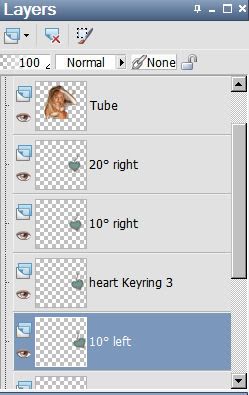
Image > Free Rotate > Rotate 10° left.
Again, the loop is not placed correctly.
Use your move tool to get this layer lined up with the others, under the steel stud.
You should have something like this:
All good? I hope so! I hope these screen shots are helping!
Now, go to your background layer (the white one) and add a new raster layer. Flood fill this layer with a color of choice. I used #b2d3d4.
Apply your Becky_Mask036. Delete mask layer. Answer "yes" to the pop-up question and merge group.
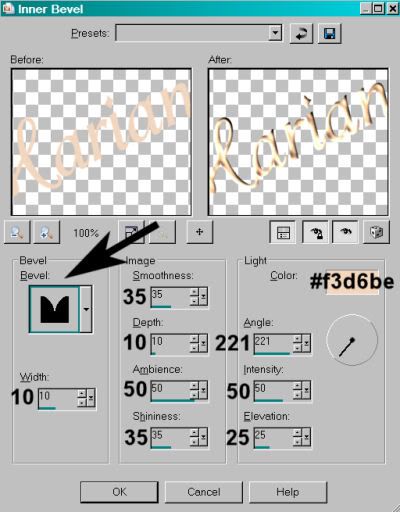
Add your name. I used color #f3d6be. This makes no sense, because I just colorized it afterward. LOL. I used an inner bevel with the following settings:
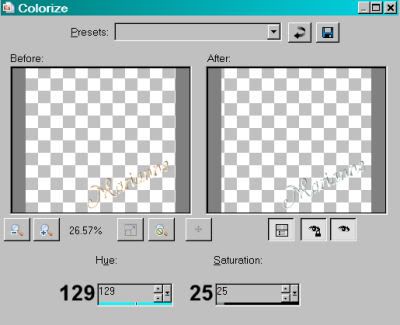
Hit okay. I then chose to colorize, as I said. I used the following settings:
Hit okay. Drop shadow your name.
Add your copyright, license information if applicable, and tagger's/watermark.
Crop out any excess white area, and resize your tag to taste.
Here we go...
Highlight your original Heart Keyring layer. Make sure all the other keyring layers are closed out.
Edit > Copy merged
Open Animation Shop. Right-click on the desktop area, and paste as new animation.
Return to PSP. Close out your original keyring layer, and open the 10° right layer.
Edit > Copy merged
Return to Animation Shop. Edit > Paste > After current frame
Back to PSP. Close out the 10° right layer and open the 20° right layer.
Return again to Animation Shop. Edit > Paste > After current frame.
And, return to PSP. Now, we're going to repeat. Close out your 20° right layer and open your 10° right layer.
Edit > Copy merged
Back to Animation Shop. Edit > Paste > After current frame.
Return to PSP. Close out your 10° right layer, and open your original keyring layer.
Edit > Copy merged
Return to Animation Shop. Edit > Paste > After current frame.
And now, return to PSP. Close out your original keyring layer and open the 10° left layer.
Edit > Copy merged
Back to Animation Shop. Edit > Paste > After current frame.
Now, right-click on the bar above your animation. Choose "Frame Properties." Change this number to 17.
View > Animation.
Did it come out alright? I hope so!! Save as .gif and we're done. I sincerely hope these screen shots helped you!!
Now I have to post this and read it over to make sure it's all done right! LOL! Have a great week!
.


No comments:
Post a Comment