
You will also need:
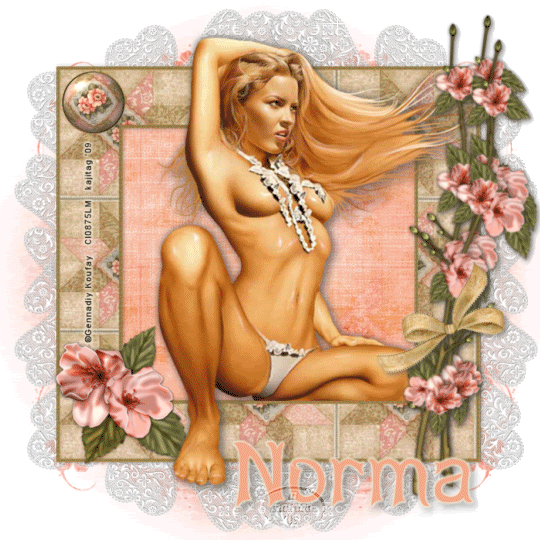
Tube of your choice. I've chosen to use the fantastic artwork of Gennadiy Koufay. You must have a license to use his work. You may purchase that license at CILM.
Animation Shop - at this time, I'm not sure where you can get this program, if you don't already have it. You may, however, save the tut as a static (non-animated) image if you like.
Scrap kit is by Norma of Paradise 4 Scrappers. The kit I'm using is PTU and called Antique Lace. They're having a sale on Valentine's Day -- everything 50% off, so grab it while it's marked down! The tutorial just below this one uses the same kit.
Filters: Eye Candy 4000 Gradient Glow and VM Natural > Sparkle.
Font: I used AbigailJackson
Supplies: Mask by Butterfly Flutterby. You can find this here.
Ready? Let's do it!!
Open your mask and minimize in PSP. Alternatively, you can load it into your PSP masks file. It will then be there for you to use when you want it. :)
Open new image, 700 x 700, white.
Open Frame2. Resize 30%. Copy and paste as new layer.
Open Bkg4. Resize to 700 x 700 pixels. Copy and paste as new layer, below your frame.
Highlight your frame layer. Grab your magic wand and click inside the frame.
Selections > Modify > Expand by 10.
Highlight your Bkg4 layer. Selections > Invert. Hit delete. Selections > Select none.
Add your tube. Drop shadow. If you have one like mine, that's "stepping out" of the frame, then this is how we do it....
Highlight your frame layer again. And again, grab your magic wand and click inside the frame. Selections > Modify > Expand by 5. Selections > Invert. Highlight your tube layer. Grab your eraser brush, and erase the foot or leg or whatever it is for you that's *not* doing the "stepping." lol. Selections > Select none.
Open Blossoms. Resize 30%. Copy and paste onto the right side of your frame. Duplicate this and rotate 5° to the left. Duplicate *that,* and Image > Mirror. Arrange your branches so they cross somewhat toward the bottom of the stems. I used my point-to-point selection tool to remove one of the leaves, as it stuck out too much for my purposes. Drop shadow each branch and merge all down to one layer.
Open Bow4. Resize 20%. Position over the branches as you like. Drop shadow.
Open Button. Resize 40%. Position on the left top corner of frame.
Open LaceDoodle2. Resize 50%. I do this part as the top layer, so I can see what I am working with. So paste as new layer, and if it's not on the top of your layer palette, drag it so it is.
Position your LaceDoodle so it will show around the outside of the frame, and to one side. Duplicate this layer and Image > Mirror. Merge these two layers down. Duplicate *that* layer and Image > Flip. Merge those two layers down. Now drag this layer to above your white background.
Open Bkg13. Resize to 700 x 700 pixels. Copy and paste as new layer, under your lace and over the white background layer.
Apply mask BflyFlby46. Delete mask layer. Answer "yes" to pop-up question and merge group.
Using your pick tool, stretch the mask so your can see it just peeking out from under the lace.
Add your name. I used color #f4a989. Add a Gradient Glow of 4 - 0 - 100, color #f6e9d2. Drop shadow.
Add your copyright, license information if applicable, and tagger's/watermark.
Resize your tag. You can save it now if you choose not to animate.
A N I M A T I O N
Go to your LaceDoodle2 layer. Duplicate twice, for a total of three layers.
Highlight your bottom LaceDoodle layer. Effects > Plugins > VM Natural > Sparkle with the following settings:
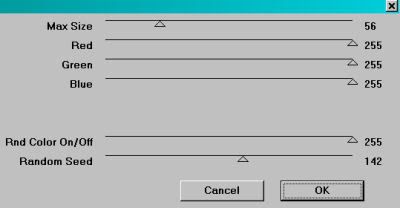
Hit okay.
Highlight the middle LaceDoodle layer. Re-apply the sparkle, but change your random seed slider. Hit okay.
Highlight the top LaceDoodle layer. Use sparkle again, changing the random seed once more.
You can stop here, but I always go over the layers a second time when using this plugin, so I can get more sparkle. It's up to you.
X out the top two LaceDoodle layers. Edit > Copy merged
Open up Animation Shop and right-click on the desktop area > Paste as new animation.
Return to PSP. X out the bottom LaceDoodle layer and open the middle one. Edit > Copy merged
Back to Animation Shop. Edit > Paste > After current frame.
Go to PSP once more, X out of the middle LaceDoodle layer and open the top. Edit > Copy merged
Finally, back to Animation Shop and Edit > Paste > After current frame.
Edit > Select All
Right-click on the top bar of your animation and change the Frame Properties to 25.
View > Animation
Save as .gif and we're done! Thanks so much for trying my tut! I hope it was easy to follow.
.


No comments:
Post a Comment