
You will also need:
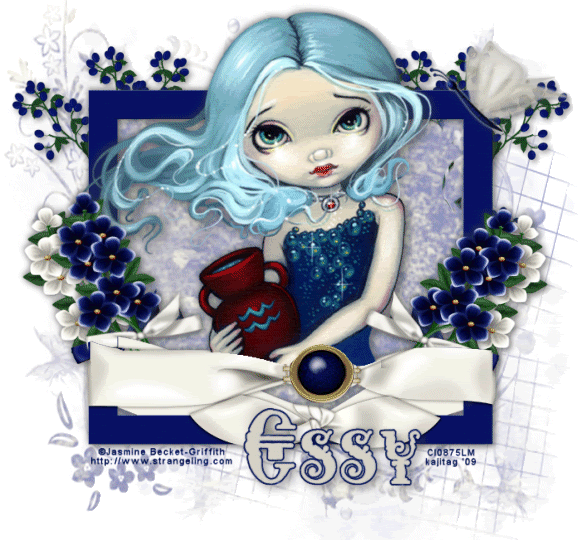
Tube of your choice. I've chosen to use the wonderful artwork of Jasmine Becket-Griffith. You must have a license to use her work. You may purchase that license at CILM.
Animation Shop - at this time, I'm not sure where you can get this program, if you don't already have it. You may, however, save the tut as a static (non-animated) image if you like.
Scrap kit by Essy, of Scrappy Stuff by Essy. You can find this kit at Sweet-n-Sassy Digiscrappers. It's a PTU kit called Blueberries-n-Cream. There is a scrappers' size and a tagger size.
Filters: Eye Candy 4000 Gradient Glow
Font: I used Erotokritos
Supplies: The mask, sg_floral-grungeframe1 and the SparkleSilver. You can find these here. The mask was made by Essex Girl. She has a LOT of wonderful masks there to choose from, so take a look! Thank you, Essex Girl, for sharing your talent with the PSP community!
Okay, let's go for it!! :)
Open your supplies and minimize in PSP. You can alternatively load your mask into your PSP masks file if you care to.
Open new image, 700 x 650, white.
Open bbncpp10. Copy and paste as new layer.
Apply your mask. Delete mask layer, answer "yes" to the pop-up questions, and merge group.
Open bbncfram1. Resize 50%. Copy and paste as new layer.
Add your tube of choice. Position and drop shadow.
Highlight your frame layer. Grab your magic wand and click inside the frame. Selections > Invert.
Now highlight your tube layer. Get your eraser brush and erase the portion of your tube that hangs over the ribbon, button, and bottom of frame. Selections > Select none.
Open bbncflwr10. Resize 35%. Position to the left of the tube and frame. Drop shadow. Highlight the frame layer. Take your magic wand and click on the portion of the ribbon that overlaps with the flower. Highlight the flowers layer. Hit delete. Selections > Select none.
Now, since the ribbon is different on the other side, we can't just mirror the previous layer. So copy and paste the resized bbncflwr10 again, and mirror. Position to the right of your tube and frame. Drop shadow. Repeat the above: highlight your frame layer, take your magic wand and click on the portion of the ribbon that overlaps your flowers. Highlight the flower layer and hit delete. Selections > Select none.
Merge the two bbncflwr10 layers down.
Do the same process for bbncflwr9. Arrange to your taste. Don't forget to drop shadow both layers, and merge the two layers down.
Open bbncbfw1. Resize 50%. Copy and paste as new layer. Rotate left 35°. I put a very small Gradient Glow on this butterfly, so it would stand out against the frame. I used settings 3 - 0 - 100, color white and preset of "Diffuse." Now drop shadow your butterfly.
Take your selection tool, set on rectangle, and draw around the shape of the frame. Highlight your mask layer. Right-click on the bar above your canvas and choose "Cut". Selections > Select none. Now right-click again on the bar and choose "Paste." This gives you two layers to work with. You can name this one "paper" if you need to have it so to keep track.
Open bbncberries2. Resize 50% and mirror. Place so that the berries hang over the top left area of your frame. Duplicate this layer and Image > Mirror. Merge these two layers down and drop shadow. Drag this layer down to just above your mask layer, and below the new paper layer we just created.
Open SilverSparkle.pspimage. Copy and paste this over your tube, if your chosen tube happens to have something sparkly on. :) Place it where you'd like it to sparkle. Duplicate this layer and move to another place you'd like to sparkle. Continue doing this until all the places you want sparkling have a little sparkle. LOL.
Add your name. I used color #d3d0c7. To add the outline, I duplicated the name layer, and dragged the duplicate down below the original layer. Selections > Select all > Float > Defloat > Modify > Expand by 2.
Flood fill with a color from the frame, or use one of your papers as a pattern, as I did. (Doesn't show up, so go ahead and use a color from the frame.) Merge down your top name layer with the flood filled layer. Drop shadow your name.
Add your copyright, license information if applicable, and taggers'/watermark.
Resize your tag. You can save it now if you choose not to animate. But if you want the tube to sparkle, keep going!
A N I M A T I O N
This is a little haphazard.
I ended up with a total of 7 sparkle layers. I simply closed some of them at random, and
Edit > Copy Merged
Go to Animation Shop, right-click on the desktop area, and paste as a new animation.
Return to PSP. Close some of the previously-open sparkles and open some others.
Edit > Copy merged
Back to Animation Shop and Edit > Paste > After current frame.
Back again to PSP and close & re-open some of the sparkles.
Edit > Copy merged
Return to Animation Shop and Edit > Paste > After current frame.
Now, View > Animation. If you don't like the way the sparkles are sequenced, simply delete a frame and go back to PSP to change the order of the sparkles and Edit > Copy merged and then back to Animation Shop and Edit > Paste > After current frame.
This is what I did until I found a sparkle "pattern" that I liked. I said it was haphazard!
Still in Animation Shop, Edit > Select All. Right click on the top bar and choose "Frame Properties." Change this number to 17.
Save as a .gif and we're done! I hope you enjoyed this tut! Sorry for the haphazardness (if that's a word) of the animation, but that's honestly how I did it.
Have a great day!
.


No comments:
Post a Comment