
You will also need:
Tube of your choice. I've chosen to use the glamorous artwork of Jennifer Janesko. You must have a license to use her work. You may purchase that license at CILM.
Animation Shop - at this time, I'm not sure where you can get this program, if you don't already have it. You may, however, save the tut as a static (non-animated) image if you like.
Scrap kit by The Urban Fairy of Terminally Unique Designs. It's a PTU kit, is called Color Me That. It comes in both scrapper and tagger sizes.
Filter: Just the usual, for the name: Eye Candy 3.1 Glass and Eye Candy 4000 Gradient Glow
Font: I used AL Fantasy Type
The mask used is by Monti, of Monti's Pixel Playground. Click on "Masks" in the left side column and then it's the fourth one down. Thank you, Monti, for sharing your resources with us!
You can grab the frame and butterfly here.
Let us begin! :)
Open your mask in PSP and minimize. Alternatively, load it into your PSP masks file for use whenever you're looking for it. Open your frame in PSP and minimize. Load your butterfly into whatever file you use for your animations, so you can find it. lol.
Open a new image, 700 x 700, white.
Open your frame. Resize by 75%. Position to the left side of your canvas. Duplicate and Image > Mirror. Merge down the two frames.
Grab your magic wand and click into the middle of both frames. Be sure to get the little loops and everything made by the rope on the frame, as well!
Selections > Modify > Expand by 7
Open Paper_007. Resize to 700 x 700. Copy and paste under your frame layer. Selections > Invert. Hit delete. Selections > Select none.
Open your tube and mirror. Copy and paste into left frame. Position as you want it and drop shadow. Highlight your frame layer and again grab the magic wand and click inside the left frame. Highlight your tube layer and Selections > Invert. Hit delete. Selections > Select none.
Change the blend mode on this layer to Luminance.
Duplicate this layer and Image > Mirror
Drop shadow your frames.
Open Flowers_016_Flourish_006. Rotate left 45°. Again, I do this stuff on the top layer, so I can see what I'm working with! Duplicate this layer and Image > Mirror. Merge these two layers down and drag to just above your background white layer. Drop shadow.
Open Flowers_016_Flourish_005. As with the first one, rotate left 45°. Duplicate *this* layer and Image > Mirror. Merge these two layers down. Drop shadow. Resize 90%. Drag down to just above your other Flourish layer.
Add your main tube. Position and drop shadow. If you're using a half- or partial- bodied tube like I did, you can make the contrast between the tube and your white background a bit softer by doing this:
Grab your lasso tool, set on Freehand with a Feather of 17. Draw a "smile" curve on the bottom of your tube. Hit delete. Voila!
Highlight your white background layer and add a new raster layer. Flood fill with a color of choice. I took my color from the frames, #c8b384.
Apply your mask. Delete mask layer, answer "yes" to the pop-up question, and merge group.
Use your pick tool to stretch the mask out sideways. I wanted to be sure those lines were visible to the sides.
Add your name. Again, I used #c8b384. If you like, apply Eye Candy 3.1 Glass with the following settings:
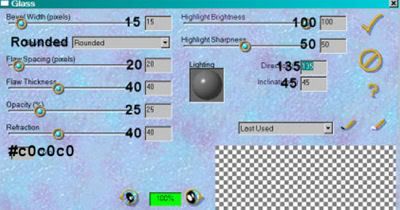
I then applied Eye Candy 4000 Gradient Glow, settings 4 - 0 - 100. Color #4ca7c0. Preset of "diffuse."
Drop shadow your name.
Add your copyright, license information if applicable, and tagger's/watermark.
Resize your tag to taste. Layers > Merge > Merge All/Flatten
Edit > Copy
Open Animation Shop. Right-click the desktop area and paste your work as new animation.
Duplicate this frame once.
Open your MultiStaticBfly.gif.
Edit > Select All
Edit > Copy
Go to your tag and Edit > Select All. Edit > Paste > Into Selected Frame.
Position your butterfly where you'd like it, and release your mouse.
View > Animation
Save as .gif and we're done! I hope you've enjoyed this tut, and that you have a great weekend!
.


No comments:
Post a Comment