
You will also need:
Tube of your choice. I'm using the fantastic pin-up artwork of Dominic Marco. You must have a license to use his work. You may purchase that license at CILM.
Animation Shop - at this time, I'm not sure where you can get this program, if you don't already have it. You may, however, save the tut as a static (non-animated) image if you like.
Scrap kit by Norma of Paradise 4 Scrappers. It is a PTU kit, called Affection.
Filters: Eye Candy 4000 > Gradient Glow
Font: I used Saliere
Supplies: You can find the bling here. There are "identifiers" in the name of this bling file, but I have no idea where I got it. If it is yours, please let me know so that I can give you the proper credit! The mask is by Monti of Monti's Pixel Playground. Click "Masks" in the left column and grab "Monti's Blinds Mask 1."
Okay, let's do it!
Open your mask in PSP and minimize. Or, you could load it into your PSP masks file. Put the bling somewhere that you can find it easily when in Animation Shop.
Open a new image, 700 x 700, white.
Open Frame4. Copy and paste as new layer. Rotate right 90°.
Open Brown Floral paper. Copy and paste as a new layer, under your frame layer.
Highlight the frame layer. Grab your magic wand and click inside the frame. Selections > Modify > Expand by 5. Selections > Invert
Highlight your Brown Floral paper layer. Hit delete. Selections > Select none
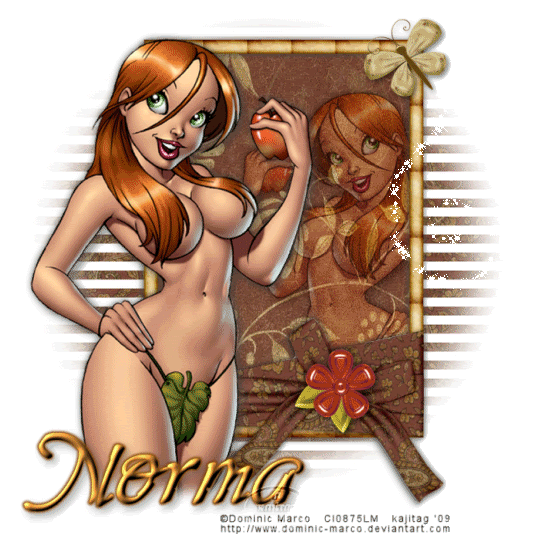
Add your tube. Position and drop shadow.
Duplicate and mirror your tube. Resize as necessary, positioning to the right side of the frame. Drag this layer below the frame layer and above the Brown Floral paper layer.
Highlight your frame layer again. Grab the magic wand and click inside the frame. Selections > Modify > Expand by 5. Selections > Invert
Highlight your second tube layer. Hit delete. Selections > Select none.
Drop shadow the second tube layer. Set the blend mode to "Soft Light."
Open Candyflower. Resize 30%. Copy and paste as a new layer. Position over the center of the bow on the frame. Drop shadow.
Drop shadow your frame.
Open Dragonfly. Resize 25%. Copy and paste as a new layer. Position in the upper right corner of the frame. Drop shadow your dragonfly.
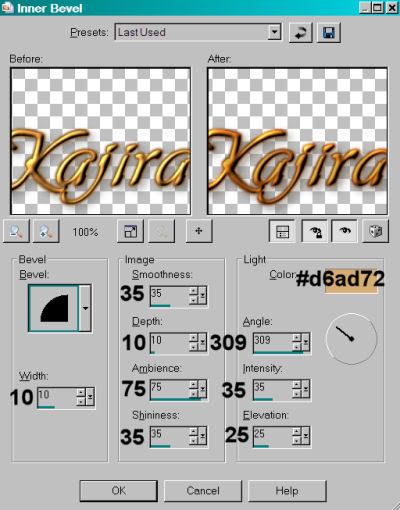
Add your name. I used color# d6ad72. I also used an inner bevel, settings below:
Hit okay.
Effect > Plugins > Eye Candy 4000 > Gradient Glow, settings of 3 - 25 - 100, color #834603. Drop shadow your name.
Add your copyright, license information if applicable, and taggers'/watermark.
Resize your tag to your taste. If you choose not to include the bling, you can save it now and be done! If you want the bling, here we go!
A N I M A T I O N
Close out your dragonfly layer.
Edit > Copy merged
Open Animation Shop, right-click on the desktop area and paste as new animation.
Duplicate this frame until you have a total of 10 frames. Move the slider at the bottom of the animation to the first frame.
Open the bling file. Edit > Select All
Rotate the bling right 90°

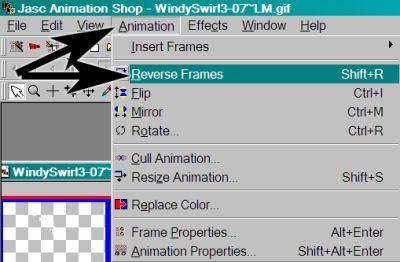
Reverse the frames.
Making sure all frames are still selected, Edit > Copy
Return to your tag. Edit > Select All. Edit > Paste > Into Selected Frame
Position your bling up toward the top right hand corner of the frame. Remember, you're going to be putting the dragonfly on the very top of it. Release your mouse button.
Return to PSP. Close out all layers. Open the dragonfly layer. Edit > Copy merged
Back to Animation Shop. Right-click on the desktop area and paste as a new animation.
Duplicate this frame until you have a total of 10 frames. Move the slider on the bottom of these frames to the first frame.
Edit > Select All. Edit > Copy
Return to the original animation that we're building, and Edit > Select All. Edit > Paste > Into Selected Frame.
Move your dragonfly into place over the top of the bling. Release your mouse button.
Click on your second frame to highlight it. Right-click on the top bar of the animation and choose "Frame Properties." Change this number to 13.
Click on your third frame to highlight it. Keeping this frame highlighted, move your slider at the bottom to the ninth frame. Holding your shift key down, click on the ninth frame so that frames 3 - 9 are highlighted. Right-click on the top bar of the animation and choose "Frame Properties" again. Change this number to 17.
Finally, click on your 10th frame to highlight it. Right-click on the top bar of the animation and choose "Frame Properties" again. Change this number to 100.
View > Animation. We are done! I hope you enjoyed designing your tag from this tut! Have a great day!
.


No comments:
Post a Comment