
You will also need:
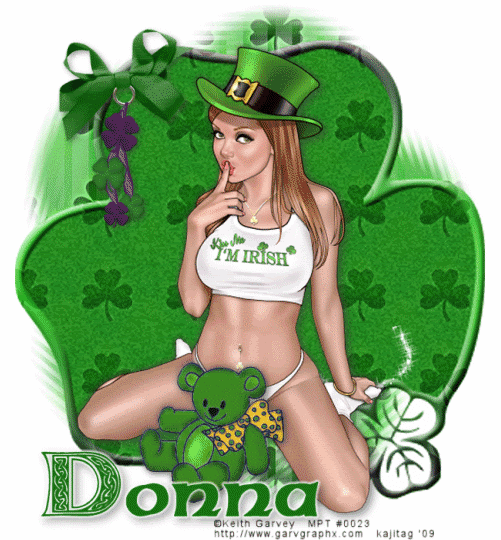
A tube of your choice. A sitting or kneeling tube would work best for this tutorial. I'm using the artwork of Keith Garvey. You must have a license to use his work. You may purchase that license at My PSP Tubes.
Animation Shop - at this time, I'm not sure where you can get this program, if you don't already have it. You may, however, save the tut as a static (non-animated) image if you like.
Scrap kit by Donna of Scraps by Donna W. It is a FTU kit, called Celtic Charm.
Filters: Eye Candy 4000 > Gradient Glow
Font: I used Celticmd
Supplies: The mask, by Sophisticat Simone, and the bling, which was made by Roberta of Roberta's Designz. Her site is no longer working, so if you know her and know where she is on the Internet, let me know so I can direct others her way! Thanks Roberta, wherever you are! You can get these supplies here.
Open your mask and minimize in PSP. Alternatively, you can load your mask into your PSP masks folder, for future use. File your bling where it will be easily available when you're in Animation Shop.
Let's start!
Open a new image, 650 x 700, white.
Open paper1. Resize to 700 x 700 pixels. Copy and paste as new layer.
Apply your mask. Delete mask layer, answer "yes" to the pop-up question and merge group.
Resize your mask 105%. That's not much, but it works. :)
Open the tag. Copy and paste as new layer. Resize 200%.
Open paper 1 again. Copy and paste as new layer.
Highlight your tag layer. Take your magic wand and click OUTSIDE the tag.
Highlight your paper layer and hit delete. Reduce the opacity on this layer to 75. Change the blend mode to Soft Light.
Drop shadow your tag.
Add your tube of choice. Resize, position and drop shadow as you like.
Open the bear. Copy and paste as new layer. Resize 85%. Position as you like and drop shadow.
Open Hanger1. Copy and paste as new layer. Resize 70%. Positon on the upper left of your shamrock tag. Drop shadow.
Add your name. I used color #187111. Add a Gradient Glow of 4 - 0 - 100, color white. Drop shadow your name.
Add your copyright, license information if applicable, and your taggers'/watermark.
Resize your tag to your desired size. You may save now if you choose not to animate.
A N I M A T I O N
Layers > View > None
Open the bottom four layers. This should look something like this:
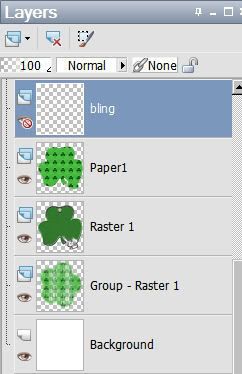
And your canvas should look like this:
Edit > Copy merged
Open Animation Shop, right-click on the desktop area and paste as a new animation.
Duplicate this frame until you have 21 frames. Move your slider bar at the bottom of your animation to the first frame.
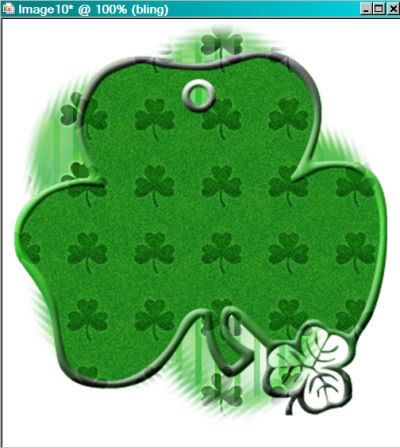
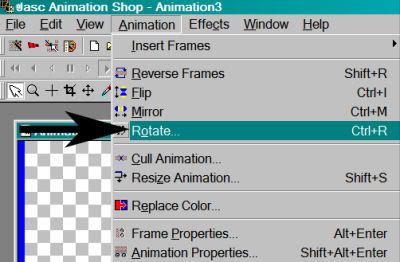
Open your bling. Delete the first frame. Now we're going to rotate the bling:
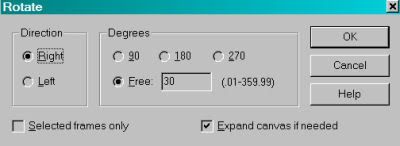
Edit > Select All. Edit > Copy
Return to the background animation you built when you first opened Animation Shop. Edit > Select All. Edit > Paste > Into Selected Frame
Line up your bling so the stem of the bling fits somewhat into the stem of the tag layer. See below:
Release your mouse button.
Return to PSP. Close out the bottom four layers and open all the layers above that.
Edit > Copy merged
Return to Animation Shop, right-click on the desktop area and paste as a new animation. Duplicate this frame until you have a total of 21 frames. Move your slider bar at the bottom of your animation to the first frame.
Edit > Select All. Edit > Copy
Go back to the animation you've been building and Edit > Select All. Edit > Paste > Into Selected Frame.
Position as you like and release your mouse button.
View > Animation. Save as a .gif and you're done! Aye and begorrah!! :) Have a great week!!
.


oh tks a lot
ReplyDelete