

You will also need:
Four tubes of your choice, by the same artist. Having one that's laying down would work best. However, there are other frame groupings in this HUGE scrap kit that are of vertical orientation, so you could use a standing one, too. I'm using the sexy artwork of Jessica Dougherty. You must have a license to use her work. You may purchase that license at CILM.
Scrap kit is by Donna of Aussie Scraps. It's a PTU kit, called Flowers for Valentines. This store isn't set up in a way that I can link you directly to the kit. Look on the left side, scrolling down quite a bit, until you see "Designs by Donna." Click on that and it will take you to a page of Donna's kits. This is a HUGE kit, and available both in scrapper and tagger sizes.
Filters: Eye Candy 4000 > Gradient Glow, Xero > Porcelain
Font: I used Love
Supplies: Just the mask, another unknown artist and ambiguous name, so if it turns out to be yours, let me know and I'll credit you correctly! You can find the mask here.
I did a lot of colorizing in this tut. I will give you examples, but you needn't do it if you don't want.
Let's begin!!
Create a new file, 750 x 700, white.
Open paper41. Copy and paste as a new layer. Using your pick tool, spread the sides of the paper out to cover the whole background.
Apply your mask. Be sure "fit to layer" is checked. Delete the mask layer, answer "yes" to the pop-up question, and merge group.
Open tripleframe1. Copy and paste as a new layer. Resize 95%.
Highlight your mask layer.
Open paper34. Copy and paste as a new layer.
Grab your lasso tool, set at point-to-point, and draw around the sides of the triple frame until the entire group of frames is selected. Selections > Invert.
Highlight your paper layer. Hit delete. Selections > Select none.
Now, choose which tubes are going to be in the frames. Add one of the tubes. Resize, position, and drop shadow to your liking.
Grab your lasso tool again, set on point-to-point. Draw your selection around the frame of your choosing (within the three frames). Selections > Invert.
Highlight your tube layer. Hit delete. Selections > Select none.
Repeat this process for the other two frames in the group.
Your tubes should be below the tripleframe layer and above your paper layer. Merge your three tube layers down.
Effects > Plugins > Xero > Porcelain. Default settings.
Close out any layers above and below the frames, tubes, and paper layers. Leave those layers open.
Layers > Merge > Merge Visible.
Open the other layers again.
Add your main tube. Resize, position and drop shadow to your liking.
Open Loveyouwordart1. Copy and paste as a new layer. Drag this layer below your frames, just above your mask. Add a soft drop shadow.
Open a rose of your choice. Resize 50%.
This is the point where I thought to capture screen shots for the colorizing. Again, if you're not colorizing, just skip it. Doesn't apply to you!
Grabbing your lasso tool, again set at point-to-point, draw around the rose (the flower only, leaving out the stem).
Adjust > Hue and Saturation > Colorize, settings below:
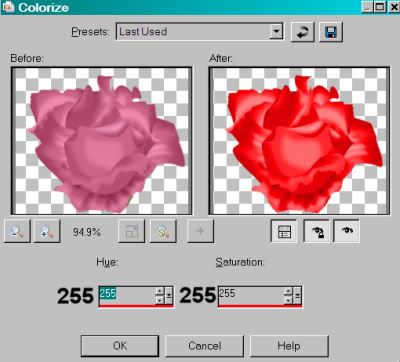
Hit okay.
Then Adjust > Brightness and Contrast > Brightness/Contrast with the following settings:
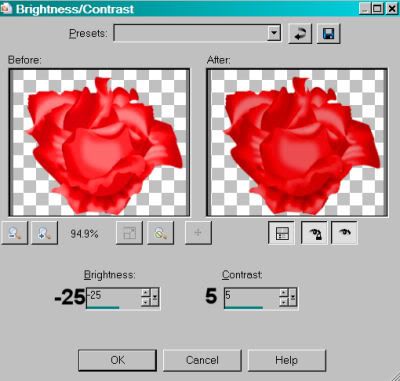
Hit okay.
Copy and paste as a new layer. Rotate left 75°. Drop shadow. Duplicate this rose. Rotate the duplicate left 25°.
Open another rose of your choosing. Resize 50%. Copy and paste as a new layer. Rotate left 80°. Drop shadow this rose. I arranged the last rose layer in between the other two rose layers. Position them all so that they cross toward the bottom of the bunch.
Open Bow2. Resize 25%. Copy and paste as a new layer. I colorized with the same settings for this. You may not need to. Rotate the bow left 90°. Be sure this layer is above all the rose layers. Position over the crossing point of the roses. Drop shadow your bow.
Open heartbeads 1 or 2. Whichever you like. Resize 50%. Copy and paste on one end of your triple frame. Drop shadow the beads.
Add your name. I used color #e6090d. Stroke was set at 3, same color. I added an inner bevel, settings below:

Effects > Plugins > Eye Candy 4000 > Gradient Glow set at 3 - 0 - 100, color black, preset of "diffuse." Drop shadow your name.
Add your copyright, license information if applicable and taggers'/watermark.
Resize your tag to the size of your choice. Merge your layers, and save! We're done! I hope you enjoyed this tut!
.


No comments:
Post a Comment