
You will also need:
Animation Shop - I've found it here! This is from CNET, so it's a safe download, too!
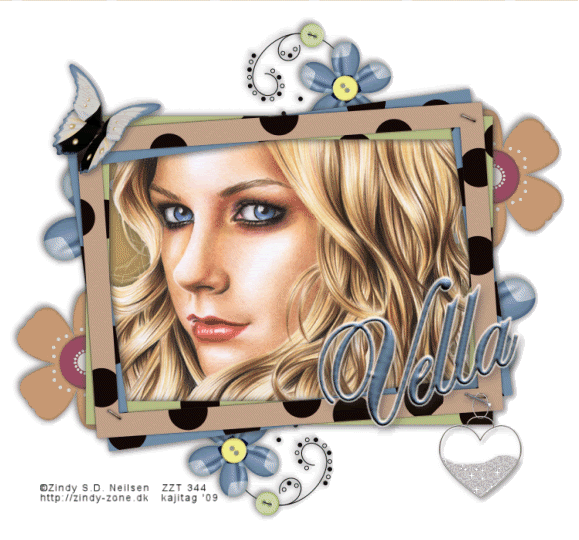
A tube your choice. I'm using the wonderful artwork of Zindy S.D. Neilsen. You must have a license to use her work. You may purchase that license at Zindy's web site.
Scrap kit is by Vella, of Wench Designs. It's a FTU kit, available on her site. This particular kit is part of yet another blog train (this one called a blog hop) I've stumbled upon. You can find it here. This blog hop originates at Baby V Design. You can find more portions of it there, too! Thanks girls, for the free stuff! Be a good community member, and thank the ladies who do this for us while you're downloading!!
Filters: Eye Candy 4000 > Gradient Glow, VM Natural > Sparkle
Font: I used Alexandra Script
Supplies: Just the widdle-bitty staple!!!
Let's begin!!
Open a new image, 700 x 750, white.
Open the frame. Copy and paste as a new layer.
Add your tube. Resize if needed, position below the frame and drop shadow.
Highlight the frame layer. Grab your magic wand and click inside the frame. Selections > Modify > Expand by 10. Selections > Invert.
Highlight your tube layer. Hit delete. DO NOT DESELECT!
Open paper4. Resize to 750 x 750 pixels. Copy and paste as a new layer. Drag this layer below your tube layer. Hit delete. Selections > Select none.
Drop shadow your frame.
Open "FlowersNButtons." Resize 20%. Copy and paste as a new layer. I positioned mine to the upper right corner of the canvas. See my tag for reference. Duplicate this layer and Image > Mirror, Image > Flip. Merge these two layers down and drop shadow.
Open Heart Charm. Resize 5%. Copy and paste as a new layer. I positioned mine to the lower right corner of the frame. Again, see my tag for reference.
Open the staple in your supplies. Copy and paste as a new layer. Rotate left 25°. Position above the heart charm layer and the staple that appears on the frame layer. Drop shadow your staple.
Open butterfly1. Resize 17%. Copy and paste as a new layer. I positioned mine on the upper left corner of the frame. See my tag for reference. Drop shadow your butterfly.
Add your name. I used color#708ba6 for the fill. Stroke size is 2, color is #c0a08b. I added the following inner bevel:
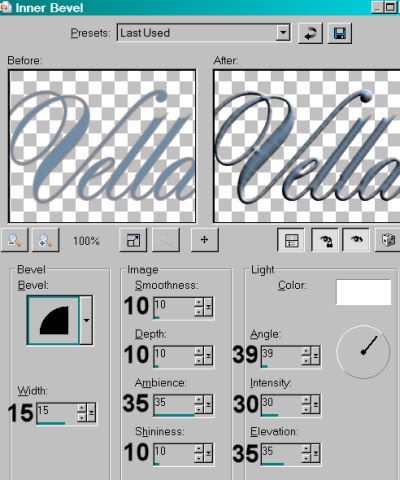
Hit okay.
Effects > Plugins > Eye Candy 4000 > Gradient Glow set at 3 - 0 - 100, color white, preset of "medium."
Drop shadow your name.
Add your copyright, license information if applicable and taggers'/watermark.
Resize your tag to the size of your choice. At this point you could stop, if you choose not to animate. Just merge your layers, and save!
A N I M A T I O N
Go to your heart charm layer. Duplicate this layer twice, for a total of three layers.
Highlight the bottom of these layers.
Get your lasso tool, set on point-to-point. Draw a selection carefully around the "fill" area in the heart charm. You may need to zoom in to do this, I sure did!
Effects > Plugins > VM Natural > Sparkle with the following settings:
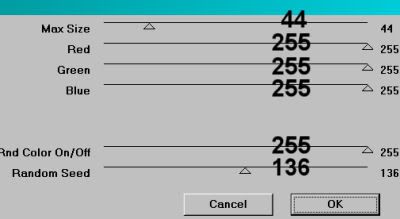
Hit okay.
Highlight the middle heart charm layer and do the same thing, but change the "Random Seed" setting to something... well... random!! You can play with the size slider, too, if you like.
Hit okay.
Highlight the top heart charm layer and add sparkles again, changing the Random Seed and/or Size setting again.
Hit okay.
Now, I'm sorry if this is a repeat for you, but in case you've NOT done any of my tuts with this Sparkle filter, I'll say it anyway: Whenever I use VM Natural > Sparkle, I do it twice. So go through the three layers again the same way.
Selections > Select none.
Close out the top two heart charm layers. Make sure the bottom heart charm layer is open.
Edit > Copy merged
Open Animation Shop, right-click on the desktop area, and paste as a new animation.
Return to PSP. Close out the bottom heart charm layer, and open the middle heart charm layer.
Edit > Copy merged.
Return to Animation Shop and Edit > Paste > After Current Frame.
Once more back to PSP. Close out the middle heart charm layer and open the top heart charm layer.
Edit > Copy merged.
And again, back to Animation Shop. Edit > Paste > After Current Frame.
Edit > Select All.
Right-click on the bar on top of your animation and choose "Frame Properties." Change this number to 35.
View > Animation. And we're done! I hope you've enjoyed this tutorial! Thanks for stopping by!
.


No comments:
Post a Comment