
You will also need:
A tube of your choice. I'm using the watercolor artwork of Jo Lynch. You must have a license to use her work. You may purchase that license at CILM.
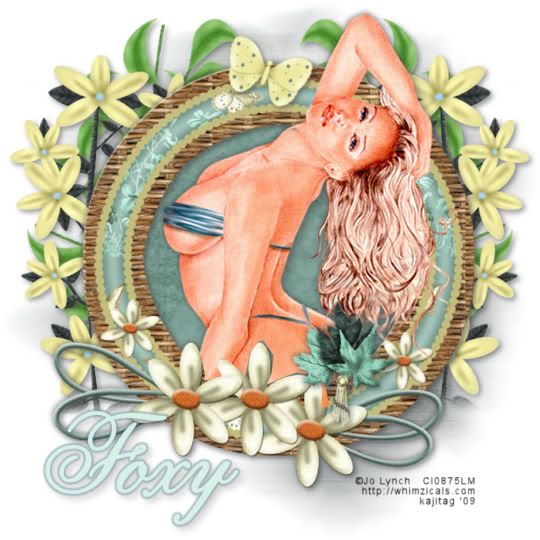
Scrap kit is by Foxy of Scrap It Sassy. It's a PTU kit, called Spring Confidence. This is another beautiful kit!
Filters: Eye Candy 4000 > Gradient Glow
Font: I used Anglia Script Enhancements
Supplies: Just a mask by the wonderful Becky, whose site is long gone by now. You can find the mask here.
Let's go!!
Create a new file, 700 x 700, white.
Open paper12. Copy and paste as a new layer.
Apply your mask. Delete the mask layer, answer "yes" to the pop-up question, and merge group.
Image > Mirror (your mask)
Open Frame3. Copy and paste as a new layer. Resize 125%.
Highlight your mask layer.
Open paper10. Copy and paste as a new layer.
Grab your lasso tool, set on point-to-point. Draw your selection around the frame. Selections > Invert.
Highlight your paper layer. Hit delete. Selections > Select none.
Add your tube. Resize and position as you like it. Duplicate your tube and drag it to the top of the layer palette. You should now have one tube between the frame and the paper, and one tube on your top layer.
Using your lasso tool, set at point-to-point, go to the bottom tube layer and draw around the excess on the bottom of the tube. Hit delete. Selections > Select none.
Highlight the top tube layer and use your lasso tool, drawing around the flower area of the frame. You don't have to be precise, you just need to get the tube area that overlaps the bottom area of the frame. Hit delect. Select none.
Drop shadow your bottom tube layer.
I sincerely hope y'all got through that alright. I don't think I was very clear in explaining it! Sorry!
Staying on your top layer, open the leafs1 element from the scrap kit. Copy and paste as a new layer. Position this on the upper left of the frame, so that there will be leaves sticking out over it and on the left side. See my tag for reference purposes. Duplicate this layer and Image > Mirror. Duplicate the original again, and rotate left 75°. Duplicate this rotated layer and Image > Mirror. Merge down all four layers of the leafs1 element. Drop shadow.
Open Flowers1. Copy and paste as a new layer, positioned over the left area of the leaves. See my tag for placement reference. Duplicate this layer and Image > Mirror. Merge these two layers down and drop shadow your flowers.
The bottom of the stems on my flowers stuck out like a sore thumb IMO, so I grabbed my lasso tool, set on freehand, feather of 23. Draw in a curve (like a smile) over both the stem bottoms. (LOL!) Hit delete. Selections > Select none.
Open Butterfly1. Resize 20%. Copy and paste as a new layer. Rotate 20° right. Place up on the top center of the frame, to fill in the empty area. Drop shadow your butterfly.
Now, because my tube was showing her bare rear, and Photobucket would delete my tag if I posted it like that, I chose the following. You probably won't have to do this part, but since I did it, I'm including it in the tutorial:
Open Bouquet1. Resize 35%. Copy and paste, positioning appropriately on the tush. Drop shadow the bouquet, if you're using it.
Add your name. I used color #d7f1e8. Effects > Plugins > Eye Candy 4000 > Gradient Glow set at 4 - 0 - 100, color #306074. Drop shadow your name.
Add your copyright, license information if applicable and taggers'/watermark.
Resize your tag to the size of your choice. Merge your layers, and save! We're done! I hope you enjoyed this tut!
.


No comments:
Post a Comment