
You will also need:
A tube of your choice. I'm using the fun & sexy artwork of Mark Waysl. You must have a license to use his work. You may purchase that license at CILM.
Unfortunately, the tube I used for this particular tutorial is not available to everyone. It was a bonus tube, given out as a prize during a promotion CILM was having. Ruby asked me about this, so I went on a hunt through my tube files, and found it in with the bonus tubes. I always try to get those tubes, as once I missed a Janesko that I darn well should have had, and learned it was a bonus tube. So I've been getting them ever since. My apologies for those of you who have been looking for this particular tube. And my thanks to Ruby for pointing it out. I'm sorry hon! And to every one else, too!!
Animation Shop - I've found it here! This is from CNET, so it's a safe download, too!
Scrap kit is by Yvette, half of the team at Misfits Scrapz. It's a FTU kit, called Rock Revolution. Be SURE to leave Yvette some thank yous if you download this freebie!!
Filters: No outside filters in this tut!
Font: I used Jokeman
Supplies: The mask, which I got from Chelle at Wee Scots Lass. Thank you so much, Chelle! Also, there are two musical notes files. One static and one animated. I don't know from where I got these two files, so if they're yours, PLEASE let me know (nicely, please) and I'll credit you correctly! You can get these supplies here!
Let's get to it!!
Open your mask and static musical notes file in PSP and minimize. Alternatively, you can load your mask into your PSP masks file, for use again later. Place your animated musical notes wherever they will be handy when we get to Animation Shop.
Create a new file, 700 x 750, white.
Add a new raster layer.
Selections > Select All.
Open Paper4. Copy and paste INTO SELECTION. Selections > Select none.
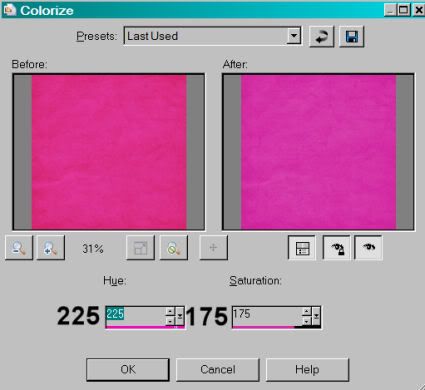
For my tube, I needed this paper colorized. Just in case you're wondering, my settings were:
Apply your mask. Delete mask layer, answer "yes" to pop-up question, and merge group.
Add your tube. Resize, position and drop shadow to your liking.
Open Drumkit. Copy and paste as a new layer. Drag this layer below the tube layer. Position as you like it.
Because certain parts of this scrap kit have a kind of "dullness" to them, I brought them out a bit with Adjust > Brightness and Contrast > Brightness/Contrast using the following settings:
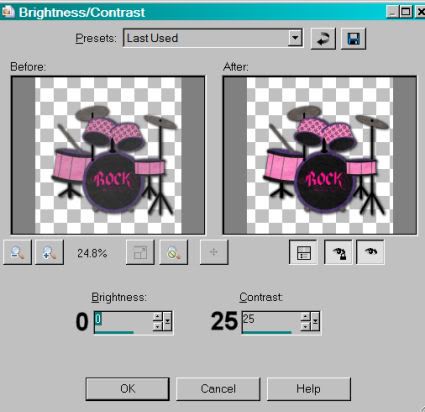
I did this for the drum kit, and the record. Drop shadow your drum kit.
Open Label4. Colorize as I showed, above, if you like. Resize 50%. Copy and paste as a new layer. I put mine on the drum. Drop shadow your label.
Open the Microphone. Copy and paste as a new layer. Position and drop shadow to your liking. I tried to get the microphone to look at least a LITTLE bit like it was being used by the tube....
Open Musicnotesbeingplayed from the supplies I gave you. Resize 175%. Adjust > Sharpness > Sharpen. Copy and paste as a new layer. Rotate left 25°. I tried to position this as though it was coming from the tube, as well. See my example for reference purposes. Duplicate this layer and rotate right 15°. Position these as you would like them. Give them both a soft drop shadow.
Open Record2. Resize 50%. As I said above, I colorized this AND adjusted the brightness and contrast on it. See the settings above. Place your record wherever you like it. Drop shadow your record.
Add your name. I used black as a fill color, and color #d83fab for the stroke, stroke width of 3.
I added my now-standard inner bevel, settings below:
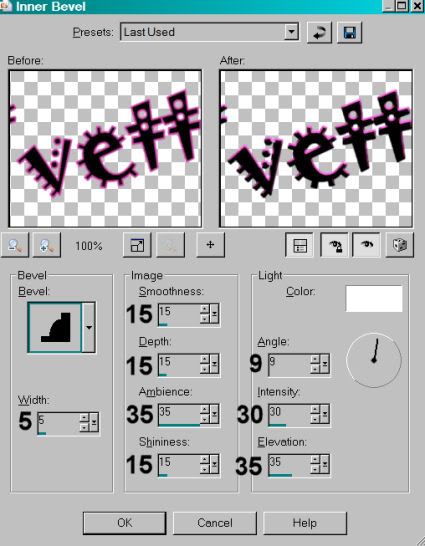
Drop shadow your name. Rotate left 15°. Position at the bottom right of the tag.
Add your copyright, license information if applicable and taggers'/watermark.
Resize your tag to the size of your choice. Merge visible all layers. You can save here and be done, if you choose not to animate.
A N I M A T I O N
Edit > Copy.
Open Animation Shop, right-click on the desktop area and paste as a new animation.
Duplicate this frame until you have a total of 8 frames. Move the slider on the bottom of this animation to frame 1.
Open your music notes animation.
Edit > Select All. Edit > Copy
Go back to the animation you are building and Edit > Select All. Edit > Paste > Into Selected Frame.
Place your notes where you want them (I put them close to the tube again, trying to make it appear as though they're coming from her or the "band"). Release your mouse button.
Repeat this process if you want two instances of this animation, as I did.
Edit > Select All.
Right-click on the top bar of your animation and choose "Frame Properties." Change this number to 35.
View > Animation. If you like what you see, save as a .gif and we're done! Thanks for trying my tut!
.


great tut I cant seem to find the tube at cilm which pack is it in?? lol
ReplyDeleteSorry, Ruby! I updated the tut, and I thank you VERY much for pointing this out. But this particular tube is not available to everyone. It was a bonus tube, given out as a prize during a promotion CILM was having. I'm so sorry, hon!!
ReplyDelete