
You will also need:
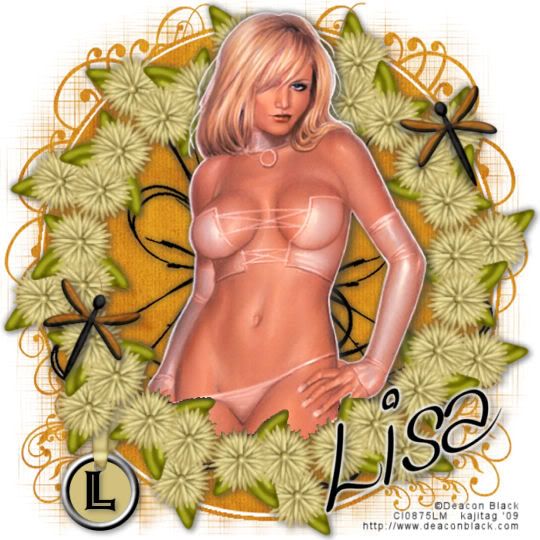
A tube of your choice. I'm using the sexy artwork of Deacon Black. You must have a license to use his work. You may purchase that license at CILM. You may notice, if you've clicked on the link I gave for Deacon Black, that it goes directly to his art at CILM. It turns out his URL isn't working right now. The title bar says it's the right place, but the content is gone. So I decided to link you to his art at CILM. Maybe you'll get some!!
Scrap kit is by Lisa of Scrap It Sassy. It's a PTU kit, called Citrus Blaze. It's a really different color spectrum (IMO), and it's on sale right now for a buck!! ($1 USD)
Filters: Eye Candy 4000 > Gradient Glow, Mura's Meister > Copies
Font: I used Kingthings Wrote for the name, Ashley Inline for the initial on the tag.
Supplies: The doodle, another unknown artist and ambiguous name, so if it turns out to be yours, let me know and I'll credit you correctly! You can find the doodle here. Also, the mask, by Gabee. You can find this mask on Gabee's Fotki page. It is gabeemask13. Thanks for sharing your work with the PSP community, Gabee!!
Let's get to this!!
Open your supplies and minimize in PSP. Alternatively, you could add your mask to your PSP masks folder, so you'd have it for use later. Always give proper credit where you can, though, as you collect your PSP booty!
Create a new file, 700 x 700, white.
Add a new raster layer. Selections > Select all.
Open paper3. Copy and paste INTO SELECTION.
Apply your mask. INVERT TRANSPARENCY! Delete the mask layer, answer "yes" to the pop-up question, and merge group.
Open FlowerCluster4. Copy and paste as a new layer. Resize 80%.
Effects > Plugins > Mura's Meister > Copies with the following settings:
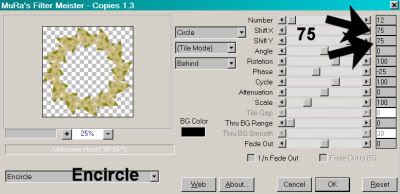
Hit okay.
It may have just been me, but when I just looked at it at this point, it didn't seem to me that the wreath created and the mask layer were centered together. If you see the same thing (don't feel bad if you don't -- I've been weird all my life! lol), fiddle with your mover tool until you see it all nice and centered.
Add your tube. Resize, position and drop shadow to your liking. If you want it to "emerge" from the wreath of flowers we made, then...
Highlight your wreath layer. Grab your magic wand and click inside the wreath. Selections > Modify > Expand by 1. Selections > Invert.
Highlight your tube layer. Get your eraser brush and erase any parts of the tube that overlap the lower portion of the wreath. Selections > Select none.
Open Tag4. Copy and paste as a new layer. I positioned mine in the bottom left corner of the tag. See my example for placement reference. Drag this layer down below the wreath layer. Drop shadow your tag.
Open Dragonfly3. Resize 45%. I added a small inner bevel to my dragonfly. This isn't necessary, I was just experimenting. If you'd like to, here are the settings I used (screen shot from a previous tut):
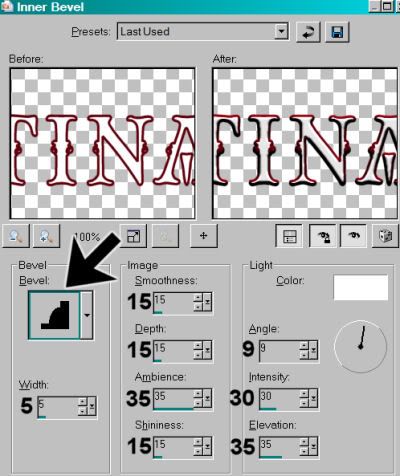
Hit okay.
Rotate dragonfly 25° right. Duplicate this layer. Image > Mirror. I placed the duplicate on the top right. Again, see my example if you wish. Merge these two layers down and drop shadow your dragonflies.
Open the doodle you got from my supplies. Copy and paste as a new layer. Drag this layer to just above the mask layer. Move it a bit to the right, so there is more doodle showing on the right side of your tube than your left. Duplicate this layer and Image > Mirror. Position as you like. Merge these two layers down and drop shadow your doodle, softly.
If you want to add your initial to the tag, now would be the time to do it. Drop shadow the initial.
Add your name. I just used black for the name. I added Effects > Plugins > Eye Candy 4000 > Gradient Glow set at 5 - 0 - 100, color white.
Drop shadow your name.
Add your copyright, license information if applicable and taggers'/watermark.
Resize your tag to the size of your choice. Merge your layers, and save! We're done! I hope you enjoyed this tut!
.


No comments:
Post a Comment