
You will also need:
Animation Shop - I've found it here! This is from CNET, so it's a safe download, too!
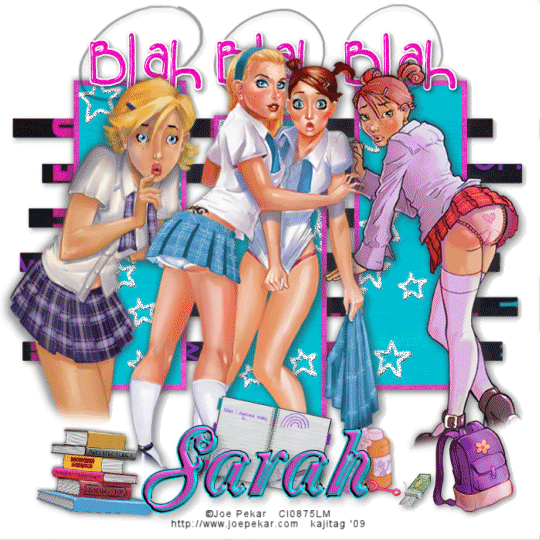
A tube (or tubes, as I have done) of your choice. I'm using the fun artwork of Joe Pekar. You must have a license to use his work. You may purchase that license at CILM.
Scrap kit is by Sarah, half of Pimp My Tags With Scraps. It's a PTU kit, called Her Highschool Years. This kit (plus a couple of others, you may have seen on their blog) is on sale for 20% off March 28 and 29 only!! Get them while they're hot!
Filters: No outside filters used in this tut!
Font: I used Oberon LET Plain 1.0
Supplies: The first is the template, which I got from Beth at Blissfully Beth. I did take about half of the template out (or maybe less), but I did use the template as my "design" for the tag. Leave Beth a little love! You can get the template here.
Next is the book tube. I don't know from where I got this one. I've had it forEVAH. If it is yours, please let me know so that I may credit you properly! And you can find the book tube here!
Let's create!!
Open your mask and minimize in PSP. Alternatively, you could file the mask in your PSP masks file for use later. Just be sure to give credit where it's due!
Open your template. Duplicate this template and close the original. Delete the credit layer, the word art layer and the hearts layers.
Resize the template 110%. Then Image > Canvas Size > 700 x 700, centered.
The first thing I did was to add my tubes, resize them as needed and position, then drop shadow. I didn't want the ones with feet and shoes to have those feet and shoes dangling out into the white space, so I did the following:
Grab your lasso tool, set on freehand, feather 17. Highlight the tube layer with which you will be working. Draw a curve downward and then upward (like a smile) at the feet of your first tube. Hit delete a couple times. Selections > Select none. If you have more than one tube, as I did, do this on each tube you want to remove stuff from on the bottom. lol.
Highlight rec 1 layer. Grab your magic wand, setting feather back at zero and click inside the center of rec 1.
Highlgiht rec 2 layer. Do the same.
Highlight rec 3 layer. Do the same again.
Highlight rec 1 layer.
Open pp1. Copy and paste as a new layer. Selections > Modify > Expand by 1. Selections > Invert.
Still on the paper layer, hit delete. Selections > Select none.
Highlight rec 1 layer again. Grab your magic wand and click on the outside "frame," if you will, of the layer. Do the same for rec 2 and rec 3 layers.
Highlight rec 1 layer.
Open pp3. Copy and paste as a new layer. Selections > Modify > Expand by 1. Selections > Invert.
Still on the paper layer, hit delete. Selections > Select none.
Now, delete rec 1, rec 2, and rec 3 layers. Merge your two paper layers down. Now you should have one layer with three rectangles, colored blue and pink. Drop shadow this layer.
Open "Blah blah blah." Copy and paste as a new layer. Bring it to the top of your canvas. I positioned it in the layer palette under my tubes. See my tag for reference. Drop shadow this layer.
Highlight your gray bars bg layer. Selections > Select all. Selections > Float > Defloat > Modify > Expand by 1.
Open pp14. I rotated mine until I got the colors positioned where I wanted them. Copy and paste as a new layer.
Selections > Invert. Hit delete. Selections > Select none. Delete your gray bars bg layer. Drop shadow the paper layer you just made.
Open notebook. Resize 25%. Copy and paste as a new layer. I positioned mine in the middle at the bottom of the canvas. Drop shadow.
Open the book_tube.psp from your supplies. Copy and paste as a new layer. I positiioned mine on the left side of the canvas, at the bottom. Rotate right 5°. Drop shadow your books.
The backpack and bubbles layer I used was part of one of the Joe Pekar tubes. I'm sorry I can't share that. If you have another school time tube, you can copy and paste it to place on the right bottom area of your canvas and drop shadow that.
Highlight your layer of rectangles in blue and pink that we made. Grab your magic wand and click inside the blue portions of these rectangles. Selections > Modify > Expand by 1.
Open gel pen doodle stars from the kit. Copy and paste as a new layer. Position these stars so that they will cover your desired areas. I moved this up a bit on the canvas. I then copied and pasted another copy of these stars and positioned them where I wanted them. Selections > Invert. Hit delete on both layers of stars. Selections > Select none. Merge down these two stars layers.
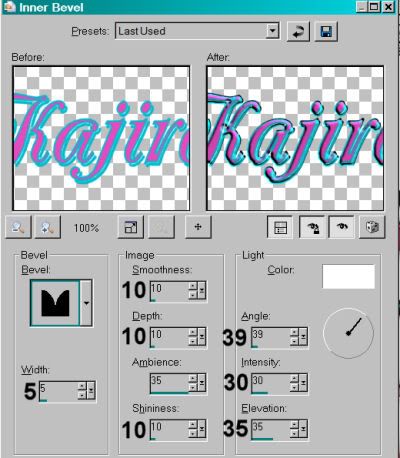
Add your name. I used color #e14dbd for the fill. Stroke set at 2, color #00bdd0. I added the following inner bevel:
Drop shadow your name.
Add your copyright, license information if applicable and taggers'/watermark.
Resize your tag to the size of your choice. At this point you could stop, if you choose not to animate. Just merge your layers, and save!
A N I M A T I O N
Go to your gel pen doodle stars layer. Duplicate this layer twice, for a total of three layers.
Highlight the bottom of these layers.
Adjust > Add/Remove Noise > Add Noise with the following settings:
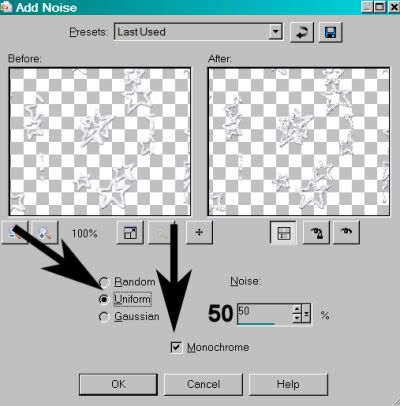
Hit okay.
Highlight the middle stars layer and do the same thing, but change the "Noise" setting to 55.
Hit okay.
Highlight the top stars layer and add Noise again, but change the setting to 60.
Hit okay.
Close out the top two stars layers. Make sure the bottom stars layer is open.
Edit > Copy merged
Open Animation Shop, right-click on the desktop area, and paste as a new animation.
Return to PSP. Close out the bottom stars layer, and open the middle stars layer.
Edit > Copy merged.
Return to Animation Shop and Edit > Paste > After Current Frame.
Once more back to PSP. Close out the middle stars layer and open the top stars layer.
Edit > Copy merged.
And again, back to Animation Shop. Edit > Paste > After Current Frame.
View > Animation. And we're done! I hope you've enjoyed this tutorial! Thanks for stopping by!
.


No comments:
Post a Comment