

You will also need:
A tube of your choice. I'm using the excellent artwork of Jennifer Janesko. You must have a license to use her work. You may purchase that license at CILM.
Animation Shop - I've found it here! This is from CNET, so it's a safe download, too!
Scrap kit is by Tina of Bitchin Scraps Boutique. It's a PTU kit, called True Red.
Filters: No outside filters in this tut!
Font: I used 2 Matilda DNA
Supplies: The doodle, made by Ziggy Fan. You can find the doodle link here!! Thanks, Ziggy Fan!
Let's get to it!!
Create a new file, 750 x 700, white.
Open rectangleframe2. Rotate either way 90° ALL LAYERS CHECKED! Resize 75%. Copy and paste as a new layer.
Highlight your background layer. Grab your magic wand and click inside the frame. Selections > Modify > Expand by 7.
Add a new raster layer. Flood fill this layer with a color of your choice. I used #c38294. Selections > Select none.
Add your tube. Resize, position and drop shadow to your liking. If you'd like it to appear to be coming out of the frame, then....
Again grab your magic wand. Click inside the frame. Selections > Modify > Expand by 1. Selections > Invert.
Grab your eraser brush. Be sure your tube layer is highlighted. Erase any of the tube area that overlaps the frame at the bottom. Selections > Select none.
Open swirlflower3. Copy and paste as a new layer. Position so the petals of the flower show above and beside the right top portion of the frame. See my tag for reference purposes. Duplicate this layer and Image > Mirror. Image > Flip. Merge these two layers down and drop shadow the flowers. Drag this layer down to just below the flood-filled layer you made earlier.
Open the doodleart2 file that you got from Ziggy Fan's web site. Be sure you're on the doodle layer. Image > Mirror. Copy and paste as a new layer. Resize 115%. Drag this layer down below the flower layer. Add a soft drop shadow.
Open paintedbutterfly4. Copy and paste as a new layer. Resize 35%. Position to your liking. Drop shadow. Duplicate this layer and Image > Mirror. Position again to your liking. See my tag for reference. You may want to drop shadow again.
Open diamonddoodle1. Copy and paste as a new layer. Resize about 105%. Position so the swirl part is on the right side of your frame. (I do this stuff on the top layer so I can see what I'm working with.) Again, see my tag for reference. Duplicate this layer and Image > Mirror. Image > Flip. Merge these two layers down. We're not done with this, I'm just moving on right now. LOL
Add your name. I used the color of white, with a 3 stroke done in color #61030d. Add the following inner bevel:
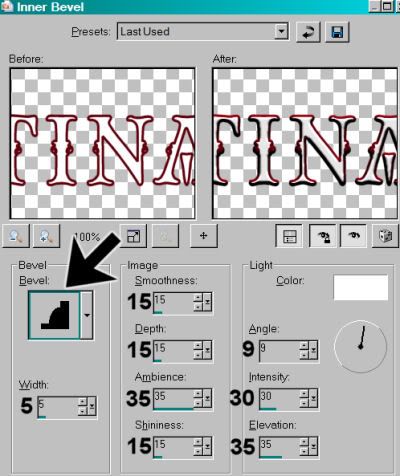
Hit okay. Drop shadow your name.
Add your copyright, license information if applicable and taggers'/watermark.
You can save here and be done, if you choose not to animate. Resize your tag to your desired size and save.
IF YOU ARE ANIMATING, do not resize yet!
A N I M A T I O N
Highlight your diamonddoodle layer. Duplicate twice, for a total of three doodle layers. Go to the bottom layer. Using your lasso tool, set on point-to-point, draw around one of the circles in the swirl.
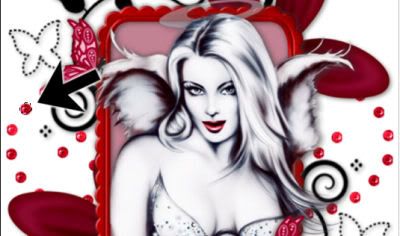
See the "marching ants?" (They're not marching on the above example, as that's a screen shot.)
Now, draw a selection around every third circle. Select, skip, skip. Select, skip skip, etc. No reason to select those in the center, as they will be covered up in the final tag.
Once you have all of the circles selected, Adjust > Brightness and Contrast > Brightness/Contrast:
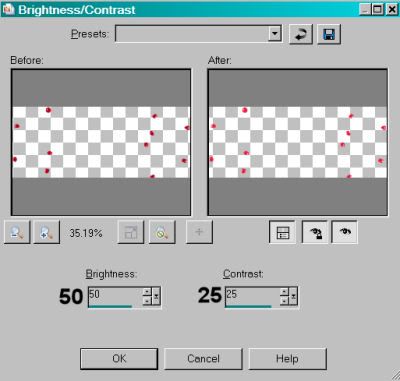
Selections > Select none.
Highlight the middle diamonddoodle1 layer and re-do your selecting again, THIS time selecting the NEXT dot in the swirl and skip, skip, Select, skip, skip again. Once done, apply the same brightness and contrast settings. Selections > Select none.
Highlight the top diamonddoodle1 layer and re-do your selecting again, this time selecting the third dot in the line and Select, skip, skip. Select, skip, skip, etc. Once done there, again you'll apply the same brightness and contrast settings. Selections > Select none.
Close out the top two diamonddoodle1 layers and leave the bottom one open.
Resize your tag to your desired size.
Edit > Copy merged.
Open animation shop, right-click on the desktop area and paste as a new animation.
Return to PSP. Close out the bottom doodle layer and open the middle doodle layer.
Edit > Copy merged
Return to Animation Shop. Edit > Paste > After Current Frame.
Back to PSP. Close out the middle doodle layer and open the top.
Edit > Copy merged.
Return again to Animation Shop and Edit > Paste > After Current Frame.
Edit > Select All
Right-click on the top bar of your animation and choose "Frame Properties." Change this number to 25.
View > Animation. If you like what you see, save as a .gif and we're done! Thanks for trying my tut!
.


No comments:
Post a Comment