
You will also need:
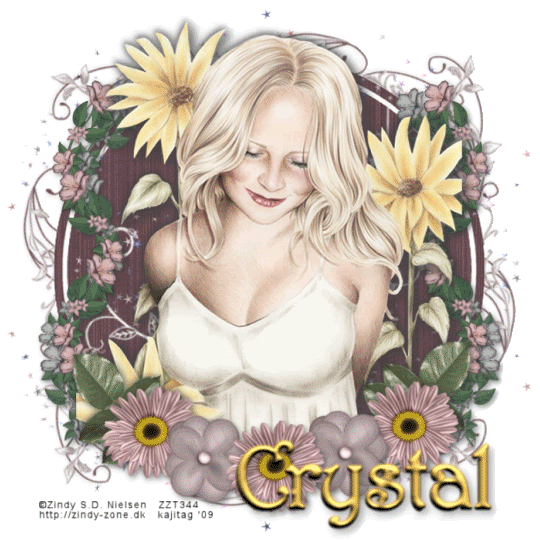
A tube of your choice. I'm using the fantasy artwork of Zindy S.D. Nielsen. You must have a license to use her work. You may purchase that license at Zindy's web site.
Animation Shop - I've found it here! This is from CNET, so it's a safe download, too!
Scrap kit is by Crystal of Scrappy Inspirations. This is a PTU kit, available through Scrap It Sassy, and is called Dawn's Embrace. This is a GORGEOUS kit! I only hope I'm doing it justice!
Filters: Eye Candy 4000 > Gradient Glow, Eye Candy 4000 > HSB Noise
Font: I used Harrington
Supplies: Just the mask. This mask is from Kirsty, a good "PSP friend" of mine. Thank you Kirsty, for your fantastic masks!
Let's go!!
Open your mask in PSP and minimize. You can also load it into your PSP masks file, for use again later.
Create a new file, 700 x 700, white.
Open paper09. Copy and paste as a new layer.
Apply your mask, INVERT TRANSPARENCY CHECKED! Delete mask layer, answer "yes" to the pop-up question and merge group.
Add your tube. Resize, position and drop shadow to your liking.
Open flower5. Resize 65%. Copy and paste as a new layer. Position on the bottom left area in front of your tube. Duplicate this flower and Image > Mirror. Duplicate once again, for a total of three of these flowers, and place it in the middle. See my tag for reference.
Open flower3. Resize 65%. Copy and paste as a new layer.
Open flower4. Resize 65%. Copy and paste as a new layer. Rotate flower4 10° either direction. Merge this layer down to the flower3 layer. Position this layer between two of the flower5 layers. See my tag for reference purposes. Duplicate this layer and Image > Mirror.
Arrange your flowers to how you best like them. Drop shadow all your flower layers. Merge all flower layers together.
Open rose leaves. Resize 50%. Copy and paste as a new layer. Rotate left 35°. Move down below your flowers layer, positioning the leaves on the far left side of the flowers. Again, see my tag for placement. Duplicate this layer and Image > Mirror. Position to your liking, merge these two layers down, and drop shadow the rose leaves.
Open vine-flower1. Copy and paste as a new layer. Position to the left of your tube. Again, see my tag for reference. Duplicate this layer and Image > Mirror. Merge these two layers down. Drag this layer to below your tube and flowers layers. Drop shadow vine-flower1.
Open vine-flower2. Copy and paste as a new layer. Rotate right 10°. Position this to the left, dragging it below your first vine-flower layer. Duplicate this layer and Image > Mirror. Merge these two vine-flower2 layers down and drop shadow.
Open sparkle-stars. Copy and paste as a new layer. Move toward the top of your tube. Drag this layer down, to just above your mask layer. Duplicate this layer and Image > Flip. Position these two layers to suit your taste. Merge these two layers down.
Add your name. I used the color #f1dc98 for the fill and the stroke, stroke width of 3. I then added the following bevel:
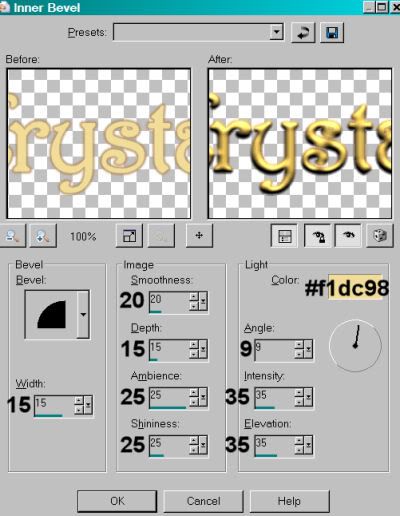
Hit okay. I then added a Gradient Glow of 4 - 0 - 100, color #b38d63, preset of medium. Drop shadow your name.
Add your copyright, license information if applicable, and taggers'/watermark.
Resize tag to the size of your choice. This is where you can stop if you choose not to animate.
A N I M A T I O N
Highlight your sparkle-stars layer. Duplicate twice, for a total of three layers.
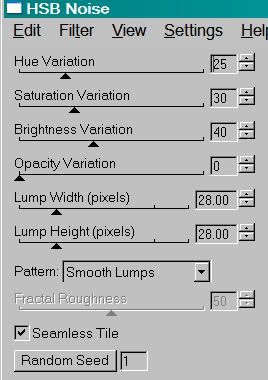
Making sure your bottom stars layer is still highlighted, Effects > Plugins > Eye Candy 4000 > HSB Noise with the default settings:
Hit okay.
Highlight the middle stars layer. Apply HSB Noise again, with the same settings, but click on the "Random Seed" button. Hit okay.
Highlight the top stars layer. Apply HSB Noise again, with the same settings, but click on the "Random Seed" button again. Hit okay.
Close out the top two stars layers, leaving open the bottom layer.
Edit > Copy merged.
Open Animation Shop, right-click on the desktop area and paste as a new animation.
Return to Paint Shop Pro. Close out the bottom stars layer and open the middle stars layer.
Edit > Copy merged
Return to Animation Shop, Edit > Paste > After Current Frame.
Back to Paint Shop Pro. Close out the middle stars layer and open the top stars layer.
Edit > Copy merged
Return again to Animation Shop. Edit > Paste > After Current Frame.
View > Animation. Et, voila! We are done! Thanks for giving this tutorial a try! I'd love to see what you make!
.


Kajira, this is just gorgeous hun! Thank you for showing off one of my kits so very well! :-)
ReplyDeleteHugs!
Crystal