
You will also need:
A tube of your choice. I'm using the fantastic artwork of Ismael Rac. You must have a license to use his work. You may purchase that license at My PSP Tubes.
Scrap kit is part of the Lucky Blog Train! That means it's all free! The portion I'm using for this tutorial was created by Pimptress. It's a generous portion, so go get it! And leave her some love when you download!
Filters: Eye Candy 4000 > HSB Noise
Font: I used Celtic
Supplies: Just the mask and the gold charm. The mask is from Sophisticat Simone. Thanks, Simone, for sharing your work with us PSPers out here! The gold charm comes from Muriel. Thanks go out to you, too, Muriel!!
I also used a stock photograph from stockxpert.com. I simply typed "Ireland outdoors" into the search and picked from there.
Let's do it!!
Open your supplies in PSP and minimize. You can also load your mask into your PSP masks file, for use again later.
Create a new file, 750 x 700, white. I'm starting this at this size so things will be all relative to the orientation of the frame I'm using. We will resize layer.
Open frame-02. Copy and paste as a new layer.
Open your stock photo, if you're using one. Copy and paste as a new layer. Drag this below your frame layer.
Highlight your frame layer. Grab your magic wand and click inside the frame. Selections > Modify > Expand by 10.
Highlight your photo layer. Hit delete. Selections > Select none.
Drop shadow your frame.
Add your tube. Resize, position and drop shadow to your taste.
Open bow-02. Resize 35%. Copy and paste as a new layer. Rotate left 35°. Position on the top left corner of your frame. See my tag for reference.
Open your gold charm. Resize 50%. Copy and paste as a new layer, positioning the gold ribbon in the center of your bow-02.
Drop shadow the charm and the bow.
At this point, I added the text "I Dream of Eire" into the frame, above the stock photo. It needed something there, and since there was a photo of Ireland in the frame, I thought it appropriate. You can choose not to do this if you like. I used the same font I did for the name, just sized smaller. I used color #8eac22 as the fill, #d2c797 for the stroke, stroke set at 2. I also used an inner bevel:
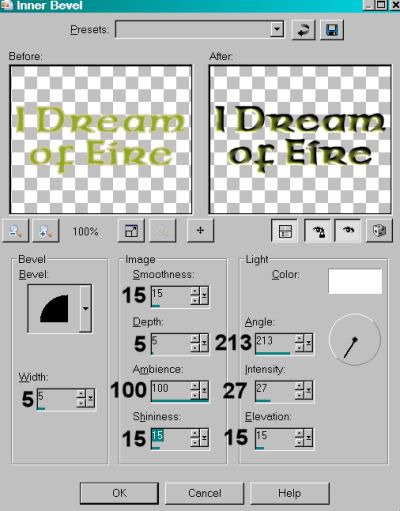
Hit okay. Drop shadow your text.
Highlight your white background layer. Add a new raster layer. Selections > Select all.
Open pp06. Copy and paste INTO SELECTION. Selections > Select none.
Apply your mask. Delete the mask layer, answer "yes" to the pop-up question, and merge group.
Add your name. I used the same colors and bevel as above. Drop shadow your name.
Add your copyright, license information if applicable, and taggers'/watermark.
Crop out any excess white around the edges of your tag. Resize tag to the size of your choice. This is where you can stop if you choose not to animate.
A N I M A T I O N
Highlight your mask layer. Duplicate twice, for a total of three layers.
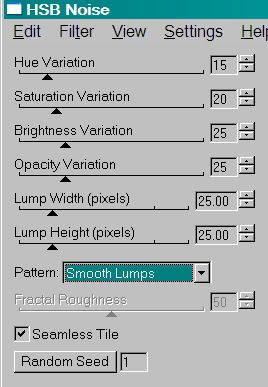
Making sure your bottom mask layer is still highlighted, Effects > Plugins > Eye Candy 4000 > HSB Noise with the following settings:
Hit okay.
Highlight the middle mask layer. Apply HSB Noise again, with the same settings, but click on the "Random Seed" button. Hit okay.
Highlight the top mask layer. Apply HSB Noise again, with the same settings, but click on the "Random Seed" button again. Hit okay.
Close out the top two mask layers, leaving open the bottom layer.
Edit > Copy merged.
Open Animation Shop, right-click on the desktop area and paste as a new animation.
Return to Paint Shop Pro. Close out the bottom mask layer and open the middle mask layer.
Edit > Copy merged
Return to Animation Shop, Edit > Paste > After Current Frame.
Back to Paint Shop Pro. Close out the middle mask layer and open the top mask layer.
Edit > Copy merged
Return again to Animation Shop. Edit > Paste > After Current Frame.
View > Animation. Et, voila! We are done! Thanks for giving this tutorial a try! I'd love to see what you make!
.


No comments:
Post a Comment