
You will also need:
A tube of your choice. I'm using the fantastic artwork of Al Rio. You must have a license to use his work. You may purchase that license at CILM.
Animation Shop - at this time, I'm not sure where you can get this program, if you don't already have it. You may, however, save the tut as a static (non-animated) image if you like.
Scrap kit by Clarey of Clarey's Designz. It is a PTU kit, and it's called Sweetest Spring. This is a VERY fun kit to play with. I think I could do lots more tuts with it... and may still do one more!
Filters: No filters used in this tut! Again! What's gotten into me??!?!
Font: I used Problem Secretary
Supplies: here. This includes the two butterfly animations, which I picked up along the past five years, and I don't know from where they came. If they are yours, let me know so that I may credit you correctly! Same goes for the two grass tubes that are included with the supplies!
[NOTE: If you did my previous tut, Springtime Butterflies, you will recognize what I'm doing with the grasses in this one. If not, prepare for a lot of duplicating, mirroring, and merging down!]
Let's begin!
Open your grass images and minimize in PSP. File your two butterfly animations wherever they will be handy for you once you're in Animation Shop.
Open a new image, 700 x 700, white.
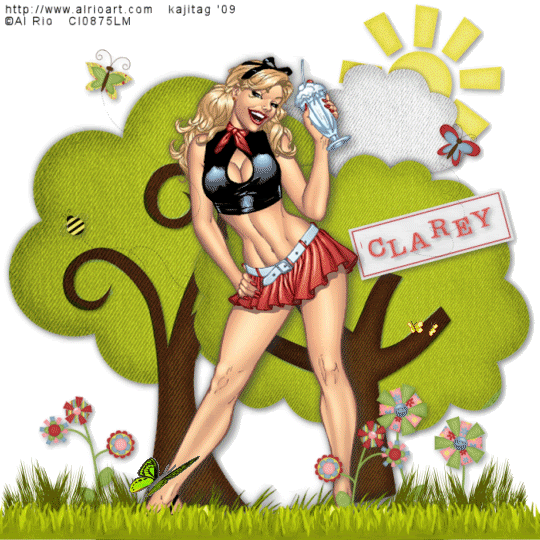
I started out with my tube. This particular tube includes the grass on which she is standing. From there, I built up the grasses like so:
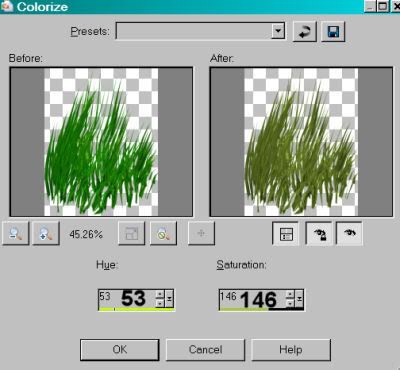
Open grass1a.psp. Resize 25%. Adjust > Hue and Saturation > Colorize with the following settings:
Hit okay. Copy and paste this grass onto your canvas as a new layer. Position it to one side, then Image > Mirror. Position as you like.
Copy and paste Grass.psp onto your canvas as a new layer. Make sure this layer is above your previous grass layers. Position to one side, then duplicate this layer. Image > Mirror. Position as you like. Duplicate again, and position to the middle. Arrange these three grass layers so that they appear as seamless as possible. Merge these three grass layers down. Soft drop shadow.
Go back to your original grasses. Continue duplicating and positioning these until you have filled out the grassy area. See my tag for reference purposes. Be sure to drag them all under the more solid-looking grass layer we just did in the previous paragraph. When finished, merge all these grass layers down to one and add another soft drop shadow.
Drop shadow your tube.
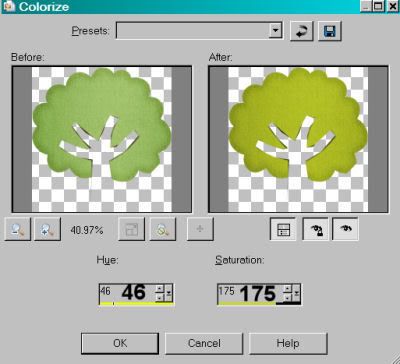
Open tree. Resize 125%. Grab your selection tool, set on point-to-point, and draw carefully around the outside edges of the tree, bringing it up through the branches. Zoom in if need be. When done selecting, Adjust > Hue and Saturation > Colorize with the following settings:
Hit okay. Selections > Select none. Copy and paste this tree onto your canvas. Drag it down under both your grasses layers. Position the tree so it looks as though it's rooted in the grass. I put mine on the right side. Drop shadow this tree.
Open tree2. Go through the same selection process for colorizing this tree. This one's branches are pretty curlique, so it takes a bit to get it done. Zoom in again, if need be. Same colorizing settings. Do not resize. Copy and paste as a new layer, making sure again that this layer is below both grass layers. Same positioning, except on the left side of the canvas. Drop shadow this tree, too.
Open cloud-sun. Copy and paste as new layer. Position as you like. Drag this layer below the two tree layers. Drop shadow.
Open stemmedflower1. Resize 35%. Copy and paste as a new layer. Drag this layer below the grass layers, as well. Position where you like. I put mine to the left of the tag. Duplicate this layer, then Image > Mirror. Place as you like. Merge these two flower layers down and drop shadow.
Open stemmedflower2. Again, resize 35%. Copy and paste as a new layer, below the grass layers. Position wherever looks best to you. Duplicate this layer and mirror, placing this one where you like it. Merge these two layers down and drop shadow. See my tag for reference purposes.
Open butterfly-trail. Resize 35%. Copy and paste as a new layer. I put mine to the right and a bit above the right-hand tree. Place yours wherever looks best to you. Drop shadow.
Open bee-trail. Resize 30%. Image > Mirror. Copy and paste as a new layer. I put mine over to the left, above the tree layer on the layer palette and on the canvas, right in the left top part of the tree. I didn't write that very well, so see my tag for reference! Drop shadow.
Open butterfly-trail1. Resize 40%. Image > Mirror. Copy and paste as a new layer. Rotate right 15°. Position where you think it looks best. Drop shadow.
Open label-blank. Add your name to this label. I used color #da5465. Objects > Align > Center in canvas. Convert to raster layer. Drop shadow your name.
Edit > Copy merged
Paste onto canvas as a new layer. Position where you like. I felt like the tree on the right was a bit too blank so I positioned mine there. Rotate left 15°. Drop shadow.
Add your copyright, license information if applicable, and taggers'/watermark.
Resize your canvas to the size of your choosing. You can save now if you don't choose to do the animation. Otherwise, onward!
A N I M A T I O N
Edit > Copy merged
Open Animation Shop, right-click on the desktop area and paste as a new animation.
Duplicate this frame until you have a total of 15 frames. Move the slider on the bottom of this animation to frame 1.
Open the two-butterflies-yellow. Edit > Select All
Return to your original canvas and Edit > Select All
Edit > Paste Into Selected Frame. I positioned mine to the right hand side, above the flowers and positioned so they make a nice contrast on the brown of the tree branches. Release your mouse button
Open 3464246.gif. Edit > Select All. Edit > Copy
Return to the animation we are building and Edit > Select All. Edit > Paste > Into Selected Frame. I positioned this one as though it were just hovering over the grass, next to the tube's leg. Release your mouse button.
View > Animation. And we're done! I hope you liked this tutorial! It's quite different than most of my tags. I felt it was really fun to make. I hope you did, too!
.


No comments:
Post a Comment