

You will also need:
Two tubes of your choice by the same artist. I'm using the fantastic artwork of Jennifer Galbreth. You must have a license to use her work. You may purchase that license at CILM.
Animation Shop - at this time, I'm not sure where you can get this program, if you don't already have it. You may, however, save the tut as a static (non-animated) image if you like.
Scrap kit by Clarey of Clarey's Designz. It is a PTU kit, and it's called Love Letters.
Filters: Eye Candy 4000 > HSB Noise, Xero > Porcelain
Font: I used WaterLily
Supplies: No outside supplies used in this tut!
Let's begin!
Open a new image, 750 x 700, white.
Open doubleframe. Copy and paste as a new layer.
Open the tube that you want to appear in the left-hand frame. Copy and paste as a new layer. Drag this layer below your frame layer. Position within the frame.
Highlight the frame layer. Grab your magic wand and click inside the left section of the frame. Selections > Modify > Expand by 5. Selections > Invert.
Highlight your tube layer. Hit delete. Selections > Select none.
Drop shadow your tube.
Repeat this process with a different tube for the right-hand side of the frame.
Merge the two tube layers down. Effects > Plugins > Xero > Porcelain with the default settings.
Open paper8. Copy and paste as a new layer. Drag this below your frame and tubes layer.
Highlight your frame layer again. Using your magic wand, click inside both sections of the frame. Selects > Modify > Expand by 5. Selections > Invert
Highlight your paper layer. Hit delete. Selections > Select none.
Drop shadow your frame.
Close out the white background layer. Make sure one of your other layers is highlighted in the palette. Layers > Merge > Merge Visible. Open the white background layer.
Open mat3. Copy and paste as a new layer. Drag this below the merged layer in your layer palette. Resize 105%. Drop shadow this mat.
Open mat1. Copy and paste as a new layer. Resize 105%. Drop shadow this mat.
Open tag. Image > Free Rotate > Right by 90°, ALL LAYERS CHECKED!
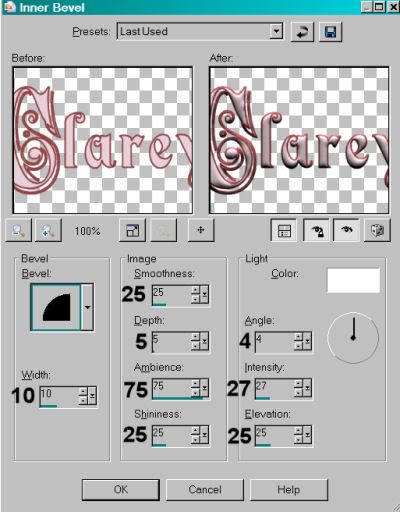
Add your name to the tag. I used color #d8b279 for the fill, #95060e for the stroke. Stroke set at 2. If you'd like to add a bevel, here are the settings I used:
Drop shadow your name.
Edit > Copy merged
Go back to your main canvas and Edit > Paste > As new layer. Resize 75%. Rotate left 35°. Position in the bottom left area of the tag. See my tag for placement. If your strings hang over your main images, use your selection tool, set on point-to-point, to remove the strings. Drop shadow your tag.
Open beadedheart1. Copy and paste as a new layer. Resize 65%. Rotate right 25˜. Darken the beaded heart so it matches the rest of the tag by going Adjust > Brightness and Contrast > Brightness/Contrast with the following settings:
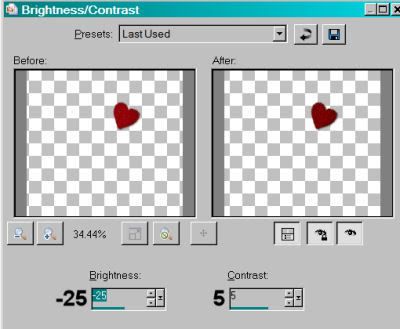
Hit okay. Position the beaded heart in the upper right area of the tag. See my example for reference purposes.
Open metalswirl2. This is easier to do if you do it on the top layer of the layer palette, so copy and paste as a new layer and drag it to the top. Rotate left 25°. Position so that just a bit of the outer edge peeks out the top left corner. Duplicate this layer. Image > Mirror. Image > Flip. Merge these two layers down. Duplicate that layer. Image > Mirror. Merge these two layers down. Drag this layer down to just above the white background layer.
Add your copyright, license information if applicable, and taggers'/watermark.
Resize your tag to your liking. You can now save and be done if you choose not to animate.
A N I M A T I O N
Highlight your metalswirl2 layer and duplicate twice, for a total of three layers. Make sure the bottom of the three is highlighted.
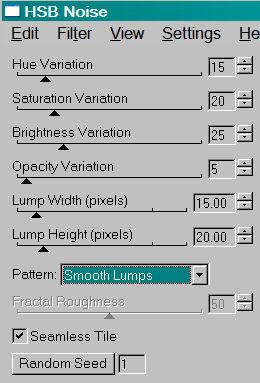
Effects > Plugins > Eye Candy 4000 > HSB Noise with the following settings:
Hit okay.
Highlight the middle swirl layer and apply HSB Noise again, this time hitting the "Random Seed" button. Hit okay.
Highlight the top swirl layer and apply HSB Noise for the last time, again hitting "Random Seed."
Close out the top two metalswirl layers and make sure the bottom one is open.
Edit > Copy merged
Open Animation Shop, right-click on the desktop area and paste as a new animation.
Return to PSP. Close out the bottom metalswirl layer and open the middle one.
Edit > Copy merged
Return to Animation Shop. Edit > Paste > After Current Selection
Go back one more time to PSP. Close out the middle metalswirl layer and open the top..
Edit > Copy merged
Back to Animation Shop. Edit > Paste > After Current Selection.
Edit > Select All.
Right-click on the top bar to the animation and choose "Frame Properties." Change this number to 25.
View > Animation. Save as a .gif and we're done! I hope you liked this tutorial!
.


No comments:
Post a Comment