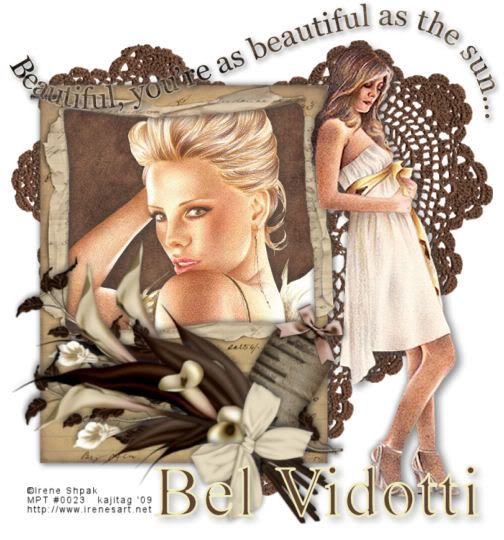
You will also need:
Two tubes of your choice by the same artist. I'm using the beautiful artwork of Irene Shpak. You must have a license to use her work. You may purchase that license at My PSP Tubes.
Scrap kit is by Bel Vidotti. It's a FTU kit, called Beautiful. Be sure to leave some love for the beautiful freebie!
Filters: Eye Candy 4000 > Gradient Glow
Font: I used Times New Roman
Supplies: No outside supplies in this tut!
Let us begin!!
Create a new file, 750 x 700, white.
Open heartdoily. Copy and paste as a new layer. Resize 125%.
Open frame01. Resize 115%. Copy and paste as a new layer. Put this to the left of your canvas. See my tag for placement.
Open paper02. Copy and paste as a new layer. Drag this layer below the frame layer, but above the heart doily layer.
Highlight the frame layer. Grab your magic wand and click inside the frame. Selections > Modify > Expand by 7. Selections > Invert.
Highlight your paper layer. Hit delete. Selections > Select none.
Open your first tube. Copy and paste as a new layer. Drag this layer between the frame and paper layers. Resize if necessary and position your tube inside the frame. If you have anything "hanging out" for lack of a better term, then
Highlight the frame layer.
Grab your magic wand and click inside the frame again. Selections > Modify > Expand by 7. Selections > Invert.
Highlight your tube layer. Hit delete. Selections > Select none.
Drop shadow your tube.
Add your next tube. Copy and paste as a new layer. Resize, position and drop shadow to your liking.
Now we're to the flowers. This is going to look totally wrong to you, but in the end we'll be rotating the whole bunch, so stay with me!
Open flower03. Resize 90%. Copy and paste as a new layer. Rotate right 60°. Drop shadow. Duplicate this layer and rotate left 20°.
Open flower06. Resize 75%. Copy and paste as a new layer, below the other flower layers. Rotate right 65%. Drop shadow. Duplicate this layer and rotate 25° left.
Now, arrange these four layers so that they all seem to cross toward the bottom of the bunch.
Open bow04. Resize 50%. Copy and paste as a new layer. Rotate right 75°. Position on top of the bunch of flowers, over the area in which they all cross. Drop shadow your bow.
Now, merge together all the flower layers and the bow layer. Rotate this layer left 120°. Position as you like. You may want to add another drop shadow. It's up to you.
Open tag. Resize 65%. Copy and paste as a new layer. Rotate right 30°. Position between the frame and the flower bunch, at the lower right corner of the frame. See my tag for reference purposes. Drop shadow your tag.
Open the word art. Resize by 75%. Copy and paste as a new layer. Position this toward the top of your canvas. See my example for reference purposes.
Effects > Plugins > Eye Candy 4000 > Gradient Glow set at 3 -0 - 100, color white, preset of "diffuse."
Drop shadow your word art.
Add your name. I used color #5f4232. Stroke width of 3, color #f0dcbc. Drop shadow your name.
Add your copyright, license information if applicable and taggers'/watermark.
Resize your tag to the size of your choice. Merge your layers, and save! We're done! I hope you enjoyed this tut!
.


No comments:
Post a Comment